wasp start
That's it 🎉 You have successfully created and served a new full-stack web app at http://localhost:3000 and Wasp is serving both frontend and backend for you.
Something Unclear?
Check More Details section below if anything went wrong with the installation, or if you have additional questions.
Want an even faster start?
Try out Wasp AI 🤖 to generate a new Wasp app in minutes just from a title and short description!
Try Wasp Without Installing 🤔?
Give Wasp a spin in the browser without any setup by running our Wasp Template for Gitpod
What next?
👉 Check out the Todo App tutorial, which will take you through all the core features of Wasp! 👈
Setup your editor for working with Wasp.
Join us on Discord! Any feedback or questions you have, we are there for you.
Follow Wasp development by subscribing to our newsletter: https://wasp-lang.dev/#signup . We usually send 1 per month, and Matija does his best to unleash his creativity to make them engaging and fun to read :D!
More details
Requirements
You must have Node.js (and NPM) installed on your machine and available in PATH. A version of Node.js must be >= 18.
If you need it, we recommend using nvm for managing your Node.js installation version(s).
A quick guide on installing/using nvm
Installation
Linux / macOS
Windows
From source
Open your terminal and run:
curl -sSL https://get.wasp-lang.dev/installer.sh | sh
Running Wasp on Mac with Mx chip (arm64)
Experiencing the 'Bad CPU type in executable' issue on a device with arm64 (Apple Silicon)? Given that the wasp binary is built for x86 and not for arm64 (Apple Silicon), you'll need to install Rosetta on your Mac if you are using a Mac with Mx (M1, M2, ...). Rosetta is a translation process that enables users to run applications designed for x86 on arm64 (Apple Silicon). To install Rosetta, run the following command in your terminal
softwareupdate --install-rosetta
Once Rosetta is installed, you should be able to run Wasp without any issues.","https://wasp-lang.dev/docs/quick-start"
"1","200","2024-04-23T15:12:37.057Z","https://wasp-lang.dev/docs/editor-setup","https://wasp-lang.dev/docs","browser","## Editor Setup
note
This page assumes you have already installed Wasp. If you do not have Wasp installed yet, check out the [Quick Start](https://wasp-lang.dev/docs/quick-start) guide.
Wasp comes with the Wasp language server, which gives supported editors powerful support and integration with the language.
## VSCode[](#vscode ""Direct link to VSCode"")
Currently, Wasp only supports integration with VSCode. Install the [Wasp language extension](https://marketplace.visualstudio.com/items?itemName=wasp-lang.wasp) to get syntax highlighting and integration with the Wasp language server.
The extension enables:
* syntax highlighting for `.wasp` files
* scaffolding of new project files
* code completion
* diagnostics (errors and warnings)
* go to definition
and more!",,"https://wasp-lang.dev/docs/editor-setup","This page assumes you have already installed Wasp. If you do not have Wasp installed yet, check out the Quick Start guide.","*","0","h3="":443""; ma=86400","max-age=600","DYNAMIC","878ecae2df654bcc-BUF",,"br","text/html; charset=utf-8","Tue, 23 Apr 2024 15:12:33 GMT","Tue, 23 Apr 2024 15:22:33 GMT","Thu, 18 Apr 2024 15:50:26 GMT","{""success_fraction"":0, ""report_to"":""cf-nel"", ""max_age"":604800}","{""endpoints"":[{""url"":""https:\/\/a.nel.cloudflare.com\/report\/v4?s=QZHPrb5EJWuJiGVKAISO9W8V6ZPjAbKMwzlWWXkiHxvMN6cgKL28APlb2gTSy1Fm4sOzaBaPBv1v6S1Ki8QGHAE1jyKCdGB%2BUvbiIDbp7HSkI8lg9CRovG6vb%2F6%2FFsbf""}], ""group"":""cf-nel"", ""max_age"":604800}","cloudflare",,"Accept-Encoding","1.1 varnish","MISS","0","47c5be94623d8bc35b5afe59687bebc6127674f7","h2","AC82:1736:587160:6A3728:6627CFDC",,"MISS","cache-nyc-kteb1890087-NYC","S1713885154.747935, VS0, VE17",,,"en","https://wasp-lang.dev/img/wasp_twitter_cover.png","og:image","https://wasp-lang.dev/docs/editor-setup","og:url","Editor Setup | Wasp","og:title","This page assumes you have already installed Wasp. If you do not have Wasp installed yet, check out the Quick Start guide.","og:description","Editor Setup | Wasp",,"Editor Setup
note
This page assumes you have already installed Wasp. If you do not have Wasp installed yet, check out the Quick Start guide.
Wasp comes with the Wasp language server, which gives supported editors powerful support and integration with the language.
VSCode
Currently, Wasp only supports integration with VSCode. Install the Wasp language extension to get syntax highlighting and integration with the Wasp language server.
The extension enables:
syntax highlighting for .wasp files
scaffolding of new project files
code completion
diagnostics (errors and warnings)
go to definition
and more!","https://wasp-lang.dev/docs/editor-setup"
"1","200","2024-04-23T15:12:47.712Z","https://wasp-lang.dev/docs/tutorial/create","https://wasp-lang.dev/docs","browser","info
You'll need to have the latest version of Wasp installed locally to follow this tutorial. If you haven't installed it yet, check out the [QuickStart](https://wasp-lang.dev/docs/quick-start) guide!
In this section, we'll guide you through the process of creating a simple Todo app with Wasp. In the process, we'll take you through the most important and useful features of Wasp.

If you get stuck at any point (or just want to chat), reach out to us on [Discord](https://discord.gg/rzdnErX) and we will help you!
You can find the complete code of the app we're about to build [here](https://github.com/wasp-lang/wasp/tree/release/examples/tutorials/TodoApp).
## Creating a Project[](#creating-a-project ""Direct link to Creating a Project"")
To setup a new Wasp project, run the following command in your terminal
Enter the newly created directory and start the development server:
note
`wasp start` will take a bit of time to start the server the first time you run it in a new project.
You will see log messages from the client, server, and database setting themselves up. When everything is ready, a new tab should open in your browser at `http://localhost:3000` with a simple placeholder page:

Wasp has generated for you the full front-end and back-end code the app! Next, we'll take a closer look at how the project is structured.",,"https://wasp-lang.dev/docs/tutorial/create","You'll need to have the latest version of Wasp installed locally to follow this tutorial. If you haven't installed it yet, check out the QuickStart guide!","*","0","h3="":443""; ma=86400","max-age=600","DYNAMIC","878ecb1c5a4c4bcc-BUF",,"br","text/html; charset=utf-8","Tue, 23 Apr 2024 15:12:42 GMT","Tue, 23 Apr 2024 15:22:42 GMT","Thu, 18 Apr 2024 15:50:27 GMT","{""success_fraction"":0, ""report_to"":""cf-nel"", ""max_age"":604800}","{""endpoints"":[{""url"":""https:\/\/a.nel.cloudflare.com\/report\/v4?s=eyTMcZt%2BGH%2BWupEu6N4Ads7TMIFR3L50qp1wa55mYWE75EKg7dncdJ%2BqytXpmUTrTk0MgjEAN9aTQLO1VORNv%2FtJwAkIevqZ6aP0lETuFYTj5Cm1xX9NS9Y9Jf3eiEiM""}], ""group"":""cf-nel"", ""max_age"":604800}","cloudflare",,"Accept-Encoding","1.1 varnish","MISS","0","1da3cdaf9bd3ef0f9eb33730b71574a562b06d83","h2","DCDE:173D:D3CEC:102A2D:6627CFE6",,"MISS","cache-nyc-kteb1890087-NYC","S1713885163.945071, VS0, VE15",,,"en","https://wasp-lang.dev/img/wasp_twitter_cover.png","og:image","https://wasp-lang.dev/docs/tutorial/create","og:url","1. Creating a New Project | Wasp","og:title","You'll need to have the latest version of Wasp installed locally to follow this tutorial. If you haven't installed it yet, check out the QuickStart guide!","og:description","1. Creating a New Project | Wasp",,"info
You'll need to have the latest version of Wasp installed locally to follow this tutorial. If you haven't installed it yet, check out the QuickStart guide!
In this section, we'll guide you through the process of creating a simple Todo app with Wasp. In the process, we'll take you through the most important and useful features of Wasp.
If you get stuck at any point (or just want to chat), reach out to us on Discord and we will help you!
You can find the complete code of the app we're about to build here.
Creating a Project
To setup a new Wasp project, run the following command in your terminal
Enter the newly created directory and start the development server:
note
wasp start will take a bit of time to start the server the first time you run it in a new project.
You will see log messages from the client, server, and database setting themselves up. When everything is ready, a new tab should open in your browser at http://localhost:3000 with a simple placeholder page:
Wasp has generated for you the full front-end and back-end code the app! Next, we'll take a closer look at how the project is structured.","https://wasp-lang.dev/docs/tutorial/create"
"1","200","2024-04-23T15:12:49.312Z","https://wasp-lang.dev/docs/tutorial/project-structure","https://wasp-lang.dev/docs","browser","## 2\. Project Structure
After creating a new Wasp project, you'll get a file structure that looks like this:
```
.├── .gitignore├── main.wasp # Your Wasp code goes here.├── package.json # Your dependencies and project info go here.├── package-lock.json├── public # Your static files (e.g., images, favicon) go here.├── src # Your source code (TS/JS/CSS/HTML) goes here.│ ├── Main.css│ ├── MainPage.jsx│ ├── vite-env.d.ts│ └── waspLogo.png├── tsconfig.json├── vite.config.ts├── .waspignore└── .wasproot
```
By _your code_, we mean the _""the code you write""_, as opposed to the code generated by Wasp. Wasp allows you to organize and structure your code however you think is best - there's no need to separate client files and server files into different directories.
note
We'd normally recommend organizing code by features (i.e., vertically).
However, since this tutorial contains only a handful of files, there's no need for fancy organization. We'll keep it simple by placing everything in the root `src` directory.
Many other files (e.g., `tsconfig.json`, `vite-env.d.ts`, `.wasproot`, etc.) help Wasp and the IDE improve your development experience with autocompletion, IntelliSense, and error reporting.
The `vite.config.ts` file is used to configure [Vite](https://vitejs.dev/guide/), Wasp's build tool of choice. We won't be configuring Vite in this tutorial, so you can safely ignore the file. Still, if you ever end up wanting more control over Vite, you'll find everything you need to know in [custom Vite config docs](https://wasp-lang.dev/docs/project/custom-vite-config).
There's no need to spend more time discussing all the helper files. They'll silently do their job in the background and let you focus on building your app.
TypeScript Support
Wasp supports TypeScript out of the box, but you are free to choose between or mix JavaScript and TypeScript as you see fit.
We'll provide you with both JavaScript and TypeScript code in this tutorial. Code blocks will have a toggle to switch between vanilla JavaScript and TypeScript.
The most important file in the project is `main.wasp`. Wasp uses the configuration within it to perform its magic. Based on what you write, it generates a bunch of code for your database, server-client communication, React routing, and more.
Let's take a closer look at `main.wasp`
## `main.wasp`[](#mainwasp ""Direct link to mainwasp"")
`main.wasp` is your app's definition file. It defines the app's central components and helps Wasp to do a lot of the legwork for you.
The file is a list of _declarations_. Each declaration defines a part of your app.
The default `main.wasp` file generated with `wasp new` on the previous page looks like this:
* JavaScript
* TypeScript
main.wasp
```
app TodoApp { wasp: { version: ""^0.13.0"" // Pins the version of Wasp to use. }, title: ""TodoApp"" // Used as the browser tab title. Note that all strings in Wasp are double quoted!}route RootRoute { path: ""/"", to: MainPage }page MainPage { // We specify that the React implementation of the page is exported from // `src/MainPage.jsx`. This statement uses standard JS import syntax. // Use `@src` to reference files inside the `src` folder. component: import { MainPage } from ""@src/MainPage""}
```
This file uses three declaration types:
* **app**: Top-level configuration information about your app.
* **route**: Describes which path each page should be accessible from.
* **page**: Defines a web page and the React component that gets rendered when the page is loaded.
In the next section, we'll explore how **route** and **page** work together to build your web app.",,"https://wasp-lang.dev/docs/tutorial/project-structure","After creating a new Wasp project, you'll get a file structure that looks like this:","*","0","h3="":443""; ma=86400","max-age=600","DYNAMIC","878ecb265c924bcc-BUF",,"br","text/html; charset=utf-8","Tue, 23 Apr 2024 15:12:44 GMT","Tue, 23 Apr 2024 15:22:44 GMT","Thu, 18 Apr 2024 15:50:26 GMT","{""success_fraction"":0, ""report_to"":""cf-nel"", ""max_age"":604800}","{""endpoints"":[{""url"":""https:\/\/a.nel.cloudflare.com\/report\/v4?s=sPACfgkhL04Y7xVtOQqbA%2B2fXlJox2u%2Fcn7aVr0oa1GemihAJ4tCAXt1VOeuK6i%2BkbEkLxS0BYNwKjRC%2Bd0OIRDyML0SkUZ0Ii%2BYcOMgZ4OVSddBZrNFkr5FcNAtvymH""}], ""group"":""cf-nel"", ""max_age"":604800}","cloudflare",,"Accept-Encoding","1.1 varnish","MISS","0","49ac15133e7cbea9c897b42d2006d185269be735","h2","D382:180046:3C276BC:472CB83:6627CFEC","HIT","MISS","cache-nyc-kteb1890087-NYC","S1713885165.543913, VS0, VE13",,,"en","https://wasp-lang.dev/img/wasp_twitter_cover.png","og:image","https://wasp-lang.dev/docs/tutorial/project-structure","og:url","2. Project Structure | Wasp","og:title","After creating a new Wasp project, you'll get a file structure that looks like this:","og:description","2. Project Structure | Wasp",,"2. Project Structure
After creating a new Wasp project, you'll get a file structure that looks like this:
.
├── .gitignore
├── main.wasp # Your Wasp code goes here.
├── package.json # Your dependencies and project info go here.
├── package-lock.json
├── public # Your static files (e.g., images, favicon) go here.
├── src # Your source code (TS/JS/CSS/HTML) goes here.
│ ├── Main.css
│ ├── MainPage.jsx
│ ├── vite-env.d.ts
│ └── waspLogo.png
├── tsconfig.json
├── vite.config.ts
├── .waspignore
└── .wasproot
By your code, we mean the ""the code you write"", as opposed to the code generated by Wasp. Wasp allows you to organize and structure your code however you think is best - there's no need to separate client files and server files into different directories.
note
We'd normally recommend organizing code by features (i.e., vertically).
However, since this tutorial contains only a handful of files, there's no need for fancy organization. We'll keep it simple by placing everything in the root src directory.
Many other files (e.g., tsconfig.json, vite-env.d.ts, .wasproot, etc.) help Wasp and the IDE improve your development experience with autocompletion, IntelliSense, and error reporting.
The vite.config.ts file is used to configure Vite, Wasp's build tool of choice. We won't be configuring Vite in this tutorial, so you can safely ignore the file. Still, if you ever end up wanting more control over Vite, you'll find everything you need to know in custom Vite config docs.
There's no need to spend more time discussing all the helper files. They'll silently do their job in the background and let you focus on building your app.
TypeScript Support
Wasp supports TypeScript out of the box, but you are free to choose between or mix JavaScript and TypeScript as you see fit.
We'll provide you with both JavaScript and TypeScript code in this tutorial. Code blocks will have a toggle to switch between vanilla JavaScript and TypeScript.
The most important file in the project is main.wasp. Wasp uses the configuration within it to perform its magic. Based on what you write, it generates a bunch of code for your database, server-client communication, React routing, and more.
Let's take a closer look at main.wasp
main.wasp
main.wasp is your app's definition file. It defines the app's central components and helps Wasp to do a lot of the legwork for you.
The file is a list of declarations. Each declaration defines a part of your app.
The default main.wasp file generated with wasp new on the previous page looks like this:
JavaScript
TypeScript
main.wasp
app TodoApp {
wasp: {
version: ""^0.13.0"" // Pins the version of Wasp to use.
},
title: ""TodoApp"" // Used as the browser tab title. Note that all strings in Wasp are double quoted!
}
route RootRoute { path: ""/"", to: MainPage }
page MainPage {
// We specify that the React implementation of the page is exported from
// `src/MainPage.jsx`. This statement uses standard JS import syntax.
// Use `@src` to reference files inside the `src` folder.
component: import { MainPage } from ""@src/MainPage""
}
This file uses three declaration types:
app: Top-level configuration information about your app.
route: Describes which path each page should be accessible from.
page: Defines a web page and the React component that gets rendered when the page is loaded.
In the next section, we'll explore how route and page work together to build your web app.","https://wasp-lang.dev/docs/tutorial/project-structure"
"1","200","2024-04-23T15:13:00.817Z","https://wasp-lang.dev/docs/tutorial/pages","https://wasp-lang.dev/docs","browser","## 3\. Pages & Routes
In the default `main.wasp` file created by `wasp new`, there is a **page** and a **route** declaration:
* JavaScript
* TypeScript
main.wasp
```
route RootRoute { path: ""/"", to: MainPage }page MainPage { // We specify that the React implementation of the page is exported from // `src/MainPage.jsx`. This statement uses standard JS import syntax. // Use `@src` to reference files inside the `src` folder. component: import { MainPage } from ""@src/MainPage""}
```
Together, these declarations tell Wasp that when a user navigates to `/`, it should render the named export from `src/MainPage.tsx`.
## The MainPage Component[](#the-mainpage-component ""Direct link to The MainPage Component"")
Let's take a look at the React component referenced by the page declaration:
* JavaScript
* TypeScript
src/MainPage.jsx
```
import waspLogo from './waspLogo.png'import './Main.css'export const MainPage = () => { // ...}
```
This is a regular functional React component. It also uses the CSS file and a logo image that sit next to it in the `src` folder.
That is all the code you need! Wasp takes care of everything else necessary to define, build, and run the web app.
tip
`wasp start` automatically picks up the changes you make and restarts the app, so keep it running in the background.
## Adding a Second Page[](#adding-a-second-page ""Direct link to Adding a Second Page"")
To add more pages, you can create another set of **page** and **route** declarations. You can even add parameters to the URL path, using the same syntax as [React Router](https://reactrouter.com/web/). Let's test this out by adding a new page:
* JavaScript
* TypeScript
main.wasp
```
route HelloRoute { path: ""/hello/:name"", to: HelloPage }page HelloPage { component: import { HelloPage } from ""@src/HelloPage""}
```
When a user visits `/hello/their-name`, Wasp will render the component exported from `src/HelloPage.tsx` and pass the URL parameter the same way as in React Router:
* JavaScript
* TypeScript
src/HelloPage.jsx
```
export const HelloPage = (props) => { return Here's {props.match.params.name}!
}
```
Now you can visit `/hello/johnny` and see ""Here's johnny!""
## Cleaning Up[](#cleaning-up ""Direct link to Cleaning Up"")
Now that you've seen how Wasp deals with Routes and Pages, it's finally time to build the Todo app.
Start by cleaning up the starter project and removing unnecessary code and files.
First, remove most of the code from the `MainPage` component:
* JavaScript
* TypeScript
src/MainPage.jsx
```
export const MainPage = () => { return Hello world!
}
```
At this point, the main page should look like this:
You can now delete redundant files: `src/Main.css`, `src/waspLogo.png`, and `src/HelloPage.tsx` (we won't need this page for the rest of the tutorial).
Since `src/HelloPage.tsx` no longer exists, remove its `route` and `page` declarations from the `main.wasp` file.
Your Wasp file should now look like this:
* JavaScript
* TypeScript
main.wasp
```
app TodoApp { wasp: { version: ""^0.13.0"" }, title: ""TodoApp""}route RootRoute { path: ""/"", to: MainPage }page MainPage { component: import { MainPage } from ""@src/MainPage""}
```
Excellent work!
You now have a basic understanding of Wasp and are ready to start building your TodoApp. We'll implement the app's core features in the following sections.",,"https://wasp-lang.dev/docs/tutorial/pages","In the default main.wasp file created by wasp new, there is a page and a route declaration:","*","0","h3="":443""; ma=86400","max-age=600","DYNAMIC","878ecb6d9cb04bcc-BUF",,"br","text/html; charset=utf-8","Tue, 23 Apr 2024 15:12:55 GMT","Tue, 23 Apr 2024 15:22:55 GMT","Thu, 18 Apr 2024 15:50:27 GMT","{""success_fraction"":0, ""report_to"":""cf-nel"", ""max_age"":604800}","{""endpoints"":[{""url"":""https:\/\/a.nel.cloudflare.com\/report\/v4?s=hleH5jjx%2BmjSDRX1YXkd0%2FHDCs1snqLRdRLaPD3F7ez2luqbtDRU2UKxYxbvh0S0fGIeNMeGa%2B7MbpI0RgOtkdRPJfqwbXA8%2BMEgr%2BxcG2l9XDVpOva8OdJAYb35qQRT""}], ""group"":""cf-nel"", ""max_age"":604800}","cloudflare",,"Accept-Encoding","1.1 varnish","MISS","0","28ba51b678b151877f02911abb924070ac4c9ffb","h2","D65C:39E569:39EF43E:44CED7B:6627CFF7",,"MISS","cache-nyc-kteb1890087-NYC","S1713885176.951885, VS0, VE15",,,"en","https://wasp-lang.dev/img/wasp_twitter_cover.png","og:image","https://wasp-lang.dev/docs/tutorial/pages","og:url","3. Pages & Routes | Wasp","og:title","In the default main.wasp file created by wasp new, there is a page and a route declaration:","og:description","3. Pages & Routes | Wasp",,"3. Pages & Routes
In the default main.wasp file created by wasp new, there is a page and a route declaration:
JavaScript
TypeScript
main.wasp
route RootRoute { path: ""/"", to: MainPage }
page MainPage {
// We specify that the React implementation of the page is exported from
// `src/MainPage.jsx`. This statement uses standard JS import syntax.
// Use `@src` to reference files inside the `src` folder.
component: import { MainPage } from ""@src/MainPage""
}
Together, these declarations tell Wasp that when a user navigates to /, it should render the named export from src/MainPage.tsx.
The MainPage Component
Let's take a look at the React component referenced by the page declaration:
JavaScript
TypeScript
src/MainPage.jsx
import waspLogo from './waspLogo.png'
import './Main.css'
export const MainPage = () => {
// ...
}
This is a regular functional React component. It also uses the CSS file and a logo image that sit next to it in the src folder.
That is all the code you need! Wasp takes care of everything else necessary to define, build, and run the web app.
tip
wasp start automatically picks up the changes you make and restarts the app, so keep it running in the background.
Adding a Second Page
To add more pages, you can create another set of page and route declarations. You can even add parameters to the URL path, using the same syntax as React Router. Let's test this out by adding a new page:
JavaScript
TypeScript
main.wasp
route HelloRoute { path: ""/hello/:name"", to: HelloPage }
page HelloPage {
component: import { HelloPage } from ""@src/HelloPage""
}
When a user visits /hello/their-name, Wasp will render the component exported from src/HelloPage.tsx and pass the URL parameter the same way as in React Router:
JavaScript
TypeScript
src/HelloPage.jsx
export const HelloPage = (props) => {
return Here's {props.match.params.name}!
}
Now you can visit /hello/johnny and see ""Here's johnny!""
Cleaning Up
Now that you've seen how Wasp deals with Routes and Pages, it's finally time to build the Todo app.
Start by cleaning up the starter project and removing unnecessary code and files.
First, remove most of the code from the MainPage component:
JavaScript
TypeScript
src/MainPage.jsx
export const MainPage = () => {
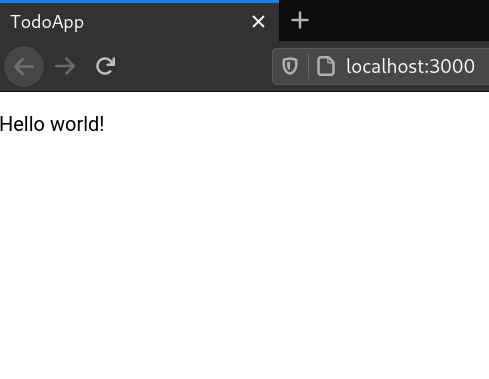
return Hello world!
}
At this point, the main page should look like this:
You can now delete redundant files: src/Main.css, src/waspLogo.png, and src/HelloPage.tsx (we won't need this page for the rest of the tutorial).
Since src/HelloPage.tsx no longer exists, remove its route and page declarations from the main.wasp file.
Your Wasp file should now look like this:
JavaScript
TypeScript
main.wasp
app TodoApp {
wasp: {
version: ""^0.13.0""
},
title: ""TodoApp""
}
route RootRoute { path: ""/"", to: MainPage }
page MainPage {
component: import { MainPage } from ""@src/MainPage""
}
Excellent work!
You now have a basic understanding of Wasp and are ready to start building your TodoApp. We'll implement the app's core features in the following sections.","https://wasp-lang.dev/docs/tutorial/pages"
"1","200","2024-04-23T15:13:03.445Z","https://wasp-lang.dev/docs/tutorial/entities","https://wasp-lang.dev/docs","browser","```
// ...entity Task {=psl id Int @id @default(autoincrement()) description String isDone Boolean @default(false)psl=}
```",,"https://wasp-lang.dev/docs/tutorial/entities","Entities are one of the most important concepts in Wasp and are how you define what gets stored in the database.","*","0","h3="":443""; ma=86400","max-age=600","DYNAMIC","878ecb84bddf4bcc-BUF",,"br","text/html; charset=utf-8","Tue, 23 Apr 2024 15:12:59 GMT","Tue, 23 Apr 2024 15:22:59 GMT","Thu, 18 Apr 2024 15:50:26 GMT","{""success_fraction"":0, ""report_to"":""cf-nel"", ""max_age"":604800}","{""endpoints"":[{""url"":""https:\/\/a.nel.cloudflare.com\/report\/v4?s=4IqQ3HCNK7lGV%2FlPYh9a58UJt6LT1U%2BQYjpdiEU3MVMjhSH8OawIUbknsjwmjX30jk6pkB%2FGeYZPFmFIuCozS7OOFgc7zQtSi58NXNTXWLiQ3o6jWiPn6x0toSa3Kx5k""}], ""group"":""cf-nel"", ""max_age"":604800}","cloudflare",,"Accept-Encoding","1.1 varnish","MISS","0","4b5f54d0c4d67ec6e5a4c17132510dd6be2fd795","h2","2E70:2405A0:3CC8093:47A7A2A:6627CFFA",,"MISS","cache-nyc-kteb1890099-NYC","S1713885180.662911, VS0, VE21",,,"en","https://wasp-lang.dev/img/wasp_twitter_cover.png","og:image","https://wasp-lang.dev/docs/tutorial/entities","og:url","4. Database Entities | Wasp","og:title","Entities are one of the most important concepts in Wasp and are how you define what gets stored in the database.","og:description","4. Database Entities | Wasp",,"// ...
entity Task {=psl
id Int @id @default(autoincrement())
description String
isDone Boolean @default(false)
psl=}","https://wasp-lang.dev/docs/tutorial/entities"
"1","200","2024-04-23T15:13:03.628Z","https://wasp-lang.dev/docs/tutorial/queries","https://wasp-lang.dev/docs","browser","## 5\. Querying the Database
We want to know which tasks we need to do, so let's list them!
The primary way of working with Entities in Wasp is with [Queries and Actions](https://wasp-lang.dev/docs/data-model/operations/overview), collectively known as **_Operations_**.
Queries are used to read an entity, while Actions are used to create, modify, and delete entities. Since we want to list the tasks, we'll want to use a Query.
To list the tasks, you must:
1. Create a Query that fetches the tasks from the database.
2. Update the `MainPage.tsx` to use that Query and display the results.
## Defining the Query[](#defining-the-query ""Direct link to Defining the Query"")
We'll create a new Query called `getTasks`. We'll need to declare the Query in the Wasp file and write its implementation in .
### Declaring a Query[](#declaring-a-query ""Direct link to Declaring a Query"")
We need to add a **query** declaration to `main.wasp` so that Wasp knows it exists:
* JavaScript
* TypeScript
main.wasp
```
// ...query getTasks { // Specifies where the implementation for the query function is. // The path `@src/queries` resolves to `src/queries.js`. // No need to specify an extension. fn: import { getTasks } from ""@src/queries"", // Tell Wasp that this query reads from the `Task` entity. Wasp will // automatically update the results of this query when tasks are modified. entities: [Task]}
```
### Implementing a Query[](#implementing-a-query ""Direct link to Implementing a Query"")
* JavaScript
* TypeScript
src/queries.js
```
export const getTasks = async (args, context) => { return context.entities.Task.findMany({ orderBy: { id: 'asc' }, })}
```
Query function parameters:
* `args: object`
The arguments the caller passes to the Query.
* `context`
An object with extra information injected by Wasp. Its type depends on the Query declaration.
Since the Query declaration in `main.wasp` says that the `getTasks` Query uses `Task` entity, Wasp injected a [Prisma client](https://www.prisma.io/docs/reference/tools-and-interfaces/prisma-client/crud) for the `Task` entity as `context.entities.Task` - we used it above to fetch all the tasks from the database.
info
Queries and Actions are NodeJS functions executed on the server.
## Invoking the Query On the Frontend[](#invoking-the-query-on-the-frontend ""Direct link to Invoking the Query On the Frontend"")
While we implement Queries on the server, Wasp generates client-side functions that automatically take care of serialization, network calls, and cache invalidation, allowing you to call the server code like it's a regular function.
This makes it easy for us to use the `getTasks` Query we just created in our React component:
* JavaScript
* TypeScript
src/MainPage.jsx
```
import { getTasks, useQuery } from 'wasp/client/operations'export const MainPage = () => { const { data: tasks, isLoading, error } = useQuery(getTasks) return ( {tasks && } {isLoading && 'Loading...'} {error && 'Error: ' + error}
)}const TaskView = ({ task }) => { return ( {task.description}
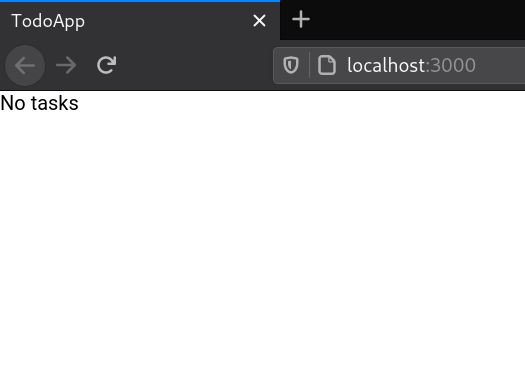
)}const TasksList = ({ tasks }) => { if (!tasks?.length) return No tasks
return ( {tasks.map((task, idx) => ( ))}
)}
```
Most of this code is regular React, the only exception being the special `wasp` imports:
We could have called the Query directly using `getTasks()`, but the `useQuery` hook makes it reactive: React will re-render the component every time the Query changes. Remember that Wasp automatically refreshes Queries whenever the data is modified.
With these changes, you should be seeing the text ""No tasks"" on the screen:
We'll create a form to add tasks in the next step 🪄",,"https://wasp-lang.dev/docs/tutorial/queries","We want to know which tasks we need to do, so let's list them!","*","0","h3="":443""; ma=86400","max-age=600","DYNAMIC","878ecb73e8ec4bcc-BUF",,"br","text/html; charset=utf-8","Tue, 23 Apr 2024 15:12:57 GMT","Tue, 23 Apr 2024 15:22:56 GMT","Thu, 18 Apr 2024 15:50:26 GMT","{""success_fraction"":0, ""report_to"":""cf-nel"", ""max_age"":604800}","{""endpoints"":[{""url"":""https:\/\/a.nel.cloudflare.com\/report\/v4?s=qLvNkVdaAVxanCN2FIMN8vnWpfBkK2t1Uk0gZqcVWuEOc6XZ3TGYxOloH6PIVnkZ5CUk5b7o5RnYKYD%2BH2iTX1bM9H65yPgq4Z17TCEWLRg5KtPiTz4AY8Vk%2FYxLo%2F4c""}], ""group"":""cf-nel"", ""max_age"":604800}","cloudflare",,"Accept-Encoding","1.1 varnish","MISS","0","597d5a4eb44bb131305963a05405d34c5416bb81","h2","5FBE:171D:735E53:88D80E:6627CFF8",,"MISS","cache-nyc-kteb1890087-NYC","S1713885177.954366, VS0, VE48",,,"en","https://wasp-lang.dev/img/wasp_twitter_cover.png","og:image","https://wasp-lang.dev/docs/tutorial/queries","og:url","5. Querying the Database | Wasp","og:title","We want to know which tasks we need to do, so let's list them!","og:description","5. Querying the Database | Wasp",,"5. Querying the Database
We want to know which tasks we need to do, so let's list them!
The primary way of working with Entities in Wasp is with Queries and Actions, collectively known as Operations.
Queries are used to read an entity, while Actions are used to create, modify, and delete entities. Since we want to list the tasks, we'll want to use a Query.
To list the tasks, you must:
Create a Query that fetches the tasks from the database.
Update the MainPage.tsx to use that Query and display the results.
Defining the Query
We'll create a new Query called getTasks. We'll need to declare the Query in the Wasp file and write its implementation in .
Declaring a Query
We need to add a query declaration to main.wasp so that Wasp knows it exists:
JavaScript
TypeScript
main.wasp
// ...
query getTasks {
// Specifies where the implementation for the query function is.
// The path `@src/queries` resolves to `src/queries.js`.
// No need to specify an extension.
fn: import { getTasks } from ""@src/queries"",
// Tell Wasp that this query reads from the `Task` entity. Wasp will
// automatically update the results of this query when tasks are modified.
entities: [Task]
}
Implementing a Query
JavaScript
TypeScript
src/queries.js
export const getTasks = async (args, context) => {
return context.entities.Task.findMany({
orderBy: { id: 'asc' },
})
}
Query function parameters:
args: object
The arguments the caller passes to the Query.
context
An object with extra information injected by Wasp. Its type depends on the Query declaration.
Since the Query declaration in main.wasp says that the getTasks Query uses Task entity, Wasp injected a Prisma client for the Task entity as context.entities.Task - we used it above to fetch all the tasks from the database.
info
Queries and Actions are NodeJS functions executed on the server.
Invoking the Query On the Frontend
While we implement Queries on the server, Wasp generates client-side functions that automatically take care of serialization, network calls, and cache invalidation, allowing you to call the server code like it's a regular function.
This makes it easy for us to use the getTasks Query we just created in our React component:
JavaScript
TypeScript
src/MainPage.jsx
import { getTasks, useQuery } from 'wasp/client/operations'
export const MainPage = () => {
const { data: tasks, isLoading, error } = useQuery(getTasks)
return (
{tasks && }
{isLoading && 'Loading...'}
{error && 'Error: ' + error}
)
}
const TaskView = ({ task }) => {
return (
{task.description}
)
}
const TasksList = ({ tasks }) => {
if (!tasks?.length) return No tasks
return (
{tasks.map((task, idx) => (
))}
)
}
Most of this code is regular React, the only exception being the special wasp imports:
We could have called the Query directly using getTasks(), but the useQuery hook makes it reactive: React will re-render the component every time the Query changes. Remember that Wasp automatically refreshes Queries whenever the data is modified.
With these changes, you should be seeing the text ""No tasks"" on the screen:
We'll create a form to add tasks in the next step 🪄","https://wasp-lang.dev/docs/tutorial/queries"
"1","200","2024-04-23T15:13:17.505Z","https://wasp-lang.dev/docs/tutorial/actions","https://wasp-lang.dev/docs","browser","## 6\. Modifying Data
In the previous section, we learned about using Queries to fetch data and only briefly mentioned that Actions can be used to update the database. Let's learn more about Actions so we can add and update tasks in the database.
We have to create:
1. A Wasp Action that creates a new task.
2. A React form that calls that Action when the user creates a task.
## Creating a New Action[](#creating-a-new-action ""Direct link to Creating a New Action"")
Creating an Action is very similar to creating a Query.
### Declaring an Action[](#declaring-an-action ""Direct link to Declaring an Action"")
We must first declare the Action in `main.wasp`:
* JavaScript
* TypeScript
main.wasp
```
// ...action createTask { fn: import { createTask } from ""@src/actions"", entities: [Task]}
```
### Implementing an Action[](#implementing-an-action ""Direct link to Implementing an Action"")
Let's now define a function for our `createTask` Action:
* JavaScript
* TypeScript
src/actions.js
```
export const createTask = async (args, context) => { return context.entities.Task.create({ data: { description: args.description }, })}
```
tip
We put the function in a new file `src/actions.ts`, but we could have put it anywhere we wanted! There are no limitations here, as long as the declaration in the Wasp file imports it correctly and the file is located within `src` directory.
## Invoking the Action on the Client[](#invoking-the-action-on-the-client ""Direct link to Invoking the Action on the Client"")
Start by defining a form for creating new tasks.
* JavaScript
* TypeScript
src/MainPage.jsx
```
import { createTask, getTasks, useQuery } from 'wasp/client/operations'// ... MainPage, TaskView, TaskList ...const NewTaskForm = () => { const handleSubmit = async (event) => { event.preventDefault() try { const target = event.target const description = target.description.value target.reset() await createTask({ description }) } catch (err) { window.alert('Error: ' + err.message) } } return ( )}
```
Unlike Queries, you can call Actions directly (i.e., without wrapping it with a hook) because we don't need reactivity. The rest is just regular React code.
All that's left now is adding this form to the page component:
* JavaScript
* TypeScript
src/MainPage.jsx
```
import { createTask, getTasks, useQuery} from 'wasp/client/operations'const MainPage = () => { const { data: tasks, isLoading, error } = useQuery(getTasks) return ( {tasks && } {isLoading && 'Loading...'} {error && 'Error: ' + error}
)}// ... TaskView, TaskList, NewTaskForm ...
```
Great work!
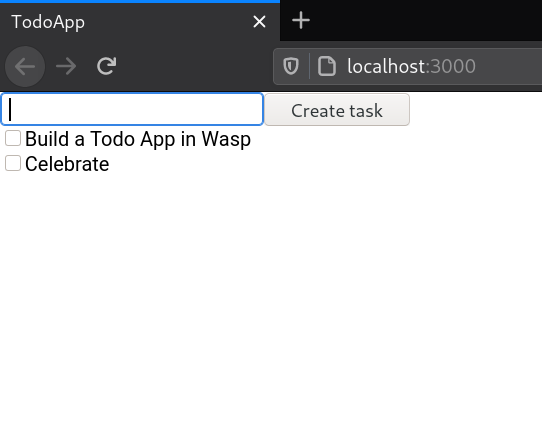
You now have a form for creating new tasks.
Try creating a ""Build a Todo App in Wasp"" task and see it appear in the list below. The task is created on the server and saved in the database.
Try refreshing the page or opening it in another browser. You'll see the tasks are still there!
Automatic Query Invalidation
When you create a new task, the list of tasks is automatically updated to display the new task, even though we have not written any code that would do that! Wasp handles these automatic updates under the hood.
When you declared the `getTasks` and `createTask` operations, you specified that they both use the `Task` entity. So when `createTask` is called, Wasp knows that the data `getTasks` fetches may have changed and automatically updates it in the background. This means that **out of the box, Wasp keeps all your queries in sync with any changes made through Actions**.
This behavior is convenient as a default but can cause poor performance in large apps. While there is no mechanism for overriding this behavior yet, it is something that we plan to include in Wasp in the future. This feature is tracked [here](https://github.com/wasp-lang/wasp/issues/63).
## A Second Action[](#a-second-action ""Direct link to A Second Action"")
Our Todo app isn't finished if you can't mark a task as done.
We'll create a new Action to update a task's status and call it from React whenever a task's checkbox is toggled.
Since we've already created one task together, try to create this one yourself. It should be an Action named `updateTask` that receives the task's `id` and its `isDone` status. You can see our implementation below.
Solution
You can now call `updateTask` from the React component:
* JavaScript
* TypeScript
src/MainPage.jsx
```
// ...import { updateTask, createTask, getTasks, useQuery,} from 'wasp/client/operations'// ... MainPage ...const TaskView = ({ task }) => { const handleIsDoneChange = async (event) => { try { await updateTask({ id: task.id, isDone: event.target.checked, }) } catch (error) { window.alert('Error while updating task: ' + error.message) } } return ( {task.description}
)}// ... TaskList, NewTaskForm ...
```
Awesome! You can now mark this task as done.
It's time to make one final addition to your app: supporting multiple users.",,"https://wasp-lang.dev/docs/tutorial/actions","In the previous section, we learned about using Queries to fetch data and only briefly mentioned that Actions can be used to update the database. Let's learn more about Actions so we can add and update tasks in the database.","*","0","h3="":443""; ma=86400","max-age=600","DYNAMIC","878ecbdf89344bcc-BUF",,"br","text/html; charset=utf-8","Tue, 23 Apr 2024 15:13:14 GMT","Tue, 23 Apr 2024 15:23:14 GMT","Thu, 18 Apr 2024 15:50:26 GMT","{""success_fraction"":0, ""report_to"":""cf-nel"", ""max_age"":604800}","{""endpoints"":[{""url"":""https:\/\/a.nel.cloudflare.com\/report\/v4?s=IW%2FhAf7JC93cXEoHPUub5bYWIWfqznqe3lCES32F4O%2BX6SX2QHsK7i4TpgNUz%2FdQ7jzw6oZnKQWxtbqvSbpJoBgLi4BIZZXIizPTDAC8UreMZV%2FufJrA5%2F2xnFO3GzeJ""}], ""group"":""cf-nel"", ""max_age"":604800}","cloudflare",,"Accept-Encoding","1.1 varnish","MISS","0","a08aa578f5bfe198673dd0ca1cc7c727b0b8590e","h2","A07A:2405A0:3CC8CCB:47A8813:6627D007","HIT","MISS","cache-nyc-kteb1890087-NYC","S1713885194.180478, VS0, VE19",,,"en","https://wasp-lang.dev/img/wasp_twitter_cover.png","og:image","https://wasp-lang.dev/docs/tutorial/actions","og:url","6. Modifying Data | Wasp","og:title","In the previous section, we learned about using Queries to fetch data and only briefly mentioned that Actions can be used to update the database. Let's learn more about Actions so we can add and update tasks in the database.","og:description","6. Modifying Data | Wasp",,"6. Modifying Data
In the previous section, we learned about using Queries to fetch data and only briefly mentioned that Actions can be used to update the database. Let's learn more about Actions so we can add and update tasks in the database.
We have to create:
A Wasp Action that creates a new task.
A React form that calls that Action when the user creates a task.
Creating a New Action
Creating an Action is very similar to creating a Query.
Declaring an Action
We must first declare the Action in main.wasp:
JavaScript
TypeScript
main.wasp
// ...
action createTask {
fn: import { createTask } from ""@src/actions"",
entities: [Task]
}
Implementing an Action
Let's now define a function for our createTask Action:
JavaScript
TypeScript
src/actions.js
export const createTask = async (args, context) => {
return context.entities.Task.create({
data: { description: args.description },
})
}
tip
We put the function in a new file src/actions.ts, but we could have put it anywhere we wanted! There are no limitations here, as long as the declaration in the Wasp file imports it correctly and the file is located within src directory.
Invoking the Action on the Client
Start by defining a form for creating new tasks.
JavaScript
TypeScript
src/MainPage.jsx
import {
createTask,
getTasks,
useQuery
} from 'wasp/client/operations'
// ... MainPage, TaskView, TaskList ...
const NewTaskForm = () => {
const handleSubmit = async (event) => {
event.preventDefault()
try {
const target = event.target
const description = target.description.value
target.reset()
await createTask({ description })
} catch (err) {
window.alert('Error: ' + err.message)
}
}
return (
)
}
Unlike Queries, you can call Actions directly (i.e., without wrapping it with a hook) because we don't need reactivity. The rest is just regular React code.
All that's left now is adding this form to the page component:
JavaScript
TypeScript
src/MainPage.jsx
import {
createTask,
getTasks,
useQuery
} from 'wasp/client/operations'
const MainPage = () => {
const { data: tasks, isLoading, error } = useQuery(getTasks)
return (
{tasks && }
{isLoading && 'Loading...'}
{error && 'Error: ' + error}
)
}
// ... TaskView, TaskList, NewTaskForm ...
Great work!
You now have a form for creating new tasks.
Try creating a ""Build a Todo App in Wasp"" task and see it appear in the list below. The task is created on the server and saved in the database.
Try refreshing the page or opening it in another browser. You'll see the tasks are still there!
Automatic Query Invalidation
When you create a new task, the list of tasks is automatically updated to display the new task, even though we have not written any code that would do that! Wasp handles these automatic updates under the hood.
When you declared the getTasks and createTask operations, you specified that they both use the Task entity. So when createTask is called, Wasp knows that the data getTasks fetches may have changed and automatically updates it in the background. This means that out of the box, Wasp keeps all your queries in sync with any changes made through Actions.
This behavior is convenient as a default but can cause poor performance in large apps. While there is no mechanism for overriding this behavior yet, it is something that we plan to include in Wasp in the future. This feature is tracked here.
A Second Action
Our Todo app isn't finished if you can't mark a task as done.
We'll create a new Action to update a task's status and call it from React whenever a task's checkbox is toggled.
Since we've already created one task together, try to create this one yourself. It should be an Action named updateTask that receives the task's id and its isDone status. You can see our implementation below.
Solution
You can now call updateTask from the React component:
JavaScript
TypeScript
src/MainPage.jsx
// ...
import {
updateTask,
createTask,
getTasks,
useQuery,
} from 'wasp/client/operations'
// ... MainPage ...
const TaskView = ({ task }) => {
const handleIsDoneChange = async (event) => {
try {
await updateTask({
id: task.id,
isDone: event.target.checked,
})
} catch (error) {
window.alert('Error while updating task: ' + error.message)
}
}
return (
{task.description}
)
}
// ... TaskList, NewTaskForm ...
Awesome! You can now mark this task as done.
It's time to make one final addition to your app: supporting multiple users.","https://wasp-lang.dev/docs/tutorial/actions"
"1",,"2024-04-23T15:13:25.755Z","https://wasp-lang.dev/docs/tutorial/auth","https://wasp-lang.dev/docs","http","## 7\. Adding Authentication
Most modern apps need a way to create and authenticate users. Wasp makes this as easy as possible with its first-class auth support.
To add users to your app, you must:
* Create a `User` Entity.
* Tell Wasp to use the _Username and Password_ authentication.
* Add login and signup pages.
* Update the main page to require authentication.
* Add a relation between `User` and `Task` entities.
* Modify your Queries and Actions so users can only see and modify their tasks.
* Add a logout button.
## Creating a User Entity[](#creating-a-user-entity ""Direct link to Creating a User Entity"")
Since Wasp manages authentication, it will create [the auth related entities](https://wasp-lang.dev/docs/auth/entities) for you in the background. Nothing to do here!
You must only add the `User` Entity to keep track of who owns which tasks.
main.wasp
```
// ...entity User {=psl id Int @id @default(autoincrement())psl=}
```
## Adding Auth to the Project[](#adding-auth-to-the-project ""Direct link to Adding Auth to the Project"")
Next, tell Wasp to use full-stack [authentication](https://wasp-lang.dev/docs/auth/overview):
main.wasp
```
app TodoApp { wasp: { version: ""^0.13.0"" }, title: ""TodoApp"", auth: { // Tells Wasp which entity to use for storing users. userEntity: User, methods: { // Enable username and password auth. usernameAndPassword: {} }, // We'll see how this is used in a bit. onAuthFailedRedirectTo: ""/login"" }}// ...
```
Don't forget to update the database schema by running:
By doing this, Wasp will create:
* [Auth UI](https://wasp-lang.dev/docs/auth/ui) with login and signup forms.
* A `logout()` action.
* A React hook `useAuth()`.
* `context.user` for use in Queries and Actions.
info
Wasp also supports authentication using [Google](https://wasp-lang.dev/docs/auth/social-auth/google), [GitHub](https://wasp-lang.dev/docs/auth/social-auth/github), and [email](https://wasp-lang.dev/docs/auth/email), with more on the way!
## Adding Login and Signup Pages[](#adding-login-and-signup-pages ""Direct link to Adding Login and Signup Pages"")
Wasp creates the login and signup forms for us, but we still need to define the pages to display those forms on. We'll start by declaring the pages in the Wasp file:
* JavaScript
* TypeScript
main.wasp
```
// ...route SignupRoute { path: ""/signup"", to: SignupPage }page SignupPage { component: import { SignupPage } from ""@src/SignupPage""}route LoginRoute { path: ""/login"", to: LoginPage }page LoginPage { component: import { LoginPage } from ""@src/LoginPage""}
```
Great, Wasp now knows these pages exist!
Here's the React code for the pages you've just imported:
* JavaScript
* TypeScript
src/LoginPage.jsx
```
import { Link } from 'react-router-dom'import { LoginForm } from 'wasp/client/auth'export const LoginPage = () => { return (
I don't have an account yet (go to signup).
)}
```
The signup page is very similar to the login page:
* JavaScript
* TypeScript
src/SignupPage.jsx
```
import { Link } from 'react-router-dom'import { SignupForm } from 'wasp/client/auth'export const SignupPage = () => { return (
I already have an account (go to login).
)}
```
## Update the Main Page to Require Auth[](#update-the-main-page-to-require-auth ""Direct link to Update the Main Page to Require Auth"")
We don't want users who are not logged in to access the main page, because they won't be able to create any tasks. So let's make the page private by requiring the user to be logged in:
main.wasp
```
// ...page MainPage { authRequired: true, component: import { MainPage } from ""@src/MainPage""}
```
Now that auth is required for this page, unauthenticated users will be redirected to `/login`, as we specified with `app.auth.onAuthFailedRedirectTo`.
Additionally, when `authRequired` is `true`, the page's React component will be provided a `user` object as prop.
* JavaScript
* TypeScript
src/MainPage.jsx
```
export const MainPage = ({ user }) => { // Do something with the user // ...}
```
Ok, time to test this out. Navigate to the main page (`/`) of the app. You'll get redirected to `/login`, where you'll be asked to authenticate.
Since we just added users, you don't have an account yet. Go to the signup page and create one. You'll be sent back to the main page where you will now be able to see the TODO list!
Let's check out what the database looks like. Start the Prisma Studio:
You'll notice that we now have a `User` entity in the database alongside the `Task` entity.
However, you will notice that if you try logging in as different users and creating some tasks, all users share the same tasks. That's because we haven't yet updated the queries and actions to have per-user tasks. Let's do that next.
You might notice some extra Prisma models like `Auth`, `AuthIdentity` and `Session` that Wasp created for us. You don't need to care about these right now, but if you are curious, you can read more about them [here](https://wasp-lang.dev/docs/auth/entities).
## Defining a User-Task Relation[](#defining-a-user-task-relation ""Direct link to Defining a User-Task Relation"")
First, let's define a one-to-many relation between users and tasks (check the [Prisma docs on relations](https://www.prisma.io/docs/reference/tools-and-interfaces/prisma-schema/relations)):
main.wasp
```
// ...entity User {=psl id Int @id @default(autoincrement()) tasks Task[]psl=}entity Task {=psl id Int @id @default(autoincrement()) description String isDone Boolean @default(false) user User? @relation(fields: [userId], references: [id]) userId Int?psl=}// ...
```
As always, you must migrate the database after changing the Entities:
note
We made `user` and `userId` in `Task` optional (via `?`) because that allows us to keep the existing tasks, which don't have a user assigned, in the database.
This isn't recommended because it allows an unwanted state in the database (what is the purpose of the task not belonging to anybody?) and normally we would not make these fields optional.
Instead, we would do a data migration to take care of those tasks, even if it means just deleting them all. However, for this tutorial, for the sake of simplicity, we will stick with this.
## Updating Operations to Check Authentication[](#updating-operations-to-check-authentication ""Direct link to Updating Operations to Check Authentication"")
Next, let's update the queries and actions to forbid access to non-authenticated users and to operate only on the currently logged-in user's tasks:
* JavaScript
* TypeScript
src/queries.js
```
import { HttpError } from 'wasp/server'export const getTasks = async (args, context) => { if (!context.user) { throw new HttpError(401) } return context.entities.Task.findMany({ where: { user: { id: context.user.id } }, orderBy: { id: 'asc' }, })}
```
* JavaScript
* TypeScript
src/actions.js
```
import { HttpError } from 'wasp/server'export const createTask = async (args, context) => { if (!context.user) { throw new HttpError(401) } return context.entities.Task.create({ data: { description: args.description, user: { connect: { id: context.user.id } }, }, })}export const updateTask = async (args, context) => { if (!context.user) { throw new HttpError(401) } return context.entities.Task.updateMany({ where: { id: args.id, user: { id: context.user.id } }, data: { isDone: args.isDone }, })}
```
note
Due to how Prisma works, we had to convert `update` to `updateMany` in `updateTask` action to be able to specify the user id in `where`.
With these changes, each user should have a list of tasks that only they can see and edit.
Try playing around, adding a few users and some tasks for each of them. Then open the DB studio:
You will see that each user has their tasks, just as we specified in our code!
## Logout Button[](#logout-button ""Direct link to Logout Button"")
Last, but not least, let's add the logout functionality:
* JavaScript
* TypeScript
src/MainPage.jsx
```
// ...import { logout } from 'wasp/client/auth'//...const MainPage = () => { // ... return ( // ...
)}
```
This is it, we have a working authentication system, and our Todo app is multi-user!
## What's Next?[](#whats-next ""Direct link to What's Next?"")
We did it 🎉 You've followed along with this tutorial to create a basic Todo app with Wasp.
You should be ready to learn about more complicated features and go more in-depth with the features already covered. Scroll through the sidebar on the left side of the page to see every feature Wasp has to offer. Or, let your imagination run wild and start building your app! ✨
Looking for inspiration?
* Get a jump start on your next project with [Starter Templates](https://wasp-lang.dev/docs/project/starter-templates)
* Make a real-time app with [Web Sockets](https://wasp-lang.dev/docs/advanced/web-sockets)
note
If you notice that some of the features you'd like to have are missing, or have any other kind of feedback, please write to us on [Discord](https://discord.gg/rzdnErX) or create an issue on [Github](https://github.com/wasp-lang/wasp), so we can learn which features to add/improve next 🙏
If you would like to contribute or help to build a feature, let us know! You can find more details on contributing [here](https://wasp-lang.dev/docs/contributing).
Oh, and do [**subscribe to our newsletter**](https://wasp-lang.dev/#signup)! We usually send one per month, and Matija does his best to unleash his creativity to make them engaging and fun to read :D!",,"https://wasp-lang.dev/docs/tutorial/auth","Most modern apps need a way to create and authenticate users. Wasp makes this as easy as possible with its first-class auth support.","*","0","h3="":443""; ma=86400","max-age=600","DYNAMIC","878ecc273d8807dd-IAD","close","br","text/html; charset=utf-8","Tue, 23 Apr 2024 15:13:25 GMT","Tue, 23 Apr 2024 15:23:25 GMT","Thu, 18 Apr 2024 15:50:26 GMT","{""success_fraction"":0,""report_to"":""cf-nel"",""max_age"":604800}","{""endpoints"":[{""url"":""https:\/\/a.nel.cloudflare.com\/report\/v4?s=bZhWgmUk8%2F%2BETb40OJSb3Bl2u9mtB98CFudvEfNVDQLmI%2FQFybvqT4j6yqaKFnq347lfNZdo%2BN%2B2ByYkgCMBMmQfI54iZ7yEbYBmXzPeuJ%2BskfxWnzIWhbcQVEXfxxmY""}],""group"":""cf-nel"",""max_age"":604800}","cloudflare","chunked","Accept-Encoding","1.1 varnish","MISS","0","29bf5e68a9b9f54bb3ed69065a5129a007e9aa50",,"921A:1353DF:3C80B25:479CEAD:6627D015",,"MISS","cache-iad-kiad7000072-IAD","S1713885206.669710,VS0,VE14",,,"en","https://wasp-lang.dev/img/wasp_twitter_cover.png","og:image","https://wasp-lang.dev/docs/tutorial/auth","og:url","7. Adding Authentication | Wasp","og:title","Most modern apps need a way to create and authenticate users. Wasp makes this as easy as possible with its first-class auth support.","og:description","7. Adding Authentication | Wasp",,"7. Adding Authentication
Most modern apps need a way to create and authenticate users. Wasp makes this as easy as possible with its first-class auth support.
To add users to your app, you must:
Create a User Entity.
Tell Wasp to use the Username and Password authentication.
Add login and signup pages.
Update the main page to require authentication.
Add a relation between User and Task entities.
Modify your Queries and Actions so users can only see and modify their tasks.
Add a logout button.
Creating a User Entity
Since Wasp manages authentication, it will create the auth related entities for you in the background. Nothing to do here!
You must only add the User Entity to keep track of who owns which tasks.
main.wasp
// ...
entity User {=psl
id Int @id @default(autoincrement())
psl=}
Adding Auth to the Project
Next, tell Wasp to use full-stack authentication:
main.wasp
app TodoApp {
wasp: {
version: ""^0.13.0""
},
title: ""TodoApp"",
auth: {
// Tells Wasp which entity to use for storing users.
userEntity: User,
methods: {
// Enable username and password auth.
usernameAndPassword: {}
},
// We'll see how this is used in a bit.
onAuthFailedRedirectTo: ""/login""
}
}
// ...
Don't forget to update the database schema by running:
By doing this, Wasp will create:
Auth UI with login and signup forms.
A logout() action.
A React hook useAuth().
context.user for use in Queries and Actions.
info
Wasp also supports authentication using Google, GitHub, and email, with more on the way!
Adding Login and Signup Pages
Wasp creates the login and signup forms for us, but we still need to define the pages to display those forms on. We'll start by declaring the pages in the Wasp file:
JavaScript
TypeScript
main.wasp
// ...
route SignupRoute { path: ""/signup"", to: SignupPage }
page SignupPage {
component: import { SignupPage } from ""@src/SignupPage""
}
route LoginRoute { path: ""/login"", to: LoginPage }
page LoginPage {
component: import { LoginPage } from ""@src/LoginPage""
}
Great, Wasp now knows these pages exist!
Here's the React code for the pages you've just imported:
JavaScript
TypeScript
src/LoginPage.jsx
import { Link } from 'react-router-dom'
import { LoginForm } from 'wasp/client/auth'
export const LoginPage = () => {
return (
I don't have an account yet (go to signup).
)
}
The signup page is very similar to the login page:
JavaScript
TypeScript
src/SignupPage.jsx
import { Link } from 'react-router-dom'
import { SignupForm } from 'wasp/client/auth'
export const SignupPage = () => {
return (
I already have an account (go to login).
)
}
Update the Main Page to Require Auth
We don't want users who are not logged in to access the main page, because they won't be able to create any tasks. So let's make the page private by requiring the user to be logged in:
main.wasp
// ...
page MainPage {
authRequired: true,
component: import { MainPage } from ""@src/MainPage""
}
Now that auth is required for this page, unauthenticated users will be redirected to /login, as we specified with app.auth.onAuthFailedRedirectTo.
Additionally, when authRequired is true, the page's React component will be provided a user object as prop.
JavaScript
TypeScript
src/MainPage.jsx
export const MainPage = ({ user }) => {
// Do something with the user
// ...
}
Ok, time to test this out. Navigate to the main page (/) of the app. You'll get redirected to /login, where you'll be asked to authenticate.
Since we just added users, you don't have an account yet. Go to the signup page and create one. You'll be sent back to the main page where you will now be able to see the TODO list!
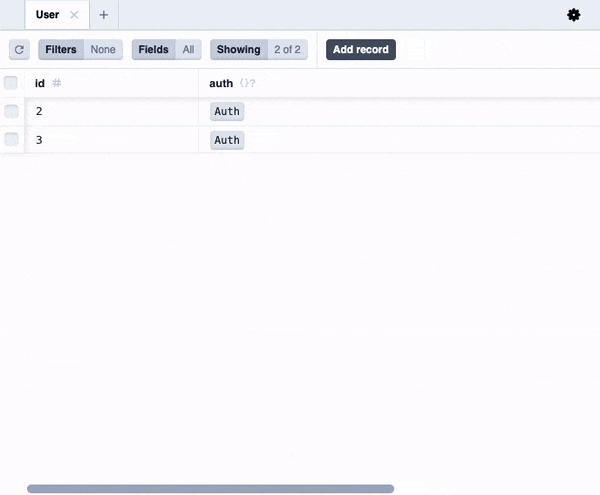
Let's check out what the database looks like. Start the Prisma Studio:
You'll notice that we now have a User entity in the database alongside the Task entity.
However, you will notice that if you try logging in as different users and creating some tasks, all users share the same tasks. That's because we haven't yet updated the queries and actions to have per-user tasks. Let's do that next.
You might notice some extra Prisma models like Auth, AuthIdentity and Session that Wasp created for us. You don't need to care about these right now, but if you are curious, you can read more about them here.
Defining a User-Task Relation
First, let's define a one-to-many relation between users and tasks (check the Prisma docs on relations):
main.wasp
// ...
entity User {=psl
id Int @id @default(autoincrement())
tasks Task[]
psl=}
entity Task {=psl
id Int @id @default(autoincrement())
description String
isDone Boolean @default(false)
user User? @relation(fields: [userId], references: [id])
userId Int?
psl=}
// ...
As always, you must migrate the database after changing the Entities:
note
We made user and userId in Task optional (via ?) because that allows us to keep the existing tasks, which don't have a user assigned, in the database.
This isn't recommended because it allows an unwanted state in the database (what is the purpose of the task not belonging to anybody?) and normally we would not make these fields optional.
Instead, we would do a data migration to take care of those tasks, even if it means just deleting them all. However, for this tutorial, for the sake of simplicity, we will stick with this.
Updating Operations to Check Authentication
Next, let's update the queries and actions to forbid access to non-authenticated users and to operate only on the currently logged-in user's tasks:
JavaScript
TypeScript
src/queries.js
import { HttpError } from 'wasp/server'
export const getTasks = async (args, context) => {
if (!context.user) {
throw new HttpError(401)
}
return context.entities.Task.findMany({
where: { user: { id: context.user.id } },
orderBy: { id: 'asc' },
})
}
JavaScript
TypeScript
src/actions.js
import { HttpError } from 'wasp/server'
export const createTask = async (args, context) => {
if (!context.user) {
throw new HttpError(401)
}
return context.entities.Task.create({
data: {
description: args.description,
user: { connect: { id: context.user.id } },
},
})
}
export const updateTask = async (args, context) => {
if (!context.user) {
throw new HttpError(401)
}
return context.entities.Task.updateMany({
where: { id: args.id, user: { id: context.user.id } },
data: { isDone: args.isDone },
})
}
note
Due to how Prisma works, we had to convert update to updateMany in updateTask action to be able to specify the user id in where.
With these changes, each user should have a list of tasks that only they can see and edit.
Try playing around, adding a few users and some tasks for each of them. Then open the DB studio:
You will see that each user has their tasks, just as we specified in our code!
Logout Button
Last, but not least, let's add the logout functionality:
JavaScript
TypeScript
src/MainPage.jsx
// ...
import { logout } from 'wasp/client/auth'
//...
const MainPage = () => {
// ...
return (
// ...
)
}
This is it, we have a working authentication system, and our Todo app is multi-user!
What's Next?
We did it 🎉 You've followed along with this tutorial to create a basic Todo app with Wasp.
You should be ready to learn about more complicated features and go more in-depth with the features already covered. Scroll through the sidebar on the left side of the page to see every feature Wasp has to offer. Or, let your imagination run wild and start building your app! ✨
Looking for inspiration?
Get a jump start on your next project with Starter Templates
Make a real-time app with Web Sockets
note
If you notice that some of the features you'd like to have are missing, or have any other kind of feedback, please write to us on Discord or create an issue on Github, so we can learn which features to add/improve next 🙏
If you would like to contribute or help to build a feature, let us know! You can find more details on contributing here.
Oh, and do subscribe to our newsletter! We usually send one per month, and Matija does his best to unleash his creativity to make them engaging and fun to read :D!","https://wasp-lang.dev/docs/tutorial/auth"
"1",,"2024-04-23T15:13:28.352Z","https://wasp-lang.dev/docs/data-model/entities","https://wasp-lang.dev/docs","http","## Entities
Entities are the foundation of your app's data model. In short, an Entity defines a model in your database.
Wasp uses the excellent [Prisma ORM](https://www.prisma.io/) to implement all database functionality and occasionally enhances it with a thin abstraction layer. Wasp Entities directly correspond to [Prisma's data model](https://www.prisma.io/docs/concepts/components/prisma-schema/data-model). Still, you don't need to be familiar with Prisma to effectively use Wasp, as it comes with a simple API wrapper for working with Prisma's core features.
The only requirement for defining Wasp Entities is familiarity with the **_Prisma Schema Language (PSL)_**, a simple definition language explicitly created for defining models in Prisma. The language is declarative and very intuitive. We'll also go through an example later in the text, so there's no need to go and thoroughly learn it right away. Still, if you're curious, look no further than Prisma's official documentation:
* [Basic intro and examples](https://www.prisma.io/docs/reference/tools-and-interfaces/prisma-schema)
* [A more exhaustive language specification](https://www.prisma.io/docs/reference/api-reference/prisma-schema-reference)
## Defining an Entity[](#defining-an-entity ""Direct link to Defining an Entity"")
As mentioned, an `entity` declaration represents a database model.
Each `Entity` declaration corresponds 1-to-1 to [Prisma's data model](https://www.prisma.io/docs/concepts/components/prisma-schema/data-model). Here's how you could define an Entity that represents a Task:
* JavaScript
* TypeScript
```
entity Task {=psl id Int @id @default(autoincrement()) description String isDone Boolean @default(false)psl=}
```
Let's go through this declaration in detail:
* `entity Task` - This tells Wasp that we wish to define an Entity (i.e., database model) called `Task`. Wasp automatically creates a table called `tasks`.
* `{=psl ... psl=}` - Wasp treats everything that comes between the two `psl` tags as [PSL (Prisma Schema Language)](https://www.prisma.io/docs/reference/tools-and-interfaces/prisma-schema).
The above PSL definition tells Wasp to create a table for storing Tasks where each task has three fields (i.e., the `tasks` table has three columns):
* `id` - An integer value serving as a primary key. The database automatically generates it by incrementing the previously generated `id`.
* `description` - A string value for storing the task's description.
* `isDone` - A boolean value indicating the task's completion status. If you don't set it when creating a new task, the database sets it to `false` by default.
### Working with Entities[](#working-with-entities ""Direct link to Working with Entities"")
Let's see how you can define and work with Wasp Entities:
1. Create/update some Entities in your `.wasp` file.
2. Run `wasp db migrate-dev`. This command syncs the database model with the Entity definitions in your `.wasp` file. It does this by creating migration scripts.
3. Migration scripts are automatically placed in the `migrations/` folder. Make sure to commit this folder into version control.
4. Use Wasp's JavasScript API to work with the database when implementing Operations (we'll cover this in detail when we talk about [operations](https://wasp-lang.dev/docs/data-model/operations/overview)).
#### Using Entities in Operations[](#using-entities-in-operations ""Direct link to Using Entities in Operations"")
Most of the time, you will be working with Entities within the context of [Operations (Queries & Actions)](https://wasp-lang.dev/docs/data-model/operations/overview). We'll see how that's done on the next page.
#### Using Entities directly[](#using-entities-directly ""Direct link to Using Entities directly"")
If you need more control, you can directly interact with Entities by importing and using the [Prisma Client](https://www.prisma.io/docs/concepts/components/prisma-client/crud). We recommend sticking with conventional Wasp-provided mechanisms, only resorting to directly using the Prisma client only if you need a feature Wasp doesn't provide.
You can only use the Prisma Client in your Wasp server code. You can import it like this:
* JavaScript
* TypeScript
```
import { prisma } from 'wasp/server'prisma.task.create({ description: ""Read the Entities doc"", isDone: true // almost :)})
```
### Next steps[](#next-steps ""Direct link to Next steps"")
Now that we've seen how to define Entities that represent Wasp's core data model, we'll see how to make the most of them in other parts of Wasp. Keep reading to learn all about Wasp Operations!",,"https://wasp-lang.dev/docs/data-model/entities","Entities are the foundation of your app's data model. In short, an Entity defines a model in your database.","*","0","h3="":443""; ma=86400","max-age=600","DYNAMIC","878ecc37cd9d381e-IAD","close","br","text/html; charset=utf-8","Tue, 23 Apr 2024 15:13:28 GMT","Tue, 23 Apr 2024 15:23:28 GMT","Thu, 18 Apr 2024 15:50:26 GMT","{""success_fraction"":0,""report_to"":""cf-nel"",""max_age"":604800}","{""endpoints"":[{""url"":""https:\/\/a.nel.cloudflare.com\/report\/v4?s=1a3jnShUIfjBgA6AriuEjZW4uX2b8Mn91rixz73BOrG5QPvGGC9rGymTcyVJ29t79RoHDdkPhoHlSpQf%2FENE9YGzQuy2AoCpw0oD28tFRZDVaTCW7Xj1vHSIjzvctck5""}],""group"":""cf-nel"",""max_age"":604800}","cloudflare","chunked","Accept-Encoding","1.1 varnish","MISS","0","e0350f89105576556a4c5d4d57cd3c44ffa6d804",,"6F5E:16C4F4:39094EC:440E927:6627D017",,"MISS","cache-iad-kiad7000168-IAD","S1713885208.314930,VS0,VE16",,,"en","https://wasp-lang.dev/img/wasp_twitter_cover.png","og:image","https://wasp-lang.dev/docs/data-model/entities","og:url","Entities | Wasp","og:title","Entities are the foundation of your app's data model. In short, an Entity defines a model in your database.","og:description","Entities | Wasp",,"Entities
Entities are the foundation of your app's data model. In short, an Entity defines a model in your database.
Wasp uses the excellent Prisma ORM to implement all database functionality and occasionally enhances it with a thin abstraction layer. Wasp Entities directly correspond to Prisma's data model. Still, you don't need to be familiar with Prisma to effectively use Wasp, as it comes with a simple API wrapper for working with Prisma's core features.
The only requirement for defining Wasp Entities is familiarity with the Prisma Schema Language (PSL), a simple definition language explicitly created for defining models in Prisma. The language is declarative and very intuitive. We'll also go through an example later in the text, so there's no need to go and thoroughly learn it right away. Still, if you're curious, look no further than Prisma's official documentation:
Basic intro and examples
A more exhaustive language specification
Defining an Entity
As mentioned, an entity declaration represents a database model.
Each Entity declaration corresponds 1-to-1 to Prisma's data model. Here's how you could define an Entity that represents a Task:
JavaScript
TypeScript
entity Task {=psl
id Int @id @default(autoincrement())
description String
isDone Boolean @default(false)
psl=}
Let's go through this declaration in detail:
entity Task - This tells Wasp that we wish to define an Entity (i.e., database model) called Task. Wasp automatically creates a table called tasks.
{=psl ... psl=} - Wasp treats everything that comes between the two psl tags as PSL (Prisma Schema Language).
The above PSL definition tells Wasp to create a table for storing Tasks where each task has three fields (i.e., the tasks table has three columns):
id - An integer value serving as a primary key. The database automatically generates it by incrementing the previously generated id.
description - A string value for storing the task's description.
isDone - A boolean value indicating the task's completion status. If you don't set it when creating a new task, the database sets it to false by default.
Working with Entities
Let's see how you can define and work with Wasp Entities:
Create/update some Entities in your .wasp file.
Run wasp db migrate-dev. This command syncs the database model with the Entity definitions in your .wasp file. It does this by creating migration scripts.
Migration scripts are automatically placed in the migrations/ folder. Make sure to commit this folder into version control.
Use Wasp's JavasScript API to work with the database when implementing Operations (we'll cover this in detail when we talk about operations).
Using Entities in Operations
Most of the time, you will be working with Entities within the context of Operations (Queries & Actions). We'll see how that's done on the next page.
Using Entities directly
If you need more control, you can directly interact with Entities by importing and using the Prisma Client. We recommend sticking with conventional Wasp-provided mechanisms, only resorting to directly using the Prisma client only if you need a feature Wasp doesn't provide.
You can only use the Prisma Client in your Wasp server code. You can import it like this:
JavaScript
TypeScript
import { prisma } from 'wasp/server'
prisma.task.create({
description: ""Read the Entities doc"",
isDone: true // almost :)
})
Next steps
Now that we've seen how to define Entities that represent Wasp's core data model, we'll see how to make the most of them in other parts of Wasp. Keep reading to learn all about Wasp Operations!","https://wasp-lang.dev/docs/data-model/entities"
"1",,"2024-04-23T15:13:30.203Z","https://wasp-lang.dev/docs/data-model/operations/overview","https://wasp-lang.dev/docs","http","Version: 0.13.0
## Overview
While Entities enable help you define your app's data model and relationships, Operations are all about working with this data.
There are two kinds of Operations: [Queries](https://wasp-lang.dev/docs/data-model/operations/queries) and [Actions](https://wasp-lang.dev/docs/data-model/operations/actions). As their names suggest, Queries are meant for reading data, and Actions are meant for changing it (either by updating existing entries or creating new ones).
Keep reading to find out all there is to know about Operations in Wasp.",,"https://wasp-lang.dev/docs/data-model/operations/overview","While Entities enable help you define your app's data model and relationships, Operations are all about working with this data.","*","0","h3="":443""; ma=86400","max-age=600","DYNAMIC","878ecc4369a59c64-IAD","close","br","text/html; charset=utf-8","Tue, 23 Apr 2024 15:13:30 GMT","Tue, 23 Apr 2024 15:23:30 GMT","Thu, 18 Apr 2024 15:50:26 GMT","{""success_fraction"":0,""report_to"":""cf-nel"",""max_age"":604800}","{""endpoints"":[{""url"":""https:\/\/a.nel.cloudflare.com\/report\/v4?s=5moGcmGQaXwg4ij5yrJQlen8floyrMtLMh2MmYmCqIJGYUCxghKtHLJWciAmuOp6TKCfI5gRNDc2ma1d%2BrUfn8qINhBLbRub7jONMcG3QzAQg%2BkbccQFFHphJk%2FHRXNs""}],""group"":""cf-nel"",""max_age"":604800}","cloudflare","chunked","Accept-Encoding","1.1 varnish","MISS","0","10b2759965718400507004399d671eb13b360e46",,"63A2:35D1BB:3B3494A:46510D6:6627D01A",,"MISS","cache-iad-kiad7000154-IAD","S1713885210.174960,VS0,VE15",,,"en","https://wasp-lang.dev/img/wasp_twitter_cover.png","og:image","https://wasp-lang.dev/docs/data-model/operations/overview","og:url","Overview | Wasp","og:title","While Entities enable help you define your app's data model and relationships, Operations are all about working with this data.","og:description","Overview | Wasp",,"Version: 0.13.0
Overview
While Entities enable help you define your app's data model and relationships, Operations are all about working with this data.
There are two kinds of Operations: Queries and Actions. As their names suggest, Queries are meant for reading data, and Actions are meant for changing it (either by updating existing entries or creating new ones).
Keep reading to find out all there is to know about Operations in Wasp.","https://wasp-lang.dev/docs/data-model/operations/overview"
"1",,"2024-04-23T15:13:32.156Z","https://wasp-lang.dev/docs/data-model/operations/queries","https://wasp-lang.dev/docs","http","## Queries
We'll explain what Queries are and how to use them. If you're looking for a detailed API specification, skip ahead to the [API Reference](#api-reference).
You can use Queries to fetch data from the server. They shouldn't modify the server's state. Fetching all comments on a blog post, a list of users that liked a video, information about a single product based on its ID... All of these are perfect use cases for a Query.
tip
Queries are fairly similar to Actions in terms of their API. Therefore, if you're already familiar with Actions, you might find reading the entire guide repetitive.
We instead recommend skipping ahead and only reading [the differences between Queries and Actions](https://wasp-lang.dev/docs/data-model/operations/actions#differences-between-queries-and-actions), and consulting the [API Reference](#api-reference) as needed.
## Working with Queries[](#working-with-queries ""Direct link to Working with Queries"")
You declare queries in the `.wasp` file and implement them using NodeJS. Wasp not only runs these queries within the server's context but also creates code that enables you to call them from any part of your codebase, whether it's on the client or server side.
This means you don't have to build an HTTP API for your query, manage server-side request handling, or even deal with client-side response handling and caching. Instead, just concentrate on implementing the business logic inside your query, and let Wasp handle the rest!
To create a Query, you must:
1. Declare the Query in Wasp using the `query` declaration.
2. Define the Query's NodeJS implementation.
After completing these two steps, you'll be able to use the Query from any point in your code.
### Declaring Queries[](#declaring-queries ""Direct link to Declaring Queries"")
To create a Query in Wasp, we begin with a `query` declaration.
Let's declare two Queries - one to fetch all tasks, and another to fetch tasks based on a filter, such as whether a task is done:
* JavaScript
* TypeScript
main.wasp
```
// ...query getAllTasks { fn: import { getAllTasks } from ""@src/queries.js""}query getFilteredTasks { fn: import { getFilteredTasks } from ""@src/queries.js""}
```
If you want to know about all supported options for the `query` declaration, take a look at the [API Reference](#api-reference).
The names of Wasp Queries and their implementations don't need to match, but we'll keep them the same to avoid confusion.
info
You might have noticed that we told Wasp to import Query implementations that don't yet exist. Don't worry about that for now. We'll write the implementations imported from `queries.ts` in the next section.
It's a good idea to start with the high-level concept (i.e., the Query declaration in the Wasp file) and only then deal with the implementation details (i.e., the Query's implementation in JavaScript).
After declaring a Wasp Query, two important things happen:
* Wasp **generates a server-side NodeJS function** that shares its name with the Query.
* Wasp **generates a client-side JavaScript function** that shares its name with the Query (e.g., `getFilteredTasks`). This function takes a single optional argument - an object containing any serializable data you wish to use inside the Query. Wasp will send this object over the network and pass it into the Query's implementation as its first positional argument (more on this when we look at the implementations). Such an abstraction works thanks to an HTTP API route handler Wasp generates on the server, which calls the Query's NodeJS implementation under the hood.
Generating these two functions ensures a uniform calling interface across the entire app (both client and server).
### Implementing Queries in Node[](#implementing-queries-in-node ""Direct link to Implementing Queries in Node"")
Now that we've declared the Query, what remains is to implement it. We've instructed Wasp to look for the Queries' implementations in the file `src/queries.ts`, so that's where we should export them from.
Here's how you might implement the previously declared Queries `getAllTasks` and `getFilteredTasks`:
* JavaScript
* TypeScript
src/queries.js
```
// our ""database""const tasks = [ { id: 1, description: 'Buy some eggs', isDone: true }, { id: 2, description: 'Make an omelette', isDone: false }, { id: 3, description: 'Eat breakfast', isDone: false },]// You don't need to use the arguments if you don't need themexport const getAllTasks = () => { return tasks}// The 'args' object is something sent by the caller (most often from the client)export const getFilteredTasks = (args) => { const { isDone } = args return tasks.filter((task) => task.isDone === isDone)}
```
tip
Wasp uses [superjson](https://github.com/blitz-js/superjson) under the hood. This means you're not limited to only sending and receiving JSON payloads.
You can send and receive any superjson-compatible payload (like Dates, Sets, Lists, circular references, etc.) and let Wasp handle the (de)serialization.
For a detailed explanation of the Query definition API (i.e., arguments and return values), check the [API Reference](#api-reference).
### Using Queries[](#using-queries ""Direct link to Using Queries"")
To use a Query, you can import it from `wasp/client/operations` and call it directly. As mentioned, the usage doesn't change depending on whether you're on the server or the client:
* JavaScript
* TypeScript
```
import { getAllTasks, getFilteredTasks } from 'wasp/client/operations'// ...const allTasks = await getAllTasks()const doneTasks = await getFilteredTasks({ isDone: true })
```
#### The `useQuery` hook[](#the-usequery-hook ""Direct link to the-usequery-hook"")
When using Queries on the client, you can make them reactive with the `useQuery` hook. This hook comes bundled with Wasp and is a thin wrapper around the `useQuery` hook from [_react-query_](https://github.com/tannerlinsley/react-query). The only difference is that you don't need to supply the key - Wasp handles this for you automatically.
Here's an example of calling the Queries using the `useQuery` hook:
* JavaScript
* TypeScript
src/MainPage.jsx
```
import React from 'react'import { useQuery, getAllTasks, getFilteredTasks } from 'wasp/client/operations'const MainPage = () => { const { data: allTasks, error: error1 } = useQuery(getAllTasks) const { data: doneTasks, error: error2 } = useQuery(getFilteredTasks, { isDone: true, }) if (error1 !== null || error2 !== null) { return There was an error
} return (
All Tasks
{allTasks && allTasks.length > 0 ? allTasks.map((task) => ) : 'No tasks'} Finished Tasks
{doneTasks && doneTasks.length > 0 ? doneTasks.map((task) => ) : 'No finished tasks'} )}const Task = ({ description, isDone }: Task) => { return ( Description: {description}
Is done: {isDone ? 'Yes' : 'No'}
)}export default MainPage
```
For a detailed specification of the `useQuery` hook, check the [API Reference](#api-reference).
### Error Handling[](#error-handling ""Direct link to Error Handling"")
For security reasons, all exceptions thrown in the Query's NodeJS implementation are sent to the client as responses with the HTTP status code `500`, with all other details removed. Hiding error details by default helps against accidentally leaking possibly sensitive information over the network.
If you do want to pass additional error information to the client, you can construct and throw an appropriate `HttpError` in your implementation:
* JavaScript
* TypeScript
src/queries.js
```
import { HttpError } from 'wasp/server'export const getAllTasks = async (args, context) => { throw new HttpError( 403, // status code ""You can't do this!"", // message { foo: 'bar' } // data )}
```
If the status code is `4xx`, the client will receive a response object with the corresponding `message` and `data` fields, and it will rethrow the error (including these fields). To prevent information leakage, the server won't forward these fields for any other HTTP status codes.
### Using Entities in Queries[](#using-entities-in-queries ""Direct link to Using Entities in Queries"")
In most cases, resources used in Queries will be [Entities](https://wasp-lang.dev/docs/data-model/entities). To use an Entity in your Query, add it to the `query` declaration in Wasp:
* JavaScript
* TypeScript
main.wasp
```
query getAllTasks { fn: import { getAllTasks } from ""@src/queries.js"", entities: [Task]}query getFilteredTasks { fn: import { getFilteredTasks } from ""@src/queries.js"", entities: [Task]}
```
Wasp will inject the specified Entity into the Query's `context` argument, giving you access to the Entity's Prisma API:
* JavaScript
* TypeScript
src/queries.js
```
export const getAllTasks = async (args, context) => { return context.entities.Task.findMany({})}export const getFilteredTasks = async (args, context) => { return context.entities.Task.findMany({ where: { isDone: args.isDone }, })}
```
The object `context.entities.Task` exposes `prisma.task` from [Prisma's CRUD API](https://www.prisma.io/docs/reference/tools-and-interfaces/prisma-client/crud).
## API Reference[](#api-reference ""Direct link to API Reference"")
### Declaring Queries[](#declaring-queries-1 ""Direct link to Declaring Queries"")
The `query` declaration supports the following fields:
* `fn: ExtImport` required
The import statement of the Query's NodeJs implementation.
* `entities: [Entity]`
A list of entities you wish to use inside your Query. For instructions on using Entities in Queries, take a look at [the guide](#using-entities-in-queries).
#### Example[](#example ""Direct link to Example"")
* JavaScript
* TypeScript
Declaring the Query:
```
query getFoo { fn: import { getFoo } from ""@src/queries.js"" entities: [Foo]}
```
Enables you to import and use it anywhere in your code (on the server or the client):
```
import { getFoo } from 'wasp/client/operations'
```
### Implementing Queries[](#implementing-queries ""Direct link to Implementing Queries"")
The Query's implementation is a NodeJS function that takes two arguments (it can be an `async` function if you need to use the `await` keyword). Since both arguments are positional, you can name the parameters however you want, but we'll stick with `args` and `context`:
1. `args` (type depends on the Query)
An object containing the data **passed in when calling the query** (e.g., filtering conditions). Check [the usage examples](#using-queries) to see how to pass this object to the Query.
2. `context` (type depends on the Query)
An additional context object **passed into the Query by Wasp**. This object contains user session information, as well as information about entities. Check the [section about using entities in Queries](#using-entities-in-queries) to see how to use the entities field on the `context` object, or the [auth section](https://wasp-lang.dev/docs/auth/overview#using-the-contextuser-object) to see how to use the `user` object.
#### Example[](#example-1 ""Direct link to Example"")
* JavaScript
* TypeScript
The following Query:
```
query getFoo { fn: import { getFoo } from ""@src/queries.js"" entities: [Foo]}
```
Expects to find a named export `getFoo` from the file `src/queries.js`
queries.js
```
export const getFoo = (args, context) => { // implementation}
```
### The `useQuery` Hook[](#the-usequery-hook-1 ""Direct link to the-usequery-hook-1"")
Wasp's `useQuery` hook is a thin wrapper around the `useQuery` hook from [_react-query_](https://github.com/tannerlinsley/react-query). One key difference is that Wasp doesn't expect you to supply the cache key - it takes care of it under the hood.
Wasp's `useQuery` hook accepts three arguments:
* `queryFn` required
The client-side query function generated by Wasp based on a `query` declaration in your `.wasp` file.
* `queryFnArgs`
The arguments object (payload) you wish to pass into the Query. The Query's NodeJS implementation will receive this object as its first positional argument.
* `options`
A _react-query_ `options` object. Use this to change [the default behavior](https://react-query.tanstack.com/guides/important-defaults) for this particular Query. If you want to change the global defaults, you can do so in the [client setup function](https://wasp-lang.dev/docs/project/client-config#overriding-default-behaviour-for-queries).
For an example of usage, check [this section](#the-usequery-hook).",,"https://wasp-lang.dev/docs/data-model/operations/queries","We'll explain what Queries are and how to use them. If you're looking for a detailed API specification, skip ahead to the API Reference.","*","0","h3="":443""; ma=86400","max-age=600","DYNAMIC","878ecc4f6c506fbf-IAD","close","br","text/html; charset=utf-8","Tue, 23 Apr 2024 15:13:32 GMT","Tue, 23 Apr 2024 15:23:32 GMT","Thu, 18 Apr 2024 15:50:27 GMT","{""success_fraction"":0,""report_to"":""cf-nel"",""max_age"":604800}","{""endpoints"":[{""url"":""https:\/\/a.nel.cloudflare.com\/report\/v4?s=sY3A4N6B5wTsial6t7O%2BIRnQ0RwbBRRfFopg3Ywgn1XhgXMGhjsOAbcAacg%2FBvG2yPIcXJM6foGf8eFGBK5xt%2Bi90p3hNuGY3e5nY3gF1gD1yfl6yqgmsF5uOLMdLl%2BJ""}],""group"":""cf-nel"",""max_age"":604800}","cloudflare","chunked","Accept-Encoding","1.1 varnish","MISS","0","56c7e9eef9933158157c161d0a7136594ebf6885",,"BA80:1D639D:3AF6585:45FB645:6627D01B",,"MISS","cache-iad-kiad7000022-IAD","S1713885212.084205,VS0,VE22",,,"en","https://wasp-lang.dev/img/wasp_twitter_cover.png","og:image","https://wasp-lang.dev/docs/data-model/operations/queries","og:url","Queries | Wasp","og:title","We'll explain what Queries are and how to use them. If you're looking for a detailed API specification, skip ahead to the API Reference.","og:description","Queries | Wasp",,"Queries
We'll explain what Queries are and how to use them. If you're looking for a detailed API specification, skip ahead to the API Reference.
You can use Queries to fetch data from the server. They shouldn't modify the server's state. Fetching all comments on a blog post, a list of users that liked a video, information about a single product based on its ID... All of these are perfect use cases for a Query.
tip
Queries are fairly similar to Actions in terms of their API. Therefore, if you're already familiar with Actions, you might find reading the entire guide repetitive.
We instead recommend skipping ahead and only reading the differences between Queries and Actions, and consulting the API Reference as needed.
Working with Queries
You declare queries in the .wasp file and implement them using NodeJS. Wasp not only runs these queries within the server's context but also creates code that enables you to call them from any part of your codebase, whether it's on the client or server side.
This means you don't have to build an HTTP API for your query, manage server-side request handling, or even deal with client-side response handling and caching. Instead, just concentrate on implementing the business logic inside your query, and let Wasp handle the rest!
To create a Query, you must:
Declare the Query in Wasp using the query declaration.
Define the Query's NodeJS implementation.
After completing these two steps, you'll be able to use the Query from any point in your code.
Declaring Queries
To create a Query in Wasp, we begin with a query declaration.
Let's declare two Queries - one to fetch all tasks, and another to fetch tasks based on a filter, such as whether a task is done:
JavaScript
TypeScript
main.wasp
// ...
query getAllTasks {
fn: import { getAllTasks } from ""@src/queries.js""
}
query getFilteredTasks {
fn: import { getFilteredTasks } from ""@src/queries.js""
}
If you want to know about all supported options for the query declaration, take a look at the API Reference.
The names of Wasp Queries and their implementations don't need to match, but we'll keep them the same to avoid confusion.
info
You might have noticed that we told Wasp to import Query implementations that don't yet exist. Don't worry about that for now. We'll write the implementations imported from queries.ts in the next section.
It's a good idea to start with the high-level concept (i.e., the Query declaration in the Wasp file) and only then deal with the implementation details (i.e., the Query's implementation in JavaScript).
After declaring a Wasp Query, two important things happen:
Wasp generates a server-side NodeJS function that shares its name with the Query.
Wasp generates a client-side JavaScript function that shares its name with the Query (e.g., getFilteredTasks). This function takes a single optional argument - an object containing any serializable data you wish to use inside the Query. Wasp will send this object over the network and pass it into the Query's implementation as its first positional argument (more on this when we look at the implementations). Such an abstraction works thanks to an HTTP API route handler Wasp generates on the server, which calls the Query's NodeJS implementation under the hood.
Generating these two functions ensures a uniform calling interface across the entire app (both client and server).
Implementing Queries in Node
Now that we've declared the Query, what remains is to implement it. We've instructed Wasp to look for the Queries' implementations in the file src/queries.ts, so that's where we should export them from.
Here's how you might implement the previously declared Queries getAllTasks and getFilteredTasks:
JavaScript
TypeScript
src/queries.js
// our ""database""
const tasks = [
{ id: 1, description: 'Buy some eggs', isDone: true },
{ id: 2, description: 'Make an omelette', isDone: false },
{ id: 3, description: 'Eat breakfast', isDone: false },
]
// You don't need to use the arguments if you don't need them
export const getAllTasks = () => {
return tasks
}
// The 'args' object is something sent by the caller (most often from the client)
export const getFilteredTasks = (args) => {
const { isDone } = args
return tasks.filter((task) => task.isDone === isDone)
}
tip
Wasp uses superjson under the hood. This means you're not limited to only sending and receiving JSON payloads.
You can send and receive any superjson-compatible payload (like Dates, Sets, Lists, circular references, etc.) and let Wasp handle the (de)serialization.
For a detailed explanation of the Query definition API (i.e., arguments and return values), check the API Reference.
Using Queries
To use a Query, you can import it from wasp/client/operations and call it directly. As mentioned, the usage doesn't change depending on whether you're on the server or the client:
JavaScript
TypeScript
import { getAllTasks, getFilteredTasks } from 'wasp/client/operations'
// ...
const allTasks = await getAllTasks()
const doneTasks = await getFilteredTasks({ isDone: true })
The useQuery hook
When using Queries on the client, you can make them reactive with the useQuery hook. This hook comes bundled with Wasp and is a thin wrapper around the useQuery hook from react-query. The only difference is that you don't need to supply the key - Wasp handles this for you automatically.
Here's an example of calling the Queries using the useQuery hook:
JavaScript
TypeScript
src/MainPage.jsx
import React from 'react'
import { useQuery, getAllTasks, getFilteredTasks } from 'wasp/client/operations'
const MainPage = () => {
const { data: allTasks, error: error1 } = useQuery(getAllTasks)
const { data: doneTasks, error: error2 } = useQuery(getFilteredTasks, {
isDone: true,
})
if (error1 !== null || error2 !== null) {
return There was an error
}
return (
All Tasks
{allTasks && allTasks.length > 0
? allTasks.map((task) => )
: 'No tasks'}
Finished Tasks
{doneTasks && doneTasks.length > 0
? doneTasks.map((task) => )
: 'No finished tasks'}
)
}
const Task = ({ description, isDone }: Task) => {
return (
Description:
{description}
Is done:
{isDone ? 'Yes' : 'No'}
)
}
export default MainPage
For a detailed specification of the useQuery hook, check the API Reference.
Error Handling
For security reasons, all exceptions thrown in the Query's NodeJS implementation are sent to the client as responses with the HTTP status code 500, with all other details removed. Hiding error details by default helps against accidentally leaking possibly sensitive information over the network.
If you do want to pass additional error information to the client, you can construct and throw an appropriate HttpError in your implementation:
JavaScript
TypeScript
src/queries.js
import { HttpError } from 'wasp/server'
export const getAllTasks = async (args, context) => {
throw new HttpError(
403, // status code
""You can't do this!"", // message
{ foo: 'bar' } // data
)
}
If the status code is 4xx, the client will receive a response object with the corresponding message and data fields, and it will rethrow the error (including these fields). To prevent information leakage, the server won't forward these fields for any other HTTP status codes.
Using Entities in Queries
In most cases, resources used in Queries will be Entities. To use an Entity in your Query, add it to the query declaration in Wasp:
JavaScript
TypeScript
main.wasp
query getAllTasks {
fn: import { getAllTasks } from ""@src/queries.js"",
entities: [Task]
}
query getFilteredTasks {
fn: import { getFilteredTasks } from ""@src/queries.js"",
entities: [Task]
}
Wasp will inject the specified Entity into the Query's context argument, giving you access to the Entity's Prisma API:
JavaScript
TypeScript
src/queries.js
export const getAllTasks = async (args, context) => {
return context.entities.Task.findMany({})
}
export const getFilteredTasks = async (args, context) => {
return context.entities.Task.findMany({
where: { isDone: args.isDone },
})
}
The object context.entities.Task exposes prisma.task from Prisma's CRUD API.
API Reference
Declaring Queries
The query declaration supports the following fields:
fn: ExtImport required
The import statement of the Query's NodeJs implementation.
entities: [Entity]
A list of entities you wish to use inside your Query. For instructions on using Entities in Queries, take a look at the guide.
Example
JavaScript
TypeScript
Declaring the Query:
query getFoo {
fn: import { getFoo } from ""@src/queries.js""
entities: [Foo]
}
Enables you to import and use it anywhere in your code (on the server or the client):
import { getFoo } from 'wasp/client/operations'
Implementing Queries
The Query's implementation is a NodeJS function that takes two arguments (it can be an async function if you need to use the await keyword). Since both arguments are positional, you can name the parameters however you want, but we'll stick with args and context:
args (type depends on the Query)
An object containing the data passed in when calling the query (e.g., filtering conditions). Check the usage examples to see how to pass this object to the Query.
context (type depends on the Query)
An additional context object passed into the Query by Wasp. This object contains user session information, as well as information about entities. Check the section about using entities in Queries to see how to use the entities field on the context object, or the auth section to see how to use the user object.
Example
JavaScript
TypeScript
The following Query:
query getFoo {
fn: import { getFoo } from ""@src/queries.js""
entities: [Foo]
}
Expects to find a named export getFoo from the file src/queries.js
queries.js
export const getFoo = (args, context) => {
// implementation
}
The useQuery Hook
Wasp's useQuery hook is a thin wrapper around the useQuery hook from react-query. One key difference is that Wasp doesn't expect you to supply the cache key - it takes care of it under the hood.
Wasp's useQuery hook accepts three arguments:
queryFn required
The client-side query function generated by Wasp based on a query declaration in your .wasp file.
queryFnArgs
The arguments object (payload) you wish to pass into the Query. The Query's NodeJS implementation will receive this object as its first positional argument.
options
A react-query options object. Use this to change the default behavior for this particular Query. If you want to change the global defaults, you can do so in the client setup function.
For an example of usage, check this section.","https://wasp-lang.dev/docs/data-model/operations/queries"
"1",,"2024-04-23T15:13:34.996Z","https://wasp-lang.dev/docs/data-model/operations/actions","https://wasp-lang.dev/docs","http","## Actions
We'll explain what Actions are and how to use them. If you're looking for a detailed API specification, skip ahead to the [API Reference](#api-reference).
Actions are quite similar to [Queries](https://wasp-lang.dev/docs/data-model/operations/queries), but with a key distinction: Actions are designed to modify and add data, while Queries are solely for reading data. Examples of Actions include adding a comment to a blog post, liking a video, or updating a product's price.
Actions and Queries work together to keep data caches up-to-date.
tip
Actions are almost identical to Queries in terms of their API. Therefore, if you're already familiar with Queries, you might find reading the entire guide repetitive.
We instead recommend skipping ahead and only reading [the differences between Queries and Actions](#differences-between-queries-and-actions), and consulting the [API Reference](#api-reference) as needed.
## Working with Actions[](#working-with-actions ""Direct link to Working with Actions"")
Actions are declared in Wasp and implemented in NodeJS. Wasp runs Actions within the server's context, but it also generates code that allows you to call them from anywhere in your code (either client or server) using the same interface.
This means you don't have to worry about building an HTTP API for the Action, managing server-side request handling, or even dealing with client-side response handling and caching. Instead, just focus on developing the business logic inside your Action, and let Wasp handle the rest!
To create an Action, you need to:
1. Declare the Action in Wasp using the `action` declaration.
2. Implement the Action's NodeJS functionality.
Once these two steps are completed, you can use the Action from anywhere in your code.
### Declaring Actions[](#declaring-actions ""Direct link to Declaring Actions"")
To create an Action in Wasp, we begin with an `action` declaration. Let's declare two Actions - one for creating a task, and another for marking tasks as done:
* JavaScript
* TypeScript
main.wasp
```
// ...action createTask { fn: import { createTask } from ""@src/actions.js""}action markTaskAsDone { fn: import { markTaskAsDone } from ""@src/actions.js""}
```
If you want to know about all supported options for the `action` declaration, take a look at the [API Reference](#api-reference).
The names of Wasp Actions and their implementations don't necessarily have to match. However, to avoid confusion, we'll keep them the same.
tip
Wasp uses [superjson](https://github.com/blitz-js/superjson) under the hood. This means you're not limited to only sending and receiving JSON payloads.
You can send and receive any superjson-compatible payload (like Dates, Sets, Lists, circular references, etc.) and let Wasp handle the (de)serialization.
After declaring a Wasp Action, two important things happen:
* Wasp **generates a server-side NodeJS function** that shares its name with the Action.
* Wasp **generates a client-side JavaScript function** that shares its name with the Action (e.g., `markTaskAsDone`). This function takes a single optional argument - an object containing any serializable data you wish to use inside the Action. Wasp will send this object over the network and pass it into the Action's implementation as its first positional argument (more on this when we look at the implementations). Such an abstraction works thanks to an HTTP API route handler Wasp generates on the server, which calls the Action's NodeJS implementation under the hood.
Generating these two functions ensures a uniform calling interface across the entire app (both client and server).
### Implementing Actions in Node[](#implementing-actions-in-node ""Direct link to Implementing Actions in Node"")
Now that we've declared the Action, what remains is to implement it. We've instructed Wasp to look for the Actions' implementations in the file `src/actions.ts`, so that's where we should export them from.
Here's how you might implement the previously declared Actions `createTask` and `markTaskAsDone`:
* JavaScript
* TypeScript
src/actions.js
```
// our ""database""let nextId = 4const tasks = [ { id: 1, description: 'Buy some eggs', isDone: true }, { id: 2, description: 'Make an omelette', isDone: false }, { id: 3, description: 'Eat breakfast', isDone: false },]// You don't need to use the arguments if you don't need themexport const createTask = (args) => { const newTask = { id: nextId, isDone: false, description: args.description, } nextId += 1 tasks.push(newTask) return newTask}// The 'args' object is something sent by the caller (most often from the client)export const markTaskAsDone = (args) => { const task = tasks.find((task) => task.id === args.id) if (!task) { // We'll show how to properly handle such errors later return } task.isDone = true}
```
tip
Wasp uses [superjson](https://github.com/blitz-js/superjson) under the hood. This means you're not limited to only sending and receiving JSON payloads.
You can send and receive any superjson-compatible payload (like Dates, Sets, Lists, circular references, etc.) and let Wasp handle the (de)serialization.
For a detailed explanation of the Action definition API (i.e., arguments and return values), check the [API Reference](#api-reference).
### Using Actions[](#using-actions ""Direct link to Using Actions"")
To use an Action, you can import it from `wasp/client/operations` and call it directly. As mentioned, the usage doesn't change depending on whether you're on the server or the client:
* JavaScript
* TypeScript
```
import { createTask, markTasAsDone } from 'wasp/client/operations'// ...const newTask = await createTask({ description: 'Learn TypeScript' })await markTasAsDone({ id: 1 })
```
When using Actions on the client, you'll most likely want to use them inside a component:
* JavaScript
* TypeScript
src/pages/Task.jsx
```
import React from 'react'import { useQuery, getTask, markTaskAsDone } from 'wasp/client/operations'export const TaskPage = ({ id }) => { const { data: task } = useQuery(getTask, { id }) if (!task) { return ""Loading""
} const { description, isDone } = task return ( Description: {description}
Is done: {isDone ? 'Yes' : 'No'}
{isDone || (
)}
)}
```
Since Actions don't require reactivity, they are safe to use inside components without a hook. Still, Wasp provides comes with the `useAction` hook you can use to enhance actions. Read all about it in the [API Reference](#api-reference).
### Error Handling[](#error-handling ""Direct link to Error Handling"")
For security reasons, all exceptions thrown in the Action's NodeJS implementation are sent to the client as responses with the HTTP status code `500`, with all other details removed. Hiding error details by default helps against accidentally leaking possibly sensitive information over the network.
If you do want to pass additional error information to the client, you can construct and throw an appropriate `HttpError` in your implementation:
* JavaScript
* TypeScript
src/actions.js
```
import { HttpError } from 'wasp/server'export const createTask = async (args, context) => { throw new HttpError( 403, // status code ""You can't do this!"", // message { foo: 'bar' } // data )}
```
### Using Entities in Actions[](#using-entities-in-actions ""Direct link to Using Entities in Actions"")
In most cases, resources used in Actions will be [Entities](https://wasp-lang.dev/docs/data-model/entities). To use an Entity in your Action, add it to the `action` declaration in Wasp:
* JavaScript
* TypeScript
main.wasp
```
action createTask { fn: import { createTask } from ""@src/actions.js"", entities: [Task]}action markTaskAsDone { fn: import { markTaskAsDone } from ""@src/actions.js"", entities: [Task]}
```
Wasp will inject the specified Entity into the Action's `context` argument, giving you access to the Entity's Prisma API. Wasp invalidates frontend Query caches by looking at the Entities used by each Action/Query. Read more about Wasp's smart cache invalidation [here](#cache-invalidation).
* JavaScript
* TypeScript
src/actions.js
```
// The 'args' object is the payload sent by the caller (most often from the client)export const createTask = async (args, context) => { const newTask = await context.entities.Task.create({ data: { description: args.description, isDone: false, }, }) return newTask}export const markTaskAsDone = async (args, context) => { await context.entities.Task.update({ where: { id: args.id }, data: { isDone: true }, })}
```
The object `context.entities.Task` exposes `prisma.task` from [Prisma's CRUD API](https://www.prisma.io/docs/reference/tools-and-interfaces/prisma-client/crud).
## Cache Invalidation[](#cache-invalidation ""Direct link to Cache Invalidation"")
One of the trickiest parts of managing a web app's state is making sure the data returned by the Queries is up to date. Since Wasp uses _react-query_ for Query management, we must make sure to invalidate Queries (more specifically, their cached results managed by _react-query_) whenever they become stale.
It's possible to invalidate the caches manually through several mechanisms _react-query_ provides (e.g., refetch, direct invalidation). However, since manual cache invalidation quickly becomes complex and error-prone, Wasp offers a faster and a more effective solution to get you started: **automatic Entity-based Query cache invalidation**. Because Actions can (and most often do) modify the state while Queries read it, Wasp invalidates a Query's cache whenever an Action that uses the same Entity is executed.
For example, if the Action `createTask` and Query `getTasks` both use the Entity `Task`, executing `createTask` may cause the cached result of `getTasks` to become outdated. In response, Wasp will invalidate it, causing `getTasks` to refetch data from the server and update it.
In practice, this means that Wasp keeps the Queries ""fresh"" without requiring you to think about cache invalidation.
On the other hand, this kind of automatic cache invalidation can become wasteful (some updates might not be necessary) and will only work for Entities. If that's an issue, you can use the mechanisms provided by _react-query_ for now, and expect more direct support in Wasp for handling those use cases in a nice, elegant way.
If you wish to optimistically set cache values after performing an Action, you can do so using [optimistic updates](https://stackoverflow.com/a/33009713). Configure them using Wasp's [useAction hook](#the-useaction-hook-and-optimistic-updates). This is currently the only manual cache invalidation mechanism Wasps supports natively. For everything else, you can always rely on _react-query_.
## Differences Between Queries and Actions[](#differences-between-queries-and-actions ""Direct link to Differences Between Queries and Actions"")
Actions and Queries are two closely related concepts in Wasp. They might seem to perform similar tasks, but Wasp treats them differently, and each concept represents a different thing.
Here are the key differences between Queries and Actions:
1. Actions can (and often should) modify the server's state, while Queries are only permitted to read it. Wasp relies on you adhering to this convention when performing cache invalidations, so it's crucial to follow it.
2. Actions don't need to be reactive, so you can call them directly. However, Wasp does provide a [`useAction` React hook](#the-useaction-hook-and-optimistic-updates) for adding extra behavior to the Action (like optimistic updates).
3. `action` declarations in Wasp are mostly identical to `query` declarations. The only difference lies in the declaration's name.
## API Reference[](#api-reference ""Direct link to API Reference"")
### Declaring Actions in Wasp[](#declaring-actions-in-wasp ""Direct link to Declaring Actions in Wasp"")
The `action` declaration supports the following fields:
* `fn: ExtImport` required
The import statement of the Action's NodeJs implementation.
* `entities: [Entity]`
A list of entities you wish to use inside your Action. For instructions on using Entities in Actions, take a look at [the guide](#using-entities-in-actions).
#### Example[](#example ""Direct link to Example"")
* JavaScript
* TypeScript
Declaring the Action:
```
query createFoo { fn: import { createFoo } from ""@src/actions.js"" entities: [Foo]}
```
Enables you to import and use it anywhere in your code (on the server or the client):
```
import { createFoo } from 'wasp/client/operations'
```
### Implementing Actions[](#implementing-actions ""Direct link to Implementing Actions"")
The Action's implementation is a NodeJS function that takes two arguments (it can be an `async` function if you need to use the `await` keyword). Since both arguments are positional, you can name the parameters however you want, but we'll stick with `args` and `context`:
1. `args` (type depends on the Action)
An object containing the data **passed in when calling the Action** (e.g., filtering conditions). Check [the usage examples](#using-actions) to see how to pass this object to the Action.
2. `context` (type depends on the Action)
An additional context object **passed into the Action by Wasp**. This object contains user session information, as well as information about entities. Check the [section about using entities in Actions](#using-entities-in-actions) to see how to use the entities field on the `context` object, or the [auth section](https://wasp-lang.dev/docs/auth/overview#using-the-contextuser-object) to see how to use the `user` object.
#### Example[](#example-1 ""Direct link to Example"")
* JavaScript
* TypeScript
The following Action:
```
action createFoo { fn: import { createFoo } from ""@src/actions.js"" entities: [Foo]}
```
Expects to find a named export `createfoo` from the file `src/actions.js`
actions.js
```
export const createFoo = (args, context) => { // implementation}
```
### The `useAction` Hook and Optimistic Updates[](#the-useaction-hook-and-optimistic-updates ""Direct link to the-useaction-hook-and-optimistic-updates"")
Make sure you understand how [Queries](https://wasp-lang.dev/docs/data-model/operations/queries) and [Cache Invalidation](#cache-invalidation) work before reading this chapter.
When using Actions in components, you can enhance them with the help of the `useAction` hook. This hook comes bundled with Wasp, and is used for decorating Wasp Actions. In other words, the hook returns a function whose API matches the original Action while also doing something extra under the hood (depending on how you configure it).
The `useAction` hook accepts two arguments:
* `actionFn` required
The Wasp Action (i.e., the client-side Action function generated by Wasp based on a Action declaration) you wish to enhance.
* `actionOptions`
An object configuring the extra features you want to add to the given Action. While this argument is technically optional, there is no point in using the `useAction` hook without providing it (it would be the same as using the Action directly). The Action options object supports the following fields:
* `optimisticUpdates`
An array of objects where each object defines an [optimistic update](https://stackoverflow.com/a/33009713) to perform on the Query cache. To define an optimistic update, you must specify the following properties:
* `getQuerySpecifier` required
A function returning the Query specifier (i.e., a value used to address the Query you want to update). A Query specifier is an array specifying the query function and arguments. For example, to optimistically update the Query used with `useQuery(fetchFilteredTasks, {isDone: true }]`, your `getQuerySpecifier` function would have to return the array `[fetchFilteredTasks, { isDone: true}]`. Wasp will forward the argument you pass into the decorated Action to this function (i.e., you can use the properties of the added/changed item to address the Query).
* `updateQuery` required
The function used to perform the optimistic update. It should return the desired state of the cache. Wasp will call it with the following arguments:
* `item` - The argument you pass into the decorated Action.
* `oldData` - The currently cached value for the Query identified by the specifier.
caution
The `updateQuery` function must be a pure function. It must return the desired cache value identified by the `getQuerySpecifier` function and _must not_ perform any side effects.
Also, make sure you only update the Query caches affected by your Action causing the optimistic update (Wasp cannot yet verify this).
Finally, your implementation of the `updateQuery` function should work correctly regardless of the state of `oldData` (e.g., don't rely on array positioning). If you need to do something else during your optimistic update, you can directly use _react-query_'s lower-level API (read more about it [here](#advanced-usage)).
Here's an example showing how to configure the Action `markTaskAsDone` that toggles a task's `isDone` status to perform an optimistic update:
* JavaScript
* TypeScript
src/pages/Task.jsx
```
import React from 'react'import { useQuery, useAction, getTask, markTaskAsDone,} from 'wasp/client/operations'const TaskPage = ({ id }) => { const { data: task } = useQuery(getTask, { id }) const markTaskAsDoneOptimistically = useAction(markTaskAsDone, { optimisticUpdates: [ { getQuerySpecifier: ({ id }) => [getTask, { id }], updateQuery: (_payload, oldData) => ({ ...oldData, isDone: true }), }, ], }) if (!task) { return ""Loading""
} const { description, isDone } = task return ( Description: {description}
Is done: {isDone ? 'Yes' : 'No'}
{isDone || (
)}
)}export default TaskPage
```
#### Advanced usage[](#advanced-usage ""Direct link to Advanced usage"")
The `useAction` hook currently only supports specifying optimistic updates. You can expect more features in future versions of Wasp.
Wasp's optimistic update API is deliberately small and focuses exclusively on updating Query caches (as that's the most common use case). You might need an API that offers more options or a higher level of control. If that's the case, instead of using Wasp's `useAction` hook, you can use _react-query_'s `useMutation` hook and directly work with [their low-level API](https://tanstack.com/query/v4/docs/guides/optimistic-updates?from=reactQueryV3&original=https://react-query-v3.tanstack.com/guides/optimistic-updates).
If you decide to use _react-query_'s API directly, you will need access to Query cache key. Wasp internally uses this key but abstracts it from the programmer. Still, you can easily obtain it by accessing the `queryCacheKey` property on any Query:
* JavaScript
* TypeScript
```
import { getTasks } from 'wasp/client/operations'const queryKey = getTasks.queryCacheKey
```",,"https://wasp-lang.dev/docs/data-model/operations/actions","We'll explain what Actions are and how to use them. If you're looking for a detailed API specification, skip ahead to the API Reference.","*","0","h3="":443""; ma=86400","max-age=600","DYNAMIC","878ecc612ea21fe3-IAD","close","br","text/html; charset=utf-8","Tue, 23 Apr 2024 15:13:34 GMT","Tue, 23 Apr 2024 15:23:34 GMT","Thu, 18 Apr 2024 15:50:27 GMT","{""success_fraction"":0,""report_to"":""cf-nel"",""max_age"":604800}","{""endpoints"":[{""url"":""https:\/\/a.nel.cloudflare.com\/report\/v4?s=MwABETvOkWiWPLZHD1PsIe%2FCgjfxbZhuIaWG%2BOw3NJkuLvji7pKZCjj0CcuXDAY6tWZ7BvUF3x9HOpBDtA2CmpTe%2BlXTm4u46Ji5e7%2FIFlm%2FhkgwJtIPFvuaRYr1t2W5""}],""group"":""cf-nel"",""max_age"":604800}","cloudflare","chunked","Accept-Encoding","1.1 varnish","MISS","0","14bbf138af3b3ca7341cfc0f015adbcf7776bf7f",,"93B4:1FE0FF:3C069EC:470BA47:6627D01D","HIT","MISS","cache-iad-kiad7000064-IAD","S1713885215.932191,VS0,VE11",,,"en","https://wasp-lang.dev/img/wasp_twitter_cover.png","og:image","https://wasp-lang.dev/docs/data-model/operations/actions","og:url","Actions | Wasp","og:title","We'll explain what Actions are and how to use them. If you're looking for a detailed API specification, skip ahead to the API Reference.","og:description","Actions | Wasp",,"Actions
We'll explain what Actions are and how to use them. If you're looking for a detailed API specification, skip ahead to the API Reference.
Actions are quite similar to Queries, but with a key distinction: Actions are designed to modify and add data, while Queries are solely for reading data. Examples of Actions include adding a comment to a blog post, liking a video, or updating a product's price.
Actions and Queries work together to keep data caches up-to-date.
tip
Actions are almost identical to Queries in terms of their API. Therefore, if you're already familiar with Queries, you might find reading the entire guide repetitive.
We instead recommend skipping ahead and only reading the differences between Queries and Actions, and consulting the API Reference as needed.
Working with Actions
Actions are declared in Wasp and implemented in NodeJS. Wasp runs Actions within the server's context, but it also generates code that allows you to call them from anywhere in your code (either client or server) using the same interface.
This means you don't have to worry about building an HTTP API for the Action, managing server-side request handling, or even dealing with client-side response handling and caching. Instead, just focus on developing the business logic inside your Action, and let Wasp handle the rest!
To create an Action, you need to:
Declare the Action in Wasp using the action declaration.
Implement the Action's NodeJS functionality.
Once these two steps are completed, you can use the Action from anywhere in your code.
Declaring Actions
To create an Action in Wasp, we begin with an action declaration. Let's declare two Actions - one for creating a task, and another for marking tasks as done:
JavaScript
TypeScript
main.wasp
// ...
action createTask {
fn: import { createTask } from ""@src/actions.js""
}
action markTaskAsDone {
fn: import { markTaskAsDone } from ""@src/actions.js""
}
If you want to know about all supported options for the action declaration, take a look at the API Reference.
The names of Wasp Actions and their implementations don't necessarily have to match. However, to avoid confusion, we'll keep them the same.
tip
Wasp uses superjson under the hood. This means you're not limited to only sending and receiving JSON payloads.
You can send and receive any superjson-compatible payload (like Dates, Sets, Lists, circular references, etc.) and let Wasp handle the (de)serialization.
After declaring a Wasp Action, two important things happen:
Wasp generates a server-side NodeJS function that shares its name with the Action.
Wasp generates a client-side JavaScript function that shares its name with the Action (e.g., markTaskAsDone). This function takes a single optional argument - an object containing any serializable data you wish to use inside the Action. Wasp will send this object over the network and pass it into the Action's implementation as its first positional argument (more on this when we look at the implementations). Such an abstraction works thanks to an HTTP API route handler Wasp generates on the server, which calls the Action's NodeJS implementation under the hood.
Generating these two functions ensures a uniform calling interface across the entire app (both client and server).
Implementing Actions in Node
Now that we've declared the Action, what remains is to implement it. We've instructed Wasp to look for the Actions' implementations in the file src/actions.ts, so that's where we should export them from.
Here's how you might implement the previously declared Actions createTask and markTaskAsDone:
JavaScript
TypeScript
src/actions.js
// our ""database""
let nextId = 4
const tasks = [
{ id: 1, description: 'Buy some eggs', isDone: true },
{ id: 2, description: 'Make an omelette', isDone: false },
{ id: 3, description: 'Eat breakfast', isDone: false },
]
// You don't need to use the arguments if you don't need them
export const createTask = (args) => {
const newTask = {
id: nextId,
isDone: false,
description: args.description,
}
nextId += 1
tasks.push(newTask)
return newTask
}
// The 'args' object is something sent by the caller (most often from the client)
export const markTaskAsDone = (args) => {
const task = tasks.find((task) => task.id === args.id)
if (!task) {
// We'll show how to properly handle such errors later
return
}
task.isDone = true
}
tip
Wasp uses superjson under the hood. This means you're not limited to only sending and receiving JSON payloads.
You can send and receive any superjson-compatible payload (like Dates, Sets, Lists, circular references, etc.) and let Wasp handle the (de)serialization.
For a detailed explanation of the Action definition API (i.e., arguments and return values), check the API Reference.
Using Actions
To use an Action, you can import it from wasp/client/operations and call it directly. As mentioned, the usage doesn't change depending on whether you're on the server or the client:
JavaScript
TypeScript
import { createTask, markTasAsDone } from 'wasp/client/operations'
// ...
const newTask = await createTask({ description: 'Learn TypeScript' })
await markTasAsDone({ id: 1 })
When using Actions on the client, you'll most likely want to use them inside a component:
JavaScript
TypeScript
src/pages/Task.jsx
import React from 'react'
import { useQuery, getTask, markTaskAsDone } from 'wasp/client/operations'
export const TaskPage = ({ id }) => {
const { data: task } = useQuery(getTask, { id })
if (!task) {
return ""Loading""
}
const { description, isDone } = task
return (
Description:
{description}
Is done:
{isDone ? 'Yes' : 'No'}
{isDone || (
)}
)
}
Since Actions don't require reactivity, they are safe to use inside components without a hook. Still, Wasp provides comes with the useAction hook you can use to enhance actions. Read all about it in the API Reference.
Error Handling
For security reasons, all exceptions thrown in the Action's NodeJS implementation are sent to the client as responses with the HTTP status code 500, with all other details removed. Hiding error details by default helps against accidentally leaking possibly sensitive information over the network.
If you do want to pass additional error information to the client, you can construct and throw an appropriate HttpError in your implementation:
JavaScript
TypeScript
src/actions.js
import { HttpError } from 'wasp/server'
export const createTask = async (args, context) => {
throw new HttpError(
403, // status code
""You can't do this!"", // message
{ foo: 'bar' } // data
)
}
Using Entities in Actions
In most cases, resources used in Actions will be Entities. To use an Entity in your Action, add it to the action declaration in Wasp:
JavaScript
TypeScript
main.wasp
action createTask {
fn: import { createTask } from ""@src/actions.js"",
entities: [Task]
}
action markTaskAsDone {
fn: import { markTaskAsDone } from ""@src/actions.js"",
entities: [Task]
}
Wasp will inject the specified Entity into the Action's context argument, giving you access to the Entity's Prisma API. Wasp invalidates frontend Query caches by looking at the Entities used by each Action/Query. Read more about Wasp's smart cache invalidation here.
JavaScript
TypeScript
src/actions.js
// The 'args' object is the payload sent by the caller (most often from the client)
export const createTask = async (args, context) => {
const newTask = await context.entities.Task.create({
data: {
description: args.description,
isDone: false,
},
})
return newTask
}
export const markTaskAsDone = async (args, context) => {
await context.entities.Task.update({
where: { id: args.id },
data: { isDone: true },
})
}
The object context.entities.Task exposes prisma.task from Prisma's CRUD API.
Cache Invalidation
One of the trickiest parts of managing a web app's state is making sure the data returned by the Queries is up to date. Since Wasp uses react-query for Query management, we must make sure to invalidate Queries (more specifically, their cached results managed by react-query) whenever they become stale.
It's possible to invalidate the caches manually through several mechanisms react-query provides (e.g., refetch, direct invalidation). However, since manual cache invalidation quickly becomes complex and error-prone, Wasp offers a faster and a more effective solution to get you started: automatic Entity-based Query cache invalidation. Because Actions can (and most often do) modify the state while Queries read it, Wasp invalidates a Query's cache whenever an Action that uses the same Entity is executed.
For example, if the Action createTask and Query getTasks both use the Entity Task, executing createTask may cause the cached result of getTasks to become outdated. In response, Wasp will invalidate it, causing getTasks to refetch data from the server and update it.
In practice, this means that Wasp keeps the Queries ""fresh"" without requiring you to think about cache invalidation.
On the other hand, this kind of automatic cache invalidation can become wasteful (some updates might not be necessary) and will only work for Entities. If that's an issue, you can use the mechanisms provided by react-query for now, and expect more direct support in Wasp for handling those use cases in a nice, elegant way.
If you wish to optimistically set cache values after performing an Action, you can do so using optimistic updates. Configure them using Wasp's useAction hook. This is currently the only manual cache invalidation mechanism Wasps supports natively. For everything else, you can always rely on react-query.
Differences Between Queries and Actions
Actions and Queries are two closely related concepts in Wasp. They might seem to perform similar tasks, but Wasp treats them differently, and each concept represents a different thing.
Here are the key differences between Queries and Actions:
Actions can (and often should) modify the server's state, while Queries are only permitted to read it. Wasp relies on you adhering to this convention when performing cache invalidations, so it's crucial to follow it.
Actions don't need to be reactive, so you can call them directly. However, Wasp does provide a useAction React hook for adding extra behavior to the Action (like optimistic updates).
action declarations in Wasp are mostly identical to query declarations. The only difference lies in the declaration's name.
API Reference
Declaring Actions in Wasp
The action declaration supports the following fields:
fn: ExtImport required
The import statement of the Action's NodeJs implementation.
entities: [Entity]
A list of entities you wish to use inside your Action. For instructions on using Entities in Actions, take a look at the guide.
Example
JavaScript
TypeScript
Declaring the Action:
query createFoo {
fn: import { createFoo } from ""@src/actions.js""
entities: [Foo]
}
Enables you to import and use it anywhere in your code (on the server or the client):
import { createFoo } from 'wasp/client/operations'
Implementing Actions
The Action's implementation is a NodeJS function that takes two arguments (it can be an async function if you need to use the await keyword). Since both arguments are positional, you can name the parameters however you want, but we'll stick with args and context:
args (type depends on the Action)
An object containing the data passed in when calling the Action (e.g., filtering conditions). Check the usage examples to see how to pass this object to the Action.
context (type depends on the Action)
An additional context object passed into the Action by Wasp. This object contains user session information, as well as information about entities. Check the section about using entities in Actions to see how to use the entities field on the context object, or the auth section to see how to use the user object.
Example
JavaScript
TypeScript
The following Action:
action createFoo {
fn: import { createFoo } from ""@src/actions.js""
entities: [Foo]
}
Expects to find a named export createfoo from the file src/actions.js
actions.js
export const createFoo = (args, context) => {
// implementation
}
The useAction Hook and Optimistic Updates
Make sure you understand how Queries and Cache Invalidation work before reading this chapter.
When using Actions in components, you can enhance them with the help of the useAction hook. This hook comes bundled with Wasp, and is used for decorating Wasp Actions. In other words, the hook returns a function whose API matches the original Action while also doing something extra under the hood (depending on how you configure it).
The useAction hook accepts two arguments:
actionFn required
The Wasp Action (i.e., the client-side Action function generated by Wasp based on a Action declaration) you wish to enhance.
actionOptions
An object configuring the extra features you want to add to the given Action. While this argument is technically optional, there is no point in using the useAction hook without providing it (it would be the same as using the Action directly). The Action options object supports the following fields:
optimisticUpdates
An array of objects where each object defines an optimistic update to perform on the Query cache. To define an optimistic update, you must specify the following properties:
getQuerySpecifier required
A function returning the Query specifier (i.e., a value used to address the Query you want to update). A Query specifier is an array specifying the query function and arguments. For example, to optimistically update the Query used with useQuery(fetchFilteredTasks, {isDone: true }], your getQuerySpecifier function would have to return the array [fetchFilteredTasks, { isDone: true}]. Wasp will forward the argument you pass into the decorated Action to this function (i.e., you can use the properties of the added/changed item to address the Query).
updateQuery required
The function used to perform the optimistic update. It should return the desired state of the cache. Wasp will call it with the following arguments:
item - The argument you pass into the decorated Action.
oldData - The currently cached value for the Query identified by the specifier.
caution
The updateQuery function must be a pure function. It must return the desired cache value identified by the getQuerySpecifier function and must not perform any side effects.
Also, make sure you only update the Query caches affected by your Action causing the optimistic update (Wasp cannot yet verify this).
Finally, your implementation of the updateQuery function should work correctly regardless of the state of oldData (e.g., don't rely on array positioning). If you need to do something else during your optimistic update, you can directly use react-query's lower-level API (read more about it here).
Here's an example showing how to configure the Action markTaskAsDone that toggles a task's isDone status to perform an optimistic update:
JavaScript
TypeScript
src/pages/Task.jsx
import React from 'react'
import {
useQuery,
useAction,
getTask,
markTaskAsDone,
} from 'wasp/client/operations'
const TaskPage = ({ id }) => {
const { data: task } = useQuery(getTask, { id })
const markTaskAsDoneOptimistically = useAction(markTaskAsDone, {
optimisticUpdates: [
{
getQuerySpecifier: ({ id }) => [getTask, { id }],
updateQuery: (_payload, oldData) => ({ ...oldData, isDone: true }),
},
],
})
if (!task) {
return ""Loading""
}
const { description, isDone } = task
return (
Description:
{description}
Is done:
{isDone ? 'Yes' : 'No'}
{isDone || (
)}
)
}
export default TaskPage
Advanced usage
The useAction hook currently only supports specifying optimistic updates. You can expect more features in future versions of Wasp.
Wasp's optimistic update API is deliberately small and focuses exclusively on updating Query caches (as that's the most common use case). You might need an API that offers more options or a higher level of control. If that's the case, instead of using Wasp's useAction hook, you can use react-query's useMutation hook and directly work with their low-level API.
If you decide to use react-query's API directly, you will need access to Query cache key. Wasp internally uses this key but abstracts it from the programmer. Still, you can easily obtain it by accessing the queryCacheKey property on any Query:
JavaScript
TypeScript
import { getTasks } from 'wasp/client/operations'
const queryKey = getTasks.queryCacheKey","https://wasp-lang.dev/docs/data-model/operations/actions"
"1",,"2024-04-23T15:13:37.700Z","https://wasp-lang.dev/docs/data-model/crud","https://wasp-lang.dev/docs","http","## Automatic CRUD
If you have a lot of experience writing full-stack apps, you probably ended up doing some of the same things many times: listing data, adding data, editing it, and deleting it.
Wasp makes handling these boring bits easy by offering a higher-level concept called Automatic CRUD.
With a single declaration, you can tell Wasp to automatically generate server-side logic (i.e., Queries and Actions) for creating, reading, updating and deleting [Entities](https://wasp-lang.dev/docs/data-model/entities). As you update definitions for your Entities, Wasp automatically regenerates the backend logic.
Early preview
This feature is currently in early preview and we are actively working on it. Read more about [our plans](#future-of-crud-operations-in-wasp) for CRUD operations.
## Overview[](#overview ""Direct link to Overview"")
Imagine we have a `Task` entity and we want to enable CRUD operations for it.
main.wasp
```
entity Task {=psl id Int @id @default(autoincrement()) description String isDone Booleanpsl=}
```
We can then define a new `crud` called `Tasks`.
We specify to use the `Task` entity and we enable the `getAll`, `get`, `create` and `update` operations (let's say we don't need the `delete` operation).
main.wasp
```
crud Tasks { entity: Task, operations: { getAll: { isPublic: true, // by default only logged in users can perform operations }, get: {}, create: { overrideFn: import { createTask } from ""@src/tasks.js"", }, update: {}, },}
```
1. It uses default implementation for `getAll`, `get`, and `update`,
2. ... while specifying a custom implementation for `create`.
3. `getAll` will be public (no auth needed), while the rest of the operations will be private.
Here's what it looks like when visualized:

Visualization of the Tasks crud declaration
We can now use the CRUD queries and actions we just specified in our client code.
Keep reading for an example of Automatic CRUD in action, or skip ahead for the [API Reference](#api-reference)
## Example: A Simple TODO App[](#example-a-simple-todo-app ""Direct link to Example: A Simple TODO App"")
Let's create a full-app example that uses automatic CRUD. We'll stick to using the `Task` entity from the previous example, but we'll add a `User` entity and enable [username and password](https://wasp-lang.dev/docs/auth/username-and-pass) based auth.
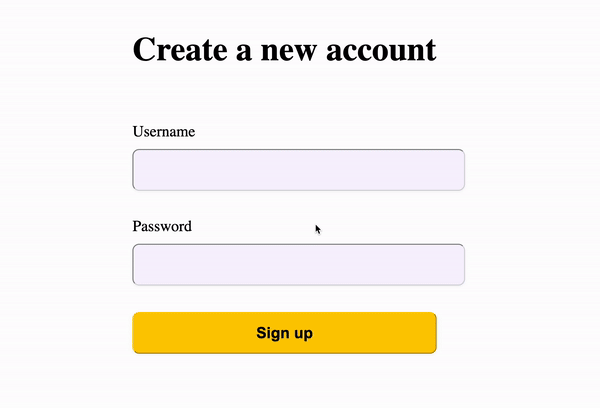
We are building a simple tasks app with username based auth
### Creating the App[](#creating-the-app ""Direct link to Creating the App"")
We can start by running `wasp new tasksCrudApp` and then adding the following to the `main.wasp` file:
main.wasp
```
app tasksCrudApp { wasp: { version: ""^0.13.0"" }, title: ""Tasks Crud App"", // We enabled auth and set the auth method to username and password auth: { userEntity: User, methods: { usernameAndPassword: {}, }, onAuthFailedRedirectTo: ""/login"", },}entity User {=psl id Int @id @default(autoincrement()) tasks Task[]psl=}// We defined a Task entity on which we'll enable CRUD later onentity Task {=psl id Int @id @default(autoincrement()) description String isDone Boolean userId Int user User @relation(fields: [userId], references: [id])psl=}// Tasks app routesroute RootRoute { path: ""/"", to: MainPage }page MainPage { component: import { MainPage } from ""@src/MainPage.jsx"", authRequired: true,}route LoginRoute { path: ""/login"", to: LoginPage }page LoginPage { component: import { LoginPage } from ""@src/LoginPage.jsx"",}route SignupRoute { path: ""/signup"", to: SignupPage }page SignupPage { component: import { SignupPage } from ""@src/SignupPage.jsx"",}
```
We can then run `wasp db migrate-dev` to create the database and run the migrations.
### Adding CRUD to the `Task` Entity ✨[](#adding-crud-to-the-task-entity- ""Direct link to adding-crud-to-the-task-entity-"")
Let's add the following `crud` declaration to our `main.wasp` file:
main.wasp
```
// ...crud Tasks { entity: Task, operations: { getAll: {}, create: { overrideFn: import { createTask } from ""@src/tasks.js"", }, },}
```
You'll notice that we enabled only `getAll` and `create` operations. This means that only these operations will be available.
We also overrode the `create` operation with a custom implementation. This means that the `create` operation will not be generated, but instead, the `createTask` function from `@src/tasks.js` will be used.
### Our Custom `create` Operation[](#our-custom-create-operation ""Direct link to our-custom-create-operation"")
Here's the `src/tasks.ts` file:
* JavaScript
* TypeScript
src/tasks.js
```
import { HttpError } from 'wasp/server'export const createTask = async (args, context) => { if (!context.user) { throw new HttpError(401, 'User not authenticated.') } const { description, isDone } = args const { Task } = context.entities return await Task.create({ data: { description, isDone, // Connect the task to the user that is creating it user: { connect: { id: context.user.id, }, }, }, })}
```
We made a custom `create` operation because we want to make sure that the task is connected to the user that is creating it. Automatic CRUD doesn't support this by default (yet!). Read more about the default implementations [here](#declaring-a-crud-with-default-options).
### Using the Generated CRUD Operations on the Client[](#using-the-generated-crud-operations-on-the-client ""Direct link to Using the Generated CRUD Operations on the Client"")
And let's use the generated operations in our client code:
* JavaScript
* TypeScript
src/MainPage.jsx
```
import { Tasks } from 'wasp/client/crud'import { useState } from 'react'export const MainPage = () => { const { data: tasks, isLoading, error } = Tasks.getAll.useQuery() const createTask = Tasks.create.useAction() const [taskDescription, setTaskDescription] = useState('') function handleCreateTask() { createTask({ description: taskDescription, isDone: false }) setTaskDescription('') } if (isLoading) return Loading...
if (error) return Error: {error.message}
return ( )}
```
And here are the login and signup pages, where we are using Wasp's [Auth UI](https://wasp-lang.dev/docs/auth/ui) components:
* JavaScript
* TypeScript
src/LoginPage.jsx
```
import { LoginForm } from 'wasp/client/auth'import { Link } from 'react-router-dom'export function LoginPage() { return ( )}
```
* JavaScript
* TypeScript
src/SignupPage.jsx
```
import { SignupForm } from 'wasp/client/auth'export function SignupPage() { return (
)}
```
That's it. You can now run `wasp start` and see the app in action. ⚡️
You should see a login page and a signup page. After you log in, you should see a page with a list of tasks and a form to create new tasks.
## Future of CRUD Operations in Wasp[](#future-of-crud-operations-in-wasp ""Direct link to Future of CRUD Operations in Wasp"")
CRUD operations currently have a limited set of knowledge about the business logic they are implementing.
* For example, they don't know that a task should be connected to the user that is creating it. This is why we had to override the `create` operation in the example above.
* Another thing: they are not aware of the authorization rules. For example, they don't know that a user should not be able to create a task for another user. In the future, we will be adding role-based authorization to Wasp, and we plan to make CRUD operations aware of the authorization rules.
* Another issue is input validation and sanitization. For example, we might want to make sure that the task description is not empty.
CRUD operations are a mechanism for getting a backend up and running quickly, but it depends on the information it can get from the Wasp app. The more information that it can pick up from your app, the more powerful it will be out of the box.
We plan on supporting CRUD operations and growing them to become the easiest way to create your backend. Follow along on [this GitHub issue](https://github.com/wasp-lang/wasp/issues/1253) to see how we are doing.
## API Reference[](#api-reference ""Direct link to API Reference"")
CRUD declaration work on top of existing entity declaration. We'll fully explore the API using two examples:
1. A basic CRUD declaration that relies on default options.
2. A more involved CRUD declaration that uses extra options and overrides.
### Declaring a CRUD With Default Options[](#declaring-a-crud-with-default-options ""Direct link to Declaring a CRUD With Default Options"")
If we create CRUD operations for an entity named `Task`, like this:
* JavaScript
* TypeScript
main.wasp
```
crud Tasks { // crud name here is ""Tasks"" entity: Task, operations: { get: {}, getAll: {}, create: {}, update: {}, delete: {}, },}
```
Wasp will give you the following default implementations:
**get** - returns one entity based on the `id` field
```
// ...// Wasp uses the field marked with `@id` in Prisma schema as the id field.return Task.findUnique({ where: { id: args.id } })
```
**getAll** - returns all entities
```
// ...// If the operation is not public, Wasp checks if an authenticated user// is making the request.return Task.findMany()
```
**create** - creates a new entity
```
// ...return Task.create({ data: args.data })
```
**update** - updates an existing entity
```
// ...// Wasp uses the field marked with `@id` in Prisma schema as the id field.return Task.update({ where: { id: args.id }, data: args.data })
```
**delete** - deletes an existing entity
```
// ...// Wasp uses the field marked with `@id` in Prisma schema as the id field.return Task.delete({ where: { id: args.id } })
```
Current Limitations
In the default `create` and `update` implementations, we are saving all of the data that the client sends to the server. This is not always desirable, i.e. in the case when the client should not be able to modify all of the data in the entity.
[In the future](#future-of-crud-operations-in-wasp), we are planning to add validation of action input, where only the data that the user is allowed to change will be saved.
For now, the solution is to provide an override function. You can override the default implementation by using the `overrideFn` option and implementing the validation logic yourself.
### Declaring a CRUD With All Available Options[](#declaring-a-crud-with-all-available-options ""Direct link to Declaring a CRUD With All Available Options"")
Here's an example of a more complex CRUD declaration:
* JavaScript
* TypeScript
main.wasp
```
crud Tasks { // crud name here is ""Tasks"" entity: Task, operations: { getAll: { isPublic: true, // optional, defaults to false }, get: {}, create: { overrideFn: import { createTask } from ""@src/tasks.js"", // optional }, update: {}, },}
```
The CRUD declaration features the following fields:
* `entity: Entity` required
The entity to which the CRUD operations will be applied.
* `operations: { [operationName]: CrudOperationOptions }` required
The operations to be generated. The key is the name of the operation, and the value is the operation configuration.
* The possible values for `operationName` are:
* `getAll`
* `get`
* `create`
* `update`
* `delete`
* `CrudOperationOptions` can have the following fields:
* `isPublic: bool` - Whether the operation is public or not. If it is public, no auth is required to access it. If it is not public, it will be available only to authenticated users. Defaults to `false`.
* `overrideFn: ExtImport` - The import statement of the optional override implementation in Node.js.
#### Defining the overrides[](#defining-the-overrides ""Direct link to Defining the overrides"")
Like with actions and queries, you can define the implementation in a Javascript/Typescript file. The overrides are functions that take the following arguments:
* `args`
The arguments of the operation i.e. the data sent from the client.
* `context`
Context contains the `user` making the request and the `entities` object with the entity that's being operated on.
For a usage example, check the [example guide](https://wasp-lang.dev/docs/data-model/crud#adding-crud-to-the-task-entity-).
#### Using the CRUD operations in client code[](#using-the-crud-operations-in-client-code ""Direct link to Using the CRUD operations in client code"")
On the client, you import the CRUD operations from `wasp/client/crud` by import the `{crud name}` object. For example, if you have a CRUD called `Tasks`, you would import the operations like this:
* JavaScript
* TypeScript
SomePage.jsx
```
import { Tasks } from 'wasp/client/crud'
```
You can then access the operations like this:
* JavaScript
* TypeScript
SomePage.jsx
```
const { data } = Tasks.getAll.useQuery()const { data } = Tasks.get.useQuery({ id: 1 })const createAction = Tasks.create.useAction()const updateAction = Tasks.update.useAction()const deleteAction = Tasks.delete.useAction()
```
All CRUD operations are implemented with [Queries and Actions](https://wasp-lang.dev/docs/data-model/operations/overview) under the hood, which means they come with all the features you'd expect (e.g., automatic SuperJSON serialization, full-stack type safety when using TypeScript)
* * *
Join our **community** on [Discord](https://discord.com/invite/rzdnErX), where we chat about full-stack web stuff. Join us to see what we are up to, share your opinions or get help with CRUD operations.",,"https://wasp-lang.dev/docs/data-model/crud","If you have a lot of experience writing full-stack apps, you probably ended up doing some of the same things many times: listing data, adding data, editing it, and deleting it.","*","0","h3="":443""; ma=86400","max-age=600","DYNAMIC","878ecc721f7081cd-IAD","close","br","text/html; charset=utf-8","Tue, 23 Apr 2024 15:13:37 GMT","Tue, 23 Apr 2024 15:23:37 GMT","Thu, 18 Apr 2024 15:50:27 GMT","{""success_fraction"":0,""report_to"":""cf-nel"",""max_age"":604800}","{""endpoints"":[{""url"":""https:\/\/a.nel.cloudflare.com\/report\/v4?s=4H0i%2FirpQTSvzFXy2qIhJSw6zFByN1heoblqB6KN8WqyUPJk3lKb31e66ZYVYzDs9SDia5ZFqrCzlD5VzOcYk0oMlYJOiBaH9nbMpFvCgilAxFwXSbY1CXR6szVQUjc8""}],""group"":""cf-nel"",""max_age"":604800}","cloudflare","chunked","Accept-Encoding","1.1 varnish","MISS","0","d3cbd1cc80ea60ba0fb87097f00892cd6d835c99",,"2380:52242:396FAF9:447557D:6627D021","HIT","MISS","cache-iad-kiad7000118-IAD","S1713885218.634569,VS0,VE18",,,"en","https://wasp-lang.dev/img/wasp_twitter_cover.png","og:image","https://wasp-lang.dev/docs/data-model/crud","og:url","Automatic CRUD | Wasp","og:title","If you have a lot of experience writing full-stack apps, you probably ended up doing some of the same things many times: listing data, adding data, editing it, and deleting it.","og:description","Automatic CRUD | Wasp",,"Automatic CRUD
If you have a lot of experience writing full-stack apps, you probably ended up doing some of the same things many times: listing data, adding data, editing it, and deleting it.
Wasp makes handling these boring bits easy by offering a higher-level concept called Automatic CRUD.
With a single declaration, you can tell Wasp to automatically generate server-side logic (i.e., Queries and Actions) for creating, reading, updating and deleting Entities. As you update definitions for your Entities, Wasp automatically regenerates the backend logic.
Early preview
This feature is currently in early preview and we are actively working on it. Read more about our plans for CRUD operations.
Overview
Imagine we have a Task entity and we want to enable CRUD operations for it.
main.wasp
entity Task {=psl
id Int @id @default(autoincrement())
description String
isDone Boolean
psl=}
We can then define a new crud called Tasks.
We specify to use the Task entity and we enable the getAll, get, create and update operations (let's say we don't need the delete operation).
main.wasp
crud Tasks {
entity: Task,
operations: {
getAll: {
isPublic: true, // by default only logged in users can perform operations
},
get: {},
create: {
overrideFn: import { createTask } from ""@src/tasks.js"",
},
update: {},
},
}
It uses default implementation for getAll, get, and update,
... while specifying a custom implementation for create.
getAll will be public (no auth needed), while the rest of the operations will be private.
Here's what it looks like when visualized:
Visualization of the Tasks crud declaration
We can now use the CRUD queries and actions we just specified in our client code.
Keep reading for an example of Automatic CRUD in action, or skip ahead for the API Reference
Example: A Simple TODO App
Let's create a full-app example that uses automatic CRUD. We'll stick to using the Task entity from the previous example, but we'll add a User entity and enable username and password based auth.
We are building a simple tasks app with username based auth
Creating the App
We can start by running wasp new tasksCrudApp and then adding the following to the main.wasp file:
main.wasp
app tasksCrudApp {
wasp: {
version: ""^0.13.0""
},
title: ""Tasks Crud App"",
// We enabled auth and set the auth method to username and password
auth: {
userEntity: User,
methods: {
usernameAndPassword: {},
},
onAuthFailedRedirectTo: ""/login"",
},
}
entity User {=psl
id Int @id @default(autoincrement())
tasks Task[]
psl=}
// We defined a Task entity on which we'll enable CRUD later on
entity Task {=psl
id Int @id @default(autoincrement())
description String
isDone Boolean
userId Int
user User @relation(fields: [userId], references: [id])
psl=}
// Tasks app routes
route RootRoute { path: ""/"", to: MainPage }
page MainPage {
component: import { MainPage } from ""@src/MainPage.jsx"",
authRequired: true,
}
route LoginRoute { path: ""/login"", to: LoginPage }
page LoginPage {
component: import { LoginPage } from ""@src/LoginPage.jsx"",
}
route SignupRoute { path: ""/signup"", to: SignupPage }
page SignupPage {
component: import { SignupPage } from ""@src/SignupPage.jsx"",
}
We can then run wasp db migrate-dev to create the database and run the migrations.
Adding CRUD to the Task Entity ✨
Let's add the following crud declaration to our main.wasp file:
main.wasp
// ...
crud Tasks {
entity: Task,
operations: {
getAll: {},
create: {
overrideFn: import { createTask } from ""@src/tasks.js"",
},
},
}
You'll notice that we enabled only getAll and create operations. This means that only these operations will be available.
We also overrode the create operation with a custom implementation. This means that the create operation will not be generated, but instead, the createTask function from @src/tasks.js will be used.
Our Custom create Operation
Here's the src/tasks.ts file:
JavaScript
TypeScript
src/tasks.js
import { HttpError } from 'wasp/server'
export const createTask = async (args, context) => {
if (!context.user) {
throw new HttpError(401, 'User not authenticated.')
}
const { description, isDone } = args
const { Task } = context.entities
return await Task.create({
data: {
description,
isDone,
// Connect the task to the user that is creating it
user: {
connect: {
id: context.user.id,
},
},
},
})
}
We made a custom create operation because we want to make sure that the task is connected to the user that is creating it. Automatic CRUD doesn't support this by default (yet!). Read more about the default implementations here.
Using the Generated CRUD Operations on the Client
And let's use the generated operations in our client code:
JavaScript
TypeScript
src/MainPage.jsx
import { Tasks } from 'wasp/client/crud'
import { useState } from 'react'
export const MainPage = () => {
const { data: tasks, isLoading, error } = Tasks.getAll.useQuery()
const createTask = Tasks.create.useAction()
const [taskDescription, setTaskDescription] = useState('')
function handleCreateTask() {
createTask({ description: taskDescription, isDone: false })
setTaskDescription('')
}
if (isLoading) return Loading...
if (error) return Error: {error.message}
return (
)
}
And here are the login and signup pages, where we are using Wasp's Auth UI components:
JavaScript
TypeScript
src/LoginPage.jsx
import { LoginForm } from 'wasp/client/auth'
import { Link } from 'react-router-dom'
export function LoginPage() {
return (
)
}
JavaScript
TypeScript
src/SignupPage.jsx
import { SignupForm } from 'wasp/client/auth'
export function SignupPage() {
return (
)
}
That's it. You can now run wasp start and see the app in action. ⚡️
You should see a login page and a signup page. After you log in, you should see a page with a list of tasks and a form to create new tasks.
Future of CRUD Operations in Wasp
CRUD operations currently have a limited set of knowledge about the business logic they are implementing.
For example, they don't know that a task should be connected to the user that is creating it. This is why we had to override the create operation in the example above.
Another thing: they are not aware of the authorization rules. For example, they don't know that a user should not be able to create a task for another user. In the future, we will be adding role-based authorization to Wasp, and we plan to make CRUD operations aware of the authorization rules.
Another issue is input validation and sanitization. For example, we might want to make sure that the task description is not empty.
CRUD operations are a mechanism for getting a backend up and running quickly, but it depends on the information it can get from the Wasp app. The more information that it can pick up from your app, the more powerful it will be out of the box.
We plan on supporting CRUD operations and growing them to become the easiest way to create your backend. Follow along on this GitHub issue to see how we are doing.
API Reference
CRUD declaration work on top of existing entity declaration. We'll fully explore the API using two examples:
A basic CRUD declaration that relies on default options.
A more involved CRUD declaration that uses extra options and overrides.
Declaring a CRUD With Default Options
If we create CRUD operations for an entity named Task, like this:
JavaScript
TypeScript
main.wasp
crud Tasks { // crud name here is ""Tasks""
entity: Task,
operations: {
get: {},
getAll: {},
create: {},
update: {},
delete: {},
},
}
Wasp will give you the following default implementations:
get - returns one entity based on the id field
// ...
// Wasp uses the field marked with `@id` in Prisma schema as the id field.
return Task.findUnique({ where: { id: args.id } })
getAll - returns all entities
// ...
// If the operation is not public, Wasp checks if an authenticated user
// is making the request.
return Task.findMany()
create - creates a new entity
// ...
return Task.create({ data: args.data })
update - updates an existing entity
// ...
// Wasp uses the field marked with `@id` in Prisma schema as the id field.
return Task.update({ where: { id: args.id }, data: args.data })
delete - deletes an existing entity
// ...
// Wasp uses the field marked with `@id` in Prisma schema as the id field.
return Task.delete({ where: { id: args.id } })
Current Limitations
In the default create and update implementations, we are saving all of the data that the client sends to the server. This is not always desirable, i.e. in the case when the client should not be able to modify all of the data in the entity.
In the future, we are planning to add validation of action input, where only the data that the user is allowed to change will be saved.
For now, the solution is to provide an override function. You can override the default implementation by using the overrideFn option and implementing the validation logic yourself.
Declaring a CRUD With All Available Options
Here's an example of a more complex CRUD declaration:
JavaScript
TypeScript
main.wasp
crud Tasks { // crud name here is ""Tasks""
entity: Task,
operations: {
getAll: {
isPublic: true, // optional, defaults to false
},
get: {},
create: {
overrideFn: import { createTask } from ""@src/tasks.js"", // optional
},
update: {},
},
}
The CRUD declaration features the following fields:
entity: Entity required
The entity to which the CRUD operations will be applied.
operations: { [operationName]: CrudOperationOptions } required
The operations to be generated. The key is the name of the operation, and the value is the operation configuration.
The possible values for operationName are:
getAll
get
create
update
delete
CrudOperationOptions can have the following fields:
isPublic: bool - Whether the operation is public or not. If it is public, no auth is required to access it. If it is not public, it will be available only to authenticated users. Defaults to false.
overrideFn: ExtImport - The import statement of the optional override implementation in Node.js.
Defining the overrides
Like with actions and queries, you can define the implementation in a Javascript/Typescript file. The overrides are functions that take the following arguments:
args
The arguments of the operation i.e. the data sent from the client.
context
Context contains the user making the request and the entities object with the entity that's being operated on.
For a usage example, check the example guide.
Using the CRUD operations in client code
On the client, you import the CRUD operations from wasp/client/crud by import the {crud name} object. For example, if you have a CRUD called Tasks, you would import the operations like this:
JavaScript
TypeScript
SomePage.jsx
import { Tasks } from 'wasp/client/crud'
You can then access the operations like this:
JavaScript
TypeScript
SomePage.jsx
const { data } = Tasks.getAll.useQuery()
const { data } = Tasks.get.useQuery({ id: 1 })
const createAction = Tasks.create.useAction()
const updateAction = Tasks.update.useAction()
const deleteAction = Tasks.delete.useAction()
All CRUD operations are implemented with Queries and Actions under the hood, which means they come with all the features you'd expect (e.g., automatic SuperJSON serialization, full-stack type safety when using TypeScript)
Join our community on Discord, where we chat about full-stack web stuff. Join us to see what we are up to, share your opinions or get help with CRUD operations.","https://wasp-lang.dev/docs/data-model/crud"
"1",,"2024-04-23T15:13:40.823Z","https://wasp-lang.dev/docs/data-model/backends","https://wasp-lang.dev/docs","http","## Databases
[Entities](https://wasp-lang.dev/docs/data-model/entities), [Operations](https://wasp-lang.dev/docs/data-model/operations/overview) and [Automatic CRUD](https://wasp-lang.dev/docs/data-model/crud) together make a high-level interface for working with your app's data. Still, all that data has to live somewhere, so let's see how Wasp deals with databases.
## Supported Database Backends[](#supported-database-backends ""Direct link to Supported Database Backends"")
Wasp supports multiple database backends. We'll list and explain each one.
### SQLite[](#sqlite ""Direct link to SQLite"")
The default database Wasp uses is [SQLite](https://www.sqlite.org/index.html).
SQLite is a great way for getting started with a new project because it doesn't require any configuration, but Wasp can only use it in development. Once you want to deploy your Wasp app to production, you'll need to switch to PostgreSQL and stick with it.
Fortunately, migrating from SQLite to PostgreSQL is pretty simple, and we have [a guide](#migrating-from-sqlite-to-postgresql) to help you.
### PostgreSQL[](#postgresql ""Direct link to PostgreSQL"")
[PostgreSQL](https://www.postgresql.org/) is the most advanced open-source database and one of the most popular databases overall. It's been in active development for 20+ years. Therefore, if you're looking for a battle-tested database, look no further.
To use Wasp with PostgreSQL, you'll have to ensure a database instance is running during development. Wasp needs access to your database for commands such as `wasp start` or `wasp db migrate-dev` and expects to find a connection string in the `DATABASE_URL` environment variable.
We cover all supported ways of connecting to a database in [the next section](#connecting-to-a-database).
### Migrating from SQLite to PostgreSQL[](#migrating-from-sqlite-to-postgresql ""Direct link to Migrating from SQLite to PostgreSQL"")
To run your Wasp app in production, you'll need to switch from SQLite to PostgreSQL.
1. Set the `app.db.system` field to PostgreSQL.
main.wasp
```
app MyApp { title: ""My app"", // ... db: { system: PostgreSQL, // ... }}
```
2. Delete all the old migrations, since they are SQLite migrations and can't be used with PostgreSQL, as well as the SQLite database by running [`wasp clean`](https://wasp-lang.dev/docs/general/cli#project-commands):
```
rm -r migrations/wasp clean
```
3. Ensure your new database is running (check the [section on connecting to a database](#connecting-to-a-database) to see how). Leave it running, since we need it for the next step.
4. In a different terminal, run `wasp db migrate-dev` to apply the changes and create a new initial migration.
5. That is it, you are all done!
## Connecting to a Database[](#connecting-to-a-database ""Direct link to Connecting to a Database"")
Assuming you're not using SQLite, Wasp offers two ways of connecting your app to a database instance:
1. A ready-made dev database that requires minimal setup and is great for quick prototyping.
2. A ""real"" database Wasp can connect to and use in production.
### Using the Dev Database Provided by Wasp[](#using-the-dev-database-provided-by-wasp ""Direct link to Using the Dev Database Provided by Wasp"")
The command `wasp start db` will start a default PostgreSQL dev database for you.
Your Wasp app will automatically connect to it, just keep `wasp start db` running in the background. Also, make sure that:
* You have [Docker installed](https://www.docker.com/get-started/) and in `PATH`.
* The port `5432` isn't taken.
### Connecting to an existing database[](#connecting-to-an-existing-database ""Direct link to Connecting to an existing database"")
If you want to spin up your own dev database (or connect to an external one), you can tell Wasp about it using the `DATABASE_URL` environment variable. Wasp will use the value of `DATABASE_URL` as a connection string.
The easiest way to set the necessary `DATABASE_URL` environment variable is by adding it to the [.env.server](https://wasp-lang.dev/docs/project/env-vars) file in the root dir of your Wasp project (if that file doesn't yet exist, create it).
Alternatively, you can set it inline when running `wasp` (this applies to all environment variables):
```
DATABASE_URL= wasp ...
```
This trick is useful for running a certain `wasp` command on a specific database. For example, you could do:
```
DATABASE_URL= wasp db seed myProductionSeed
```
This command seeds the data for a fresh staging or production database. To more precisely understand how seeding works, keep reading.
## Seeding the Database[](#seeding-the-database ""Direct link to Seeding the Database"")
**Database seeding** is a term used for populating the database with some initial data.
Seeding is most commonly used for two following scenarios:
1. To put the development database into a state convenient for working and testing.
2. To initialize any database (`dev`, `staging`, or `prod`) with essential data it requires to operate. For example, populating the Currency table with default currencies, or the Country table with all available countries.
### Writing a Seed Function[](#writing-a-seed-function ""Direct link to Writing a Seed Function"")
You can define as many **seed functions** as you want in an array under the `app.db.seeds` field:
* JavaScript
* TypeScript
main.wasp
```
app MyApp { // ... db: { // ... seeds: [ import { devSeedSimple } from ""@src/dbSeeds.js"", import { prodSeed } from ""@src/dbSeeds.js"" ] }}
```
Each seed function must be an async function that takes one argument, `prisma`, which is a [Prisma Client](https://www.prisma.io/docs/concepts/components/prisma-client/crud) instance used to interact with the database. This is the same Prisma Client instance that Wasp uses internally and thus includes all of the usual features (e.g., password hashing).
Since a seed function falls under server-side code, it can import other server-side functions. This is convenient because you might want to seed the database using Actions.
Here's an example of a seed function that imports an Action:
* JavaScript
* TypeScript
```
import { createTask } from './actions.js'import { sanitizeAndSerializeProviderData } from 'wasp/server/auth'export const devSeedSimple = async (prisma) => { const user = await createUser(prisma, { username: 'RiuTheDog', password: 'bark1234', }) await createTask( { description: 'Chase the cat' }, { user, entities: { Task: prisma.task } } )}async function createUser(prisma, data) { const newUser = await prisma.user.create({ data: { auth: { create: { identities: { create: { providerName: 'username', providerUserId: data.username, providerData: sanitizeAndSerializeProviderData({ hashedPassword: data.password }), }, }, }, }, }, }) return newUser}
```
### Running seed functions[](#running-seed-functions ""Direct link to Running seed functions"")
Run the command `wasp db seed` and Wasp will ask you which seed function you'd like to run (if you've defined more than one).
Alternatively, run the command `wasp db seed ` to choose a specific seed function right away, for example:
```
wasp db seed devSeedSimple
```
Check the [API Reference](#cli-commands-for-seeding-the-database) for more details on these commands.
tip
You'll often want to call `wasp db seed` right after you run `wasp db reset`, as it makes sense to fill the database with initial data after clearing it.
## Prisma Configuration[](#prisma-configuration ""Direct link to Prisma Configuration"")
Wasp uses [Prisma](https://www.prisma.io/) to interact with the database. Prisma is a ""Next-generation Node.js and TypeScript ORM"" that provides a type-safe API for working with your database.
### Prisma Preview Features[](#prisma-preview-features ""Direct link to Prisma Preview Features"")
Prisma is still in active development and some of its features are not yet stable. To use them, you have to enable them in the `app.db.prisma.clientPreviewFeatures` field:
main.wasp
```
app MyApp { // ... db: { system: PostgreSQL, prisma: { clientPreviewFeatures: [""postgresqlExtensions""] } }}
```
Read more about Prisma preview features in the [Prisma docs](https://www.prisma.io/docs/concepts/components/preview-features/client-preview-features).
### PostgreSQL Extensions[](#postgresql-extensions ""Direct link to PostgreSQL Extensions"")
PostgreSQL supports [extensions](https://www.postgresql.org/docs/current/contrib.html) that add additional functionality to the database. For example, the [hstore](https://www.postgresql.org/docs/13/hstore.html) extension adds support for storing key-value pairs in a single column.
To use PostgreSQL extensions with Prisma, you have to enable them in the `app.db.prisma.dbExtensions` field:
main.wasp
```
app MyApp { // ... db: { system: PostgreSQL, prisma: { clientPreviewFeatures: [""postgresqlExtensions""] dbExtensions: [ { name: ""hstore"", schema: ""myHstoreSchema"" }, { name: ""pg_trgm"" }, { name: ""postgis"", version: ""2.1"" }, ] } }}
```
Read more about PostgreSQL configuration in Wasp in the [API Reference](#the-appdb-field).
## API Reference[](#api-reference ""Direct link to API Reference"")
You can tell Wasp which database to use in the `app` declaration's `db` field:
### The `app.db` Field[](#the-appdb-field ""Direct link to the-appdb-field"")
Here's an example that uses the `app.db` field to its full potential:
* JavaScript
* TypeScript
main.wasp
```
app MyApp { title: ""My app"", // ... db: { system: PostgreSQL, seeds: [ import devSeed from ""@src/dbSeeds.js"" ], prisma: { clientPreviewFeatures: [""extendedWhereUnique""] } }}
```
`app.db` is a dictionary with the following fields (all fields are optional):
* `system: DbSystem`
The database system Wasp should use. It can be either PostgreSQL or SQLite. The default value for the field is SQLite (this default value also applies if the entire `db` field is left unset). Whenever you modify the `db.system` field, make sure to run `wasp db migrate-dev` to apply the changes.
* `seeds: [ExtImport]`
Defines the seed functions you can use with the `wasp db seed` command to seed your database with initial data. Read the [Seeding section](#seeding-the-database) for more details.
* `prisma: PrismaOptions`
Additional configuration for Prisma.
main.wasp
```
app MyApp { // ... db: { // ... prisma: { clientPreviewFeatures: [""postgresqlExtensions""], dbExtensions: [ { name: ""hstore"", schema: ""myHstoreSchema"" }, { name: ""pg_trgm"" }, { name: ""postgis"", version: ""2.1"" }, ] } }}
```
It's a dictionary with the following fields:
* `clientPreviewFeatures : [string]`
Allows you to define [Prisma client preview features](https://www.prisma.io/docs/concepts/components/preview-features/client-preview-features), like for example, `""postgresqlExtensions""`.
* `dbExtensions: DbExtension[]`
It allows you to define PostgreSQL extensions that should be enabled for your database. Read more about [PostgreSQL extensions in Prisma](https://www.prisma.io/docs/concepts/components/prisma-schema/postgresql-extensions).
For each extension you define a dict with the following fields:
* `name: string` required
The name of the extension you would normally put in the Prisma file.
schema.prisma
```
extensions = [hstore(schema: ""myHstoreSchema""), pg_trgm, postgis(version: ""2.1"")]// 👆 Extension name
```
* `map: string`
It sets the `map` argument of the extension. Explanation for the field from the Prisma docs:
> This is the database name of the extension. If this argument is not specified, the name of the extension in the Prisma schema must match the database name.
* `schema: string`
It sets the `schema` argument of the extension. Explanation for the field from the Prisma docs:
> This is the name of the schema in which to activate the extension's objects. If this argument is not specified, the current default object creation schema is used.
* `version: string`
It sets the `version` argument of the extension. Explanation for the field from the Prisma docs:
> This is the version of the extension to activate. If this argument is not specified, the value given in the extension's control file is used.
### CLI Commands for Seeding the Database[](#cli-commands-for-seeding-the-database ""Direct link to CLI Commands for Seeding the Database"")
Use one of the following commands to run the seed functions:
* `wasp db seed`
If you've only defined a single seed function, this command runs it. If you've defined multiple seed functions, it asks you to choose one interactively.
* `wasp db seed `
This command runs the seed function with the specified name. The name is the identifier used in its `import` expression in the `app.db.seeds` list. For example, to run the seed function `devSeedSimple` which was defined like this:
* JavaScript
* TypeScript
main.wasp
```
app MyApp { // ... db: { // ... seeds: [ // ... import { devSeedSimple } from ""@src/dbSeeds.js"", ] }}
```
Use the following command:
```
wasp db seed devSeedSimple
```",,"https://wasp-lang.dev/docs/data-model/backends","Entities, Operations and Automatic CRUD together make a high-level interface for working with your app's data. Still, all that data has to live somewhere, so let's see how Wasp deals with databases.","*","0","h3="":443""; ma=86400","max-age=600","DYNAMIC","878ecc842c9e81b7-IAD","close","br","text/html; charset=utf-8","Tue, 23 Apr 2024 15:13:40 GMT","Tue, 23 Apr 2024 15:23:40 GMT","Thu, 18 Apr 2024 15:50:26 GMT","{""success_fraction"":0,""report_to"":""cf-nel"",""max_age"":604800}","{""endpoints"":[{""url"":""https:\/\/a.nel.cloudflare.com\/report\/v4?s=F3D9QAvttKQmHgSULoMD%2Fbepm9JUMrhCz2lGy6adw%2Bf%2FxTE1L%2FGYhXDIPWhrE8%2BOm%2FPbcRFGs9XSItyUB6WRVJf1AN%2Bo1FF1WliQ6B3AJ%2F3UOWKQK2dKHVJYadAh9odM""}],""group"":""cf-nel"",""max_age"":604800}","cloudflare","chunked","Accept-Encoding","1.1 varnish","MISS","0","e8e3f25bebe7750f697e8818746a3fb7e852ec2a",,"F104:3F9EB3:3A37D48:453CB4D:6627D024","HIT","MISS","cache-iad-kiad7000138-IAD","S1713885221.525737,VS0,VE14",,,"en","https://wasp-lang.dev/img/wasp_twitter_cover.png","og:image","https://wasp-lang.dev/docs/data-model/backends","og:url","Databases | Wasp","og:title","Entities, Operations and Automatic CRUD together make a high-level interface for working with your app's data. Still, all that data has to live somewhere, so let's see how Wasp deals with databases.","og:description","Databases | Wasp",,"Databases
Entities, Operations and Automatic CRUD together make a high-level interface for working with your app's data. Still, all that data has to live somewhere, so let's see how Wasp deals with databases.
Supported Database Backends
Wasp supports multiple database backends. We'll list and explain each one.
SQLite
The default database Wasp uses is SQLite.
SQLite is a great way for getting started with a new project because it doesn't require any configuration, but Wasp can only use it in development. Once you want to deploy your Wasp app to production, you'll need to switch to PostgreSQL and stick with it.
Fortunately, migrating from SQLite to PostgreSQL is pretty simple, and we have a guide to help you.
PostgreSQL
PostgreSQL is the most advanced open-source database and one of the most popular databases overall. It's been in active development for 20+ years. Therefore, if you're looking for a battle-tested database, look no further.
To use Wasp with PostgreSQL, you'll have to ensure a database instance is running during development. Wasp needs access to your database for commands such as wasp start or wasp db migrate-dev and expects to find a connection string in the DATABASE_URL environment variable.
We cover all supported ways of connecting to a database in the next section.
Migrating from SQLite to PostgreSQL
To run your Wasp app in production, you'll need to switch from SQLite to PostgreSQL.
Set the app.db.system field to PostgreSQL.
main.wasp
app MyApp {
title: ""My app"",
// ...
db: {
system: PostgreSQL,
// ...
}
}
Delete all the old migrations, since they are SQLite migrations and can't be used with PostgreSQL, as well as the SQLite database by running wasp clean:
rm -r migrations/
wasp clean
Ensure your new database is running (check the section on connecting to a database to see how). Leave it running, since we need it for the next step.
In a different terminal, run wasp db migrate-dev to apply the changes and create a new initial migration.
That is it, you are all done!
Connecting to a Database
Assuming you're not using SQLite, Wasp offers two ways of connecting your app to a database instance:
A ready-made dev database that requires minimal setup and is great for quick prototyping.
A ""real"" database Wasp can connect to and use in production.
Using the Dev Database Provided by Wasp
The command wasp start db will start a default PostgreSQL dev database for you.
Your Wasp app will automatically connect to it, just keep wasp start db running in the background. Also, make sure that:
You have Docker installed and in PATH.
The port 5432 isn't taken.
Connecting to an existing database
If you want to spin up your own dev database (or connect to an external one), you can tell Wasp about it using the DATABASE_URL environment variable. Wasp will use the value of DATABASE_URL as a connection string.
The easiest way to set the necessary DATABASE_URL environment variable is by adding it to the .env.server file in the root dir of your Wasp project (if that file doesn't yet exist, create it).
Alternatively, you can set it inline when running wasp (this applies to all environment variables):
DATABASE_URL= wasp ...
This trick is useful for running a certain wasp command on a specific database. For example, you could do:
DATABASE_URL= wasp db seed myProductionSeed
This command seeds the data for a fresh staging or production database. To more precisely understand how seeding works, keep reading.
Seeding the Database
Database seeding is a term used for populating the database with some initial data.
Seeding is most commonly used for two following scenarios:
To put the development database into a state convenient for working and testing.
To initialize any database (dev, staging, or prod) with essential data it requires to operate. For example, populating the Currency table with default currencies, or the Country table with all available countries.
Writing a Seed Function
You can define as many seed functions as you want in an array under the app.db.seeds field:
JavaScript
TypeScript
main.wasp
app MyApp {
// ...
db: {
// ...
seeds: [
import { devSeedSimple } from ""@src/dbSeeds.js"",
import { prodSeed } from ""@src/dbSeeds.js""
]
}
}
Each seed function must be an async function that takes one argument, prisma, which is a Prisma Client instance used to interact with the database. This is the same Prisma Client instance that Wasp uses internally and thus includes all of the usual features (e.g., password hashing).
Since a seed function falls under server-side code, it can import other server-side functions. This is convenient because you might want to seed the database using Actions.
Here's an example of a seed function that imports an Action:
JavaScript
TypeScript
import { createTask } from './actions.js'
import { sanitizeAndSerializeProviderData } from 'wasp/server/auth'
export const devSeedSimple = async (prisma) => {
const user = await createUser(prisma, {
username: 'RiuTheDog',
password: 'bark1234',
})
await createTask(
{ description: 'Chase the cat' },
{ user, entities: { Task: prisma.task } }
)
}
async function createUser(prisma, data) {
const newUser = await prisma.user.create({
data: {
auth: {
create: {
identities: {
create: {
providerName: 'username',
providerUserId: data.username,
providerData: sanitizeAndSerializeProviderData({
hashedPassword: data.password
}),
},
},
},
},
},
})
return newUser
}
Running seed functions
Run the command wasp db seed and Wasp will ask you which seed function you'd like to run (if you've defined more than one).
Alternatively, run the command wasp db seed to choose a specific seed function right away, for example:
wasp db seed devSeedSimple
Check the API Reference for more details on these commands.
tip
You'll often want to call wasp db seed right after you run wasp db reset, as it makes sense to fill the database with initial data after clearing it.
Prisma Configuration
Wasp uses Prisma to interact with the database. Prisma is a ""Next-generation Node.js and TypeScript ORM"" that provides a type-safe API for working with your database.
Prisma Preview Features
Prisma is still in active development and some of its features are not yet stable. To use them, you have to enable them in the app.db.prisma.clientPreviewFeatures field:
main.wasp
app MyApp {
// ...
db: {
system: PostgreSQL,
prisma: {
clientPreviewFeatures: [""postgresqlExtensions""]
}
}
}
Read more about Prisma preview features in the Prisma docs.
PostgreSQL Extensions
PostgreSQL supports extensions that add additional functionality to the database. For example, the hstore extension adds support for storing key-value pairs in a single column.
To use PostgreSQL extensions with Prisma, you have to enable them in the app.db.prisma.dbExtensions field:
main.wasp
app MyApp {
// ...
db: {
system: PostgreSQL,
prisma: {
clientPreviewFeatures: [""postgresqlExtensions""]
dbExtensions: [
{ name: ""hstore"", schema: ""myHstoreSchema"" },
{ name: ""pg_trgm"" },
{ name: ""postgis"", version: ""2.1"" },
]
}
}
}
Read more about PostgreSQL configuration in Wasp in the API Reference.
API Reference
You can tell Wasp which database to use in the app declaration's db field:
The app.db Field
Here's an example that uses the app.db field to its full potential:
JavaScript
TypeScript
main.wasp
app MyApp {
title: ""My app"",
// ...
db: {
system: PostgreSQL,
seeds: [
import devSeed from ""@src/dbSeeds.js""
],
prisma: {
clientPreviewFeatures: [""extendedWhereUnique""]
}
}
}
app.db is a dictionary with the following fields (all fields are optional):
system: DbSystem
The database system Wasp should use. It can be either PostgreSQL or SQLite. The default value for the field is SQLite (this default value also applies if the entire db field is left unset). Whenever you modify the db.system field, make sure to run wasp db migrate-dev to apply the changes.
seeds: [ExtImport]
Defines the seed functions you can use with the wasp db seed command to seed your database with initial data. Read the Seeding section for more details.
prisma: PrismaOptions
Additional configuration for Prisma.
main.wasp
app MyApp {
// ...
db: {
// ...
prisma: {
clientPreviewFeatures: [""postgresqlExtensions""],
dbExtensions: [
{ name: ""hstore"", schema: ""myHstoreSchema"" },
{ name: ""pg_trgm"" },
{ name: ""postgis"", version: ""2.1"" },
]
}
}
}
It's a dictionary with the following fields:
clientPreviewFeatures : [string]
Allows you to define Prisma client preview features, like for example, ""postgresqlExtensions"".
dbExtensions: DbExtension[]
It allows you to define PostgreSQL extensions that should be enabled for your database. Read more about PostgreSQL extensions in Prisma.
For each extension you define a dict with the following fields:
name: string required
The name of the extension you would normally put in the Prisma file.
schema.prisma
extensions = [hstore(schema: ""myHstoreSchema""), pg_trgm, postgis(version: ""2.1"")]
// 👆 Extension name
map: string
It sets the map argument of the extension. Explanation for the field from the Prisma docs:
This is the database name of the extension. If this argument is not specified, the name of the extension in the Prisma schema must match the database name.
schema: string
It sets the schema argument of the extension. Explanation for the field from the Prisma docs:
This is the name of the schema in which to activate the extension's objects. If this argument is not specified, the current default object creation schema is used.
version: string
It sets the version argument of the extension. Explanation for the field from the Prisma docs:
This is the version of the extension to activate. If this argument is not specified, the value given in the extension's control file is used.
CLI Commands for Seeding the Database
Use one of the following commands to run the seed functions:
wasp db seed
If you've only defined a single seed function, this command runs it. If you've defined multiple seed functions, it asks you to choose one interactively.
wasp db seed
This command runs the seed function with the specified name. The name is the identifier used in its import expression in the app.db.seeds list. For example, to run the seed function devSeedSimple which was defined like this:
JavaScript
TypeScript
main.wasp
app MyApp {
// ...
db: {
// ...
seeds: [
// ...
import { devSeedSimple } from ""@src/dbSeeds.js"",
]
}
}
Use the following command:
wasp db seed devSeedSimple","https://wasp-lang.dev/docs/data-model/backends"
"1",,"2024-04-23T15:13:49.490Z","https://wasp-lang.dev/docs/auth/ui","https://wasp-lang.dev/docs","http","## Auth UI
To make using authentication in your app as easy as possible, Wasp generates the server-side code but also the client-side UI for you. It enables you to quickly get the login, signup, password reset and email verification flows in your app.
Below we cover all of the available UI components and how to use them.

## Overview[](#overview ""Direct link to Overview"")
After Wasp generates the UI components for your auth, you can use it as is, or customize it to your liking.
Based on the authentication providers you enabled in your `main.wasp` file, the Auth UI will show the corresponding UI (form and buttons). For example, if you enabled e-mail authentication:
* JavaScript
* TypeScript
main.wasp
```
app MyApp { //... auth: { methods: { email: {}, }, // ... }}
```
You'll get the following UI:
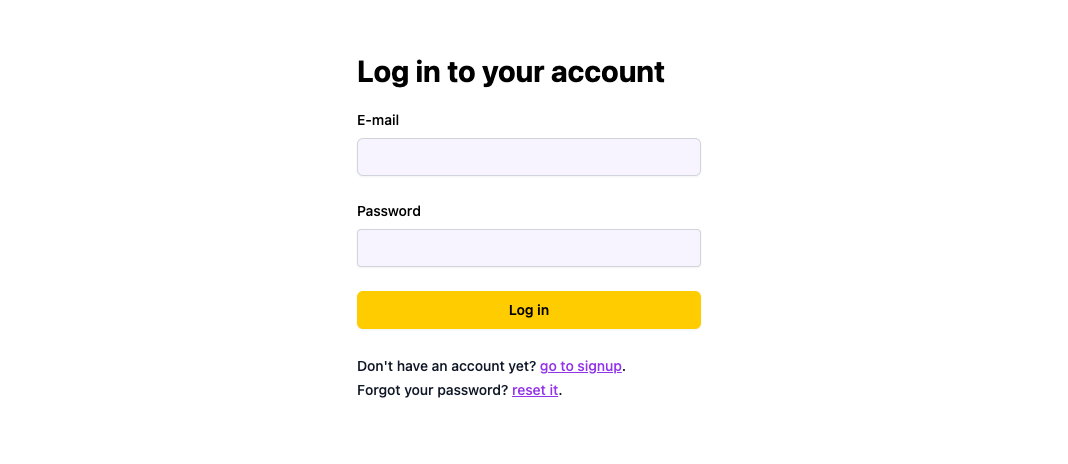
And then if you enable Google and Github:
* JavaScript
* TypeScript
main.wasp
```
app MyApp { //... auth: { methods: { email: {}, google: {}, github: {}, }, // ... }}
```
The form will automatically update to look like this:
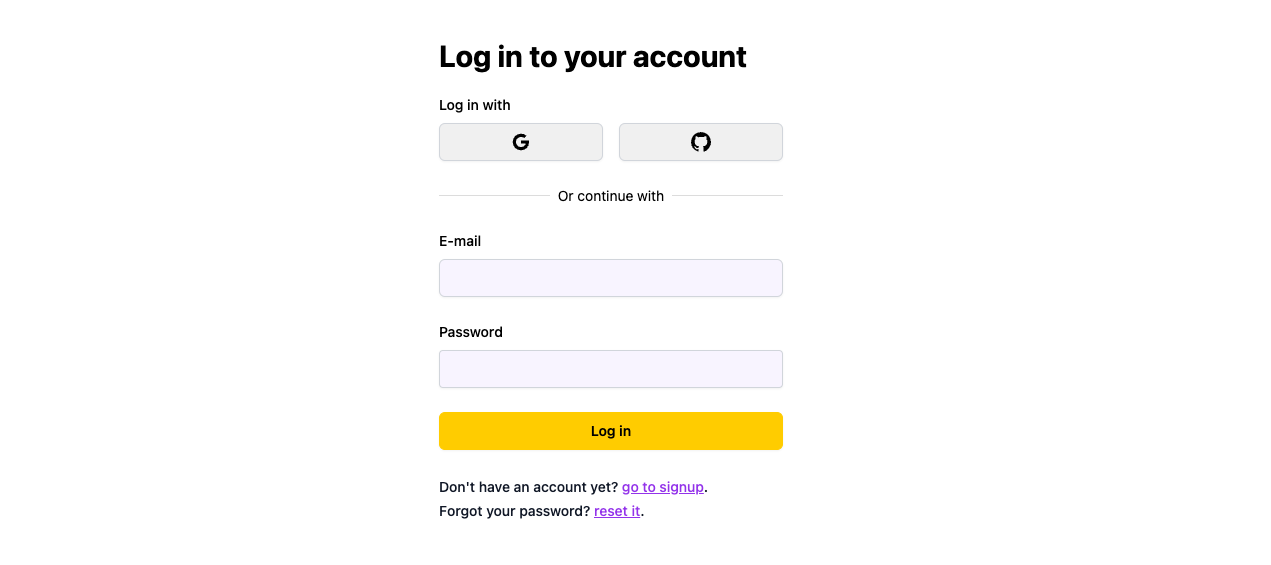
Let's go through all of the available components and how to use them.
## Auth Components[](#auth-components ""Direct link to Auth Components"")
The following components are available for you to use in your app:
* [Login form](#login-form)
* [Signup form](#signup-form)
* [Forgot password form](#forgot-password-form)
* [Reset password form](#reset-password-form)
* [Verify email form](#verify-email-form)
### Login Form[](#login-form ""Direct link to Login Form"")
Used with [Username & Password](https://wasp-lang.dev/docs/auth/username-and-pass), [Email](https://wasp-lang.dev/docs/auth/email), [Github](https://wasp-lang.dev/docs/auth/social-auth/github), [Google](https://wasp-lang.dev/docs/auth/social-auth/google) and [Keycloak](https://wasp-lang.dev/docs/auth/social-auth/keycloak) authentication.

You can use the `LoginForm` component to build your login page:
* JavaScript
* TypeScript
main.wasp
```
// ...route LoginRoute { path: ""/login"", to: LoginPage }page LoginPage { component: import { LoginPage } from ""@src/LoginPage.jsx""}
```
src/LoginPage.jsx
```
import { LoginForm } from 'wasp/client/auth'// Use it like thisexport function LoginPage() { return }
```
It will automatically show the correct authentication providers based on your `main.wasp` file.
### Signup Form[](#signup-form ""Direct link to Signup Form"")
Used with [Username & Password](https://wasp-lang.dev/docs/auth/username-and-pass), [Email](https://wasp-lang.dev/docs/auth/email), [Github](https://wasp-lang.dev/docs/auth/social-auth/github), [Google](https://wasp-lang.dev/docs/auth/social-auth/google) and [Keycloak](https://wasp-lang.dev/docs/auth/social-auth/keycloak) authentication.
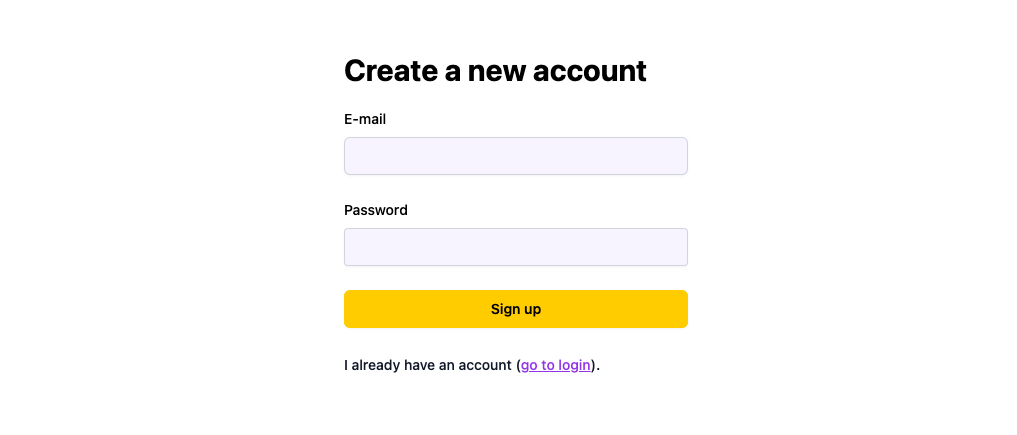
You can use the `SignupForm` component to build your signup page:
* JavaScript
* TypeScript
main.wasp
```
// ...route SignupRoute { path: ""/signup"", to: SignupPage }page SignupPage { component: import { SignupPage } from ""@src/SignupPage.jsx""}
```
src/SignupPage.jsx
```
import { SignupForm } from 'wasp/client/auth'// Use it like thisexport function SignupPage() { return }
```
It will automatically show the correct authentication providers based on your `main.wasp` file.
Read more about customizing the signup process like adding additional fields or extra UI in the [Auth Overview](https://wasp-lang.dev/docs/auth/overview#customizing-the-signup-process) section.
### Forgot Password Form[](#forgot-password-form ""Direct link to Forgot Password Form"")
Used with [Email](https://wasp-lang.dev/docs/auth/email) authentication.
If users forget their password, they can use this form to reset it.
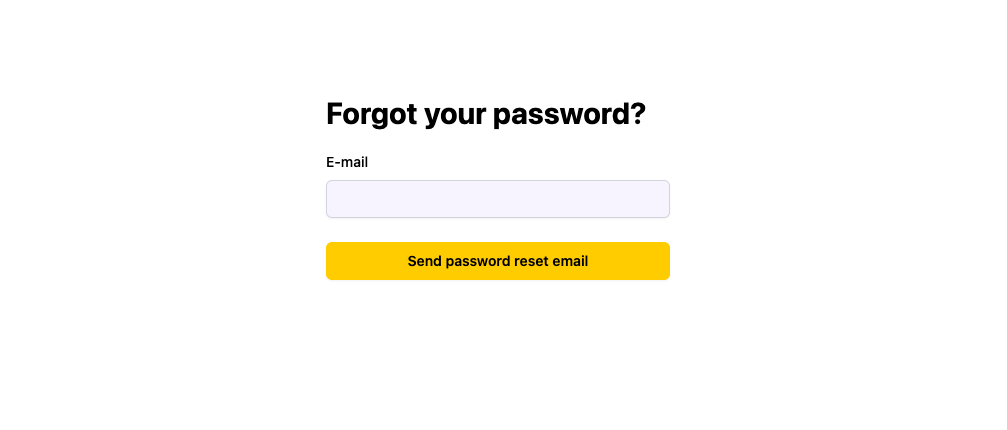
You can use the `ForgotPasswordForm` component to build your own forgot password page:
* JavaScript
* TypeScript
main.wasp
```
// ...route RequestPasswordResetRoute { path: ""/request-password-reset"", to: RequestPasswordResetPage }page RequestPasswordResetPage { component: import { ForgotPasswordPage } from ""@src/ForgotPasswordPage.jsx""}
```
src/ForgotPasswordPage.jsx
```
import { ForgotPasswordForm } from 'wasp/client/auth'// Use it like thisexport function ForgotPasswordPage() { return }
```
### Reset Password Form[](#reset-password-form ""Direct link to Reset Password Form"")
Used with [Email](https://wasp-lang.dev/docs/auth/email) authentication.
After users click on the link in the email they receive after submitting the forgot password form, they will be redirected to this form where they can reset their password.
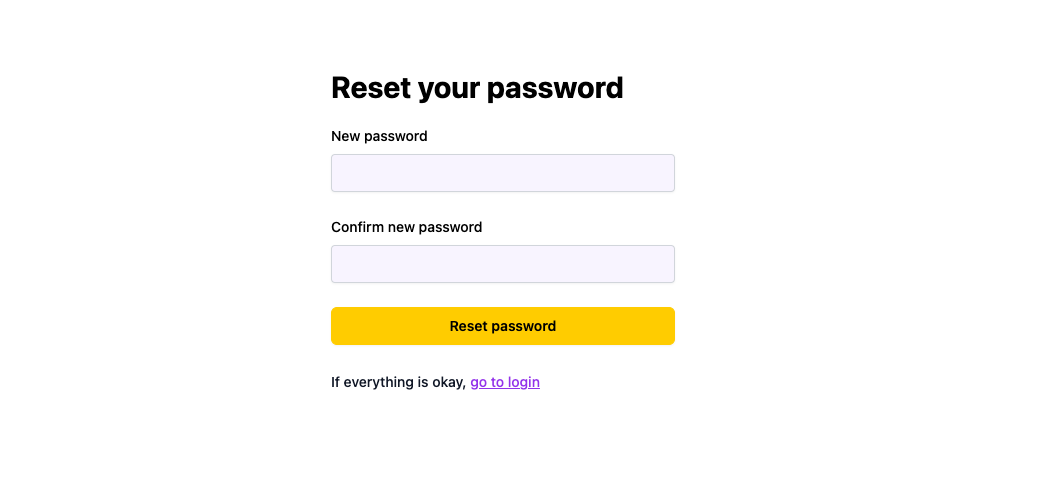
You can use the `ResetPasswordForm` component to build your reset password page:
* JavaScript
* TypeScript
main.wasp
```
// ...route PasswordResetRoute { path: ""/password-reset"", to: PasswordResetPage }page PasswordResetPage { component: import { ResetPasswordPage } from ""@src/ResetPasswordPage.jsx""}
```
src/ResetPasswordPage.jsx
```
import { ResetPasswordForm } from 'wasp/client/auth'// Use it like thisexport function ResetPasswordPage() { return }
```
### Verify Email Form[](#verify-email-form ""Direct link to Verify Email Form"")
Used with [Email](https://wasp-lang.dev/docs/auth/email) authentication.
After users sign up, they will receive an email with a link to this form where they can verify their email.
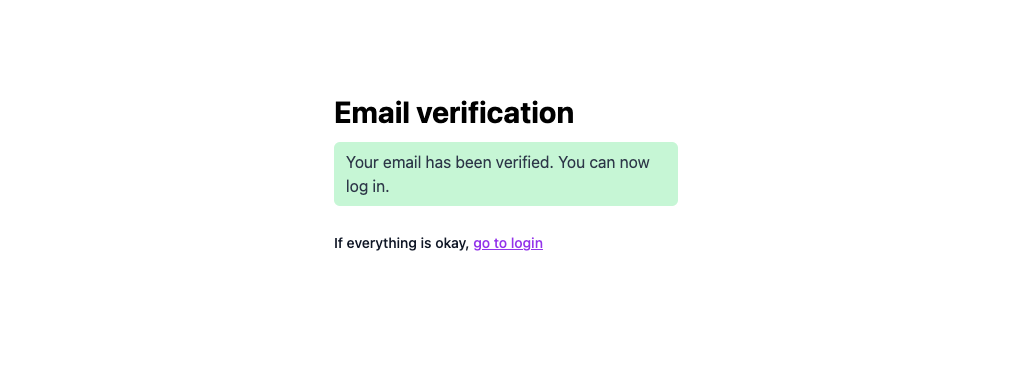
You can use the `VerifyEmailForm` component to build your email verification page:
* JavaScript
* TypeScript
main.wasp
```
// ...route EmailVerificationRoute { path: ""/email-verification"", to: EmailVerificationPage }page EmailVerificationPage { component: import { VerifyEmailPage } from ""@src/VerifyEmailPage.jsx""}
```
src/VerifyEmailPage.jsx
```
import { VerifyEmailForm } from 'wasp/client/auth'// Use it like thisexport function VerifyEmailPage() { return }
```
## Customization 💅🏻[](#customization- ""Direct link to Customization 💅🏻"")
You customize all of the available forms by passing props to them.
Props you can pass to all of the forms:
1. `appearance` - customize the form colors (via design tokens)
2. `logo` - path to your logo
3. `socialLayout` - layout of the social buttons, which can be `vertical` or `horizontal`
### 1\. Customizing the Colors[](#1-customizing-the-colors ""Direct link to 1. Customizing the Colors"")
We use [Stitches](https://stitches.dev/) to style the Auth UI. You can customize the styles by overriding the default theme tokens.
* JavaScript
* TypeScript
src/appearance.js
```
export const authAppearance = { colors: { brand: '#5969b8', // blue brandAccent: '#de5998', // pink submitButtonText: 'white', },}
```
src/LoginPage.jsx
```
import { LoginForm } from 'wasp/client/auth'import { authAppearance } from './appearance'export function LoginPage() { return ( )}
```
We recommend defining your appearance in a separate file and importing it into your components.
### 2\. Using Your Logo[](#2-using-your-logo ""Direct link to 2. Using Your Logo"")
You can add your logo to the Auth UI by passing the `logo` prop to any of the components.
* JavaScript
* TypeScript
src/LoginPage.jsx
```
import { LoginForm } from 'wasp/client/auth'import Logo from './logo.png'export function LoginPage() { return ( )}
```
You can change the layout of the social buttons by passing the `socialLayout` prop to any of the components. It can be either `vertical` or `horizontal` (default).
If we pass in `vertical`:
* JavaScript
* TypeScript
src/LoginPage.jsx
```
import { LoginForm } from 'wasp/client/auth'export function LoginPage() { return ( )}
```
We get this:
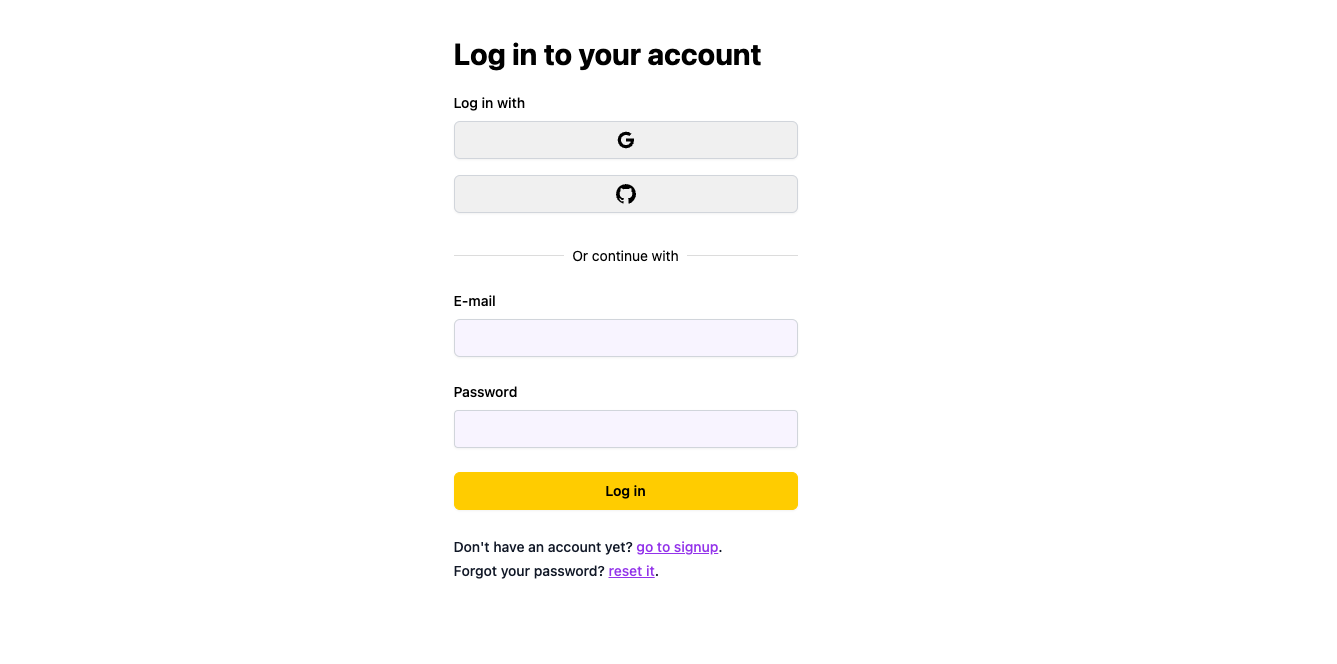
### Let's Put Everything Together 🪄[](#lets-put-everything-together- ""Direct link to Let's Put Everything Together 🪄"")
If we provide the logo and custom colors:
* JavaScript
* TypeScript
src/appearance.js
```
export const appearance = { colors: { brand: '#5969b8', // blue brandAccent: '#de5998', // pink submitButtonText: 'white', },}
```
src/LoginPage.jsx
```
import { LoginForm } from 'wasp/client/auth'import { authAppearance } from './appearance'import todoLogo from './todoLogo.png'export function LoginPage() { return }
```
We get a form looking like this:
",,"https://wasp-lang.dev/docs/auth/ui","To make using authentication in your app as easy as possible, Wasp generates the server-side code but also the client-side UI for you. It enables you to quickly get the login, signup, password reset and email verification flows in your app.","*","0","h3="":443""; ma=86400","max-age=600","DYNAMIC","878eccbb99e13903-IAD","close","br","text/html; charset=utf-8","Tue, 23 Apr 2024 15:13:49 GMT","Tue, 23 Apr 2024 15:23:49 GMT","Thu, 18 Apr 2024 15:50:27 GMT","{""success_fraction"":0,""report_to"":""cf-nel"",""max_age"":604800}","{""endpoints"":[{""url"":""https:\/\/a.nel.cloudflare.com\/report\/v4?s=ypke%2FW2pfLPDcyWQr6b2%2F6RH6xOFm3BlK9eWQXe4RFxUJbug9Uvk4LYRhYaCrcr5H%2F7lbqfop6XkYk6%2Fzh8SMOk3mzgmr%2BRN8wrtBCaT%2BMFP0Be1EbtWWIXRglepniE3""}],""group"":""cf-nel"",""max_age"":604800}","cloudflare","chunked","Accept-Encoding","1.1 varnish","MISS","0","deff1826367750d2a6c31fac766e5dd8e7765101",,"85FE:20ED2:3C22B46:47437A0:6627D02C","HIT","MISS","cache-iad-kiad7000160-IAD","S1713885229.435263,VS0,VE12",,,"en","https://wasp-lang.dev/img/wasp_twitter_cover.png","og:image","https://wasp-lang.dev/docs/auth/ui","og:url","Auth UI | Wasp","og:title","To make using authentication in your app as easy as possible, Wasp generates the server-side code but also the client-side UI for you. It enables you to quickly get the login, signup, password reset and email verification flows in your app.","og:description","Auth UI | Wasp",,"Auth UI
To make using authentication in your app as easy as possible, Wasp generates the server-side code but also the client-side UI for you. It enables you to quickly get the login, signup, password reset and email verification flows in your app.
Below we cover all of the available UI components and how to use them.
Overview
After Wasp generates the UI components for your auth, you can use it as is, or customize it to your liking.
Based on the authentication providers you enabled in your main.wasp file, the Auth UI will show the corresponding UI (form and buttons). For example, if you enabled e-mail authentication:
JavaScript
TypeScript
main.wasp
app MyApp {
//...
auth: {
methods: {
email: {},
},
// ...
}
}
You'll get the following UI:
And then if you enable Google and Github:
JavaScript
TypeScript
main.wasp
app MyApp {
//...
auth: {
methods: {
email: {},
google: {},
github: {},
},
// ...
}
}
The form will automatically update to look like this:
Let's go through all of the available components and how to use them.
Auth Components
The following components are available for you to use in your app:
Login form
Signup form
Forgot password form
Reset password form
Verify email form
Login Form
Used with Username & Password, Email, Github, Google and Keycloak authentication.
You can use the LoginForm component to build your login page:
JavaScript
TypeScript
main.wasp
// ...
route LoginRoute { path: ""/login"", to: LoginPage }
page LoginPage {
component: import { LoginPage } from ""@src/LoginPage.jsx""
}
src/LoginPage.jsx
import { LoginForm } from 'wasp/client/auth'
// Use it like this
export function LoginPage() {
return
}
It will automatically show the correct authentication providers based on your main.wasp file.
Signup Form
Used with Username & Password, Email, Github, Google and Keycloak authentication.
You can use the SignupForm component to build your signup page:
JavaScript
TypeScript
main.wasp
// ...
route SignupRoute { path: ""/signup"", to: SignupPage }
page SignupPage {
component: import { SignupPage } from ""@src/SignupPage.jsx""
}
src/SignupPage.jsx
import { SignupForm } from 'wasp/client/auth'
// Use it like this
export function SignupPage() {
return
}
It will automatically show the correct authentication providers based on your main.wasp file.
Read more about customizing the signup process like adding additional fields or extra UI in the Auth Overview section.
Forgot Password Form
Used with Email authentication.
If users forget their password, they can use this form to reset it.
You can use the ForgotPasswordForm component to build your own forgot password page:
JavaScript
TypeScript
main.wasp
// ...
route RequestPasswordResetRoute { path: ""/request-password-reset"", to: RequestPasswordResetPage }
page RequestPasswordResetPage {
component: import { ForgotPasswordPage } from ""@src/ForgotPasswordPage.jsx""
}
src/ForgotPasswordPage.jsx
import { ForgotPasswordForm } from 'wasp/client/auth'
// Use it like this
export function ForgotPasswordPage() {
return
}
Reset Password Form
Used with Email authentication.
After users click on the link in the email they receive after submitting the forgot password form, they will be redirected to this form where they can reset their password.
You can use the ResetPasswordForm component to build your reset password page:
JavaScript
TypeScript
main.wasp
// ...
route PasswordResetRoute { path: ""/password-reset"", to: PasswordResetPage }
page PasswordResetPage {
component: import { ResetPasswordPage } from ""@src/ResetPasswordPage.jsx""
}
src/ResetPasswordPage.jsx
import { ResetPasswordForm } from 'wasp/client/auth'
// Use it like this
export function ResetPasswordPage() {
return
}
Verify Email Form
Used with Email authentication.
After users sign up, they will receive an email with a link to this form where they can verify their email.
You can use the VerifyEmailForm component to build your email verification page:
JavaScript
TypeScript
main.wasp
// ...
route EmailVerificationRoute { path: ""/email-verification"", to: EmailVerificationPage }
page EmailVerificationPage {
component: import { VerifyEmailPage } from ""@src/VerifyEmailPage.jsx""
}
src/VerifyEmailPage.jsx
import { VerifyEmailForm } from 'wasp/client/auth'
// Use it like this
export function VerifyEmailPage() {
return
}
Customization 💅🏻
You customize all of the available forms by passing props to them.
Props you can pass to all of the forms:
appearance - customize the form colors (via design tokens)
logo - path to your logo
socialLayout - layout of the social buttons, which can be vertical or horizontal
1. Customizing the Colors
We use Stitches to style the Auth UI. You can customize the styles by overriding the default theme tokens.
JavaScript
TypeScript
src/appearance.js
export const authAppearance = {
colors: {
brand: '#5969b8', // blue
brandAccent: '#de5998', // pink
submitButtonText: 'white',
},
}
src/LoginPage.jsx
import { LoginForm } from 'wasp/client/auth'
import { authAppearance } from './appearance'
export function LoginPage() {
return (
)
}
We recommend defining your appearance in a separate file and importing it into your components.
2. Using Your Logo
You can add your logo to the Auth UI by passing the logo prop to any of the components.
JavaScript
TypeScript
src/LoginPage.jsx
import { LoginForm } from 'wasp/client/auth'
import Logo from './logo.png'
export function LoginPage() {
return (
)
}
You can change the layout of the social buttons by passing the socialLayout prop to any of the components. It can be either vertical or horizontal (default).
If we pass in vertical:
JavaScript
TypeScript
src/LoginPage.jsx
import { LoginForm } from 'wasp/client/auth'
export function LoginPage() {
return (
)
}
We get this:
Let's Put Everything Together 🪄
If we provide the logo and custom colors:
JavaScript
TypeScript
src/appearance.js
export const appearance = {
colors: {
brand: '#5969b8', // blue
brandAccent: '#de5998', // pink
submitButtonText: 'white',
},
}
src/LoginPage.jsx
import { LoginForm } from 'wasp/client/auth'
import { authAppearance } from './appearance'
import todoLogo from './todoLogo.png'
export function LoginPage() {
return
}
We get a form looking like this:","https://wasp-lang.dev/docs/auth/ui"
"1",,"2024-04-23T15:13:50.528Z","https://wasp-lang.dev/docs/auth/username-and-pass","https://wasp-lang.dev/docs","http","## Username & Password
Wasp supports username & password authentication out of the box with login and signup flows. It provides you with the server-side implementation and the UI components for the client-side.
## Setting Up Username & Password Authentication[](#setting-up-username--password-authentication ""Direct link to Setting Up Username & Password Authentication"")
To set up username authentication we need to:
1. Enable username authentication in the Wasp file
2. Add the `User` entity
3. Add the auth routes and pages
4. Use Auth UI components in our pages
Structure of the `main.wasp` file we will end up with:
main.wasp
```
// Configuring e-mail authenticationapp myApp { auth: { ... }}// Defining User entityentity User { ... }// Defining routes and pagesroute SignupRoute { ... }page SignupPage { ... }// ...
```
### 1\. Enable Username Authentication[](#1-enable-username-authentication ""Direct link to 1. Enable Username Authentication"")
Let's start with adding the following to our `main.wasp` file:
* JavaScript
* TypeScript
main.wasp
```
app myApp { wasp: { version: ""^0.13.0"" }, title: ""My App"", auth: { // 1. Specify the user entity (we'll define it next) userEntity: User, methods: { // 2. Enable username authentication usernameAndPassword: {}, }, onAuthFailedRedirectTo: ""/login"" }}
```
Read more about the `usernameAndPassword` auth method options [here](#fields-in-the-usernameandpassword-dict).
### 2\. Add the User Entity[](#2-add-the-user-entity ""Direct link to 2. Add the User Entity"")
The `User` entity can be as simple as including only the `id` field:
* JavaScript
* TypeScript
main.wasp
```
// 3. Define the user entityentity User {=psl id Int @id @default(autoincrement()) // Add your own fields below // ...psl=}
```
You can read more about how the `User` entity is connected to the rest of the auth system in the [Auth Entities](https://wasp-lang.dev/docs/auth/entities) section of the docs.
### 3\. Add the Routes and Pages[](#3-add-the-routes-and-pages ""Direct link to 3. Add the Routes and Pages"")
Next, we need to define the routes and pages for the authentication pages.
Add the following to the `main.wasp` file:
* JavaScript
* TypeScript
main.wasp
```
// ...// 4. Define the routesroute LoginRoute { path: ""/login"", to: LoginPage }page LoginPage { component: import { Login } from ""@src/pages/auth.jsx""}route SignupRoute { path: ""/signup"", to: SignupPage }page SignupPage { component: import { Signup } from ""@src/pages/auth.jsx""}
```
We'll define the React components for these pages in the `src/pages/auth.tsx` file below.
### 4\. Create the Client Pages[](#4-create-the-client-pages ""Direct link to 4. Create the Client Pages"")
info
We are using [Tailwind CSS](https://tailwindcss.com/) to style the pages. Read more about how to add it [here](https://wasp-lang.dev/docs/project/css-frameworks).
Let's create a `auth.tsx` file in the `src/pages` folder and add the following to it:
* JavaScript
* TypeScript
src/pages/auth.jsx
```
import { LoginForm, SignupForm } from 'wasp/client/auth'import { Link } from 'react-router-dom'export function Login() { return (
Don't have an account yet? go to signup. );}export function Signup() { return (
I already have an account (go to login). );}// A layout component to center the contentexport function Layout({ children }) { return ( );}
```
We imported the generated Auth UI components and used them in our pages. Read more about the Auth UI components [here](https://wasp-lang.dev/docs/auth/ui).
### Conclusion[](#conclusion ""Direct link to Conclusion"")
That's it! We have set up username authentication in our app. 🎉
Running `wasp db migrate-dev` and then `wasp start` should give you a working app with username authentication. If you want to put some of the pages behind authentication, read the [auth overview docs](https://wasp-lang.dev/docs/auth/overview).
Using multiple auth identities for a single user
Wasp currently doesn't support multiple auth identities for a single user. This means, for example, that a user can't have both an email-based auth identity and a Google-based auth identity. This is something we will add in the future with the introduction of the [account merging feature](https://github.com/wasp-lang/wasp/issues/954).
Account merging means that multiple auth identities can be merged into a single user account. For example, a user's email and Google identity can be merged into a single user account. Then the user can log in with either their email or Google account and they will be logged into the same account.
## Customizing the Auth Flow[](#customizing-the-auth-flow ""Direct link to Customizing the Auth Flow"")
The login and signup flows are pretty standard: they allow the user to sign up and then log in with their username and password. The signup flow validates the username and password and then creates a new user entity in the database.
Read more about the default username and password validation rules in the [auth overview docs](https://wasp-lang.dev/docs/auth/overview#default-validations).
If you require more control in your authentication flow, you can achieve that in the following ways:
1. Create your UI and use `signup` and `login` actions.
2. Create your custom sign-up action which uses the lower-level API, along with your custom code.
### 1\. Using the `signup` and `login` actions[](#1-using-the-signup-and-login-actions ""Direct link to 1-using-the-signup-and-login-actions"")
#### `login()`[](#login ""Direct link to login"")
An action for logging in the user.
It takes two arguments:
* `username: string` required
Username of the user logging in.
* `password: string` required
Password of the user logging in.
You can use it like this:
* JavaScript
* TypeScript
src/pages/auth.jsx
```
import { login } from 'wasp/client/auth'import { useState } from 'react'import { useHistory, Link } from 'react-router-dom'export function LoginPage() { const [username, setUsername] = useState('') const [password, setPassword] = useState('') const [error, setError] = useState(null) const history = useHistory() async function handleSubmit(event) { event.preventDefault() try { await login(username, password) history.push('/') } catch (error) { setError(error) } } return ( );}
```
note
When using the exposed `login()` function, make sure to implement your redirect on success login logic (e.g. redirecting to home).
#### `signup()`[](#signup ""Direct link to signup"")
An action for signing up the user. This action does not log in the user, you still need to call `login()`.
It takes one argument:
* `userFields: object` required
It has the following fields:
* `username: string` required
* `password: string` required
info
By default, Wasp will only save the `username` and `password` fields. If you want to add extra fields to your signup process, read about [defining extra signup fields](https://wasp-lang.dev/docs/auth/overview#customizing-the-signup-process).
You can use it like this:
* JavaScript
* TypeScript
src/pages/auth.jsx
```
import { signup, login } from 'wasp/client/auth'import { useState } from 'react'import { useHistory } from 'react-router-dom'import { Link } from 'react-router-dom'export function Signup() { const [username, setUsername] = useState('') const [password, setPassword] = useState('') const [error, setError] = useState(null) const history = useHistory() async function handleSubmit(event) { event.preventDefault() try { await signup({ username, password, }) await login(username, password) history.push(""/"") } catch (error) { setError(error) } } return ( );}
```
### 2\. Creating your custom sign-up action[](#2-creating-your-custom-sign-up-action ""Direct link to 2. Creating your custom sign-up action"")
The code of your custom sign-up action can look like this:
* JavaScript
* TypeScript
main.wasp
```
// ...action customSignup { fn: import { signup } from ""@src/auth/signup.js"",}
```
src/auth/signup.js
```
import { ensurePasswordIsPresent, ensureValidPassword, ensureValidUsername, createProviderId, sanitizeAndSerializeProviderData, createUser,} from 'wasp/server/auth'export const signup = async (args, _context) => { ensureValidUsername(args) ensurePasswordIsPresent(args) ensureValidPassword(args) try { const providerId = createProviderId('username', args.username) const providerData = await sanitizeAndSerializeProviderData({ hashedPassword: args.password, }) await createUser( providerId, providerData, // Any additional data you want to store on the User entity {}, ) } catch (e) { return { success: false, message: e.message, } } // Your custom code after sign-up. // ... return { success: true, message: 'User created successfully', }}
```
We suggest using the built-in field validators for your authentication flow. You can import them from `wasp/server/auth`. These are the same validators that Wasp uses internally for the default authentication flow.
#### Username[](#username ""Direct link to Username"")
* `ensureValidUsername(args)`
Checks if the username is valid and throws an error if it's not. Read more about the validation rules [here](https://wasp-lang.dev/docs/auth/overview#default-validations).
#### Password[](#password ""Direct link to Password"")
* `ensurePasswordIsPresent(args)`
Checks if the password is present and throws an error if it's not.
* `ensureValidPassword(args)`
Checks if the password is valid and throws an error if it's not. Read more about the validation rules [here](https://wasp-lang.dev/docs/auth/overview#default-validations).
## Using Auth[](#using-auth ""Direct link to Using Auth"")
To read more about how to set up the logout button and how to get access to the logged-in user in our client and server code, read the [auth overview docs](https://wasp-lang.dev/docs/auth/overview).
### `getUsername`[](#getusername ""Direct link to getusername"")
If you are looking to access the user's username in your code, you can do that by accessing the info about the user that is stored in the `user.auth.identities` array.
To make things a bit easier for you, Wasp offers the `getUsername` helper.
The `getUsername` helper returns the user's username or `null` if the user doesn't have a username auth identity.
* JavaScript
* TypeScript
src/MainPage.jsx
```
import { getUsername } from 'wasp/auth'const MainPage = ({ user }) => { const username = getUsername(user) // ...}
```
src/tasks.js
```
import { getUsername } from 'wasp/auth'export const createTask = async (args, context) => { const username = getUsername(context.user) // ...}
```
## API Reference[](#api-reference ""Direct link to API Reference"")
### `userEntity` fields[](#userentity-fields ""Direct link to userentity-fields"")
* JavaScript
* TypeScript
main.wasp
```
app myApp { wasp: { version: ""^0.13.0"" }, title: ""My App"", auth: { userEntity: User, methods: { usernameAndPassword: {}, }, onAuthFailedRedirectTo: ""/login"" }}entity User {=psl id Int @id @default(autoincrement())psl=}
```
The user entity needs to have the following fields:
* `id` required
It can be of any type, but it needs to be marked with `@id`
You can add any other fields you want to the user entity. Make sure to also define them in the `userSignupFields` field if they need to be set during the sign-up process.
### Fields in the `usernameAndPassword` dict[](#fields-in-the-usernameandpassword-dict ""Direct link to fields-in-the-usernameandpassword-dict"")
* JavaScript
* TypeScript
main.wasp
```
app myApp { wasp: { version: ""^0.13.0"" }, title: ""My App"", auth: { userEntity: User, methods: { usernameAndPassword: { userSignupFields: import { userSignupFields } from ""@src/auth/email.js"", }, }, onAuthFailedRedirectTo: ""/login"" }}// ...
```
#### `userSignupFields: ExtImport`[](#usersignupfields-extimport ""Direct link to usersignupfields-extimport"")
`userSignupFields` defines all the extra fields that need to be set on the `User` during the sign-up process. For example, if you have `address` and `phone` fields on your `User` entity, you can set them by defining the `userSignupFields` like this:
* JavaScript
* TypeScript
src/auth.js
```
import { defineUserSignupFields } from 'wasp/server/auth'export const userSignupFields = defineUserSignupFields({ address: (data) => { if (!data.address) { throw new Error('Address is required') } return data.address } phone: (data) => data.phone,})
```
Read more about the \`userSignupFields\` function \[here\](./overview#1-defining-extra-fields).",,"https://wasp-lang.dev/docs/auth/username-and-pass","Wasp supports username & password authentication out of the box with login and signup flows. It provides you with the server-side implementation and the UI components for the client-side.","*","0","h3="":443""; ma=86400","max-age=600","DYNAMIC","878eccc1c9cb3931-IAD","close","br","text/html; charset=utf-8","Tue, 23 Apr 2024 15:13:50 GMT","Tue, 23 Apr 2024 15:23:50 GMT","Thu, 18 Apr 2024 15:50:26 GMT","{""success_fraction"":0,""report_to"":""cf-nel"",""max_age"":604800}","{""endpoints"":[{""url"":""https:\/\/a.nel.cloudflare.com\/report\/v4?s=zCbajsEfLFBdOxb0toHYWAkgHUZqYe0aBsF%2BikDBKo83S3lOc6cjyy8X8JsExBL6MkdouTcLxvtBgpLBtHr3MTDQSj%2BKFDRGv6nMkEbEgIQ3PMb2Adm77DCEkIcvA2hw""}],""group"":""cf-nel"",""max_age"":604800}","cloudflare","chunked","Accept-Encoding","1.1 varnish","MISS","0","19b6980ee752644a4c3c36d5942decccad0f78ee",,"C444:53E77:3A81190:459D74E:6627D02D","HIT","MISS","cache-iad-kiad7000073-IAD","S1713885230.394492,VS0,VE16",,,"en","https://wasp-lang.dev/img/wasp_twitter_cover.png","og:image","https://wasp-lang.dev/docs/auth/username-and-pass","og:url","Username & Password | Wasp","og:title","Wasp supports username & password authentication out of the box with login and signup flows. It provides you with the server-side implementation and the UI components for the client-side.","og:description","Username & Password | Wasp",,"Username & Password
Wasp supports username & password authentication out of the box with login and signup flows. It provides you with the server-side implementation and the UI components for the client-side.
Setting Up Username & Password Authentication
To set up username authentication we need to:
Enable username authentication in the Wasp file
Add the User entity
Add the auth routes and pages
Use Auth UI components in our pages
Structure of the main.wasp file we will end up with:
main.wasp
// Configuring e-mail authentication
app myApp {
auth: { ... }
}
// Defining User entity
entity User { ... }
// Defining routes and pages
route SignupRoute { ... }
page SignupPage { ... }
// ...
1. Enable Username Authentication
Let's start with adding the following to our main.wasp file:
JavaScript
TypeScript
main.wasp
app myApp {
wasp: {
version: ""^0.13.0""
},
title: ""My App"",
auth: {
// 1. Specify the user entity (we'll define it next)
userEntity: User,
methods: {
// 2. Enable username authentication
usernameAndPassword: {},
},
onAuthFailedRedirectTo: ""/login""
}
}
Read more about the usernameAndPassword auth method options here.
2. Add the User Entity
The User entity can be as simple as including only the id field:
JavaScript
TypeScript
main.wasp
// 3. Define the user entity
entity User {=psl
id Int @id @default(autoincrement())
// Add your own fields below
// ...
psl=}
You can read more about how the User entity is connected to the rest of the auth system in the Auth Entities section of the docs.
3. Add the Routes and Pages
Next, we need to define the routes and pages for the authentication pages.
Add the following to the main.wasp file:
JavaScript
TypeScript
main.wasp
// ...
// 4. Define the routes
route LoginRoute { path: ""/login"", to: LoginPage }
page LoginPage {
component: import { Login } from ""@src/pages/auth.jsx""
}
route SignupRoute { path: ""/signup"", to: SignupPage }
page SignupPage {
component: import { Signup } from ""@src/pages/auth.jsx""
}
We'll define the React components for these pages in the src/pages/auth.tsx file below.
4. Create the Client Pages
info
We are using Tailwind CSS to style the pages. Read more about how to add it here.
Let's create a auth.tsx file in the src/pages folder and add the following to it:
JavaScript
TypeScript
src/pages/auth.jsx
import { LoginForm, SignupForm } from 'wasp/client/auth'
import { Link } from 'react-router-dom'
export function Login() {
return (
Don't have an account yet? go to signup.
);
}
export function Signup() {
return (
I already have an account (go to login).
);
}
// A layout component to center the content
export function Layout({ children }) {
return (
);
}
We imported the generated Auth UI components and used them in our pages. Read more about the Auth UI components here.
Conclusion
That's it! We have set up username authentication in our app. 🎉
Running wasp db migrate-dev and then wasp start should give you a working app with username authentication. If you want to put some of the pages behind authentication, read the auth overview docs.
Using multiple auth identities for a single user
Wasp currently doesn't support multiple auth identities for a single user. This means, for example, that a user can't have both an email-based auth identity and a Google-based auth identity. This is something we will add in the future with the introduction of the account merging feature.
Account merging means that multiple auth identities can be merged into a single user account. For example, a user's email and Google identity can be merged into a single user account. Then the user can log in with either their email or Google account and they will be logged into the same account.
Customizing the Auth Flow
The login and signup flows are pretty standard: they allow the user to sign up and then log in with their username and password. The signup flow validates the username and password and then creates a new user entity in the database.
Read more about the default username and password validation rules in the auth overview docs.
If you require more control in your authentication flow, you can achieve that in the following ways:
Create your UI and use signup and login actions.
Create your custom sign-up action which uses the lower-level API, along with your custom code.
1. Using the signup and login actions
login()
An action for logging in the user.
It takes two arguments:
username: string required
Username of the user logging in.
password: string required
Password of the user logging in.
You can use it like this:
JavaScript
TypeScript
src/pages/auth.jsx
import { login } from 'wasp/client/auth'
import { useState } from 'react'
import { useHistory, Link } from 'react-router-dom'
export function LoginPage() {
const [username, setUsername] = useState('')
const [password, setPassword] = useState('')
const [error, setError] = useState(null)
const history = useHistory()
async function handleSubmit(event) {
event.preventDefault()
try {
await login(username, password)
history.push('/')
} catch (error) {
setError(error)
}
}
return (
);
}
note
When using the exposed login() function, make sure to implement your redirect on success login logic (e.g. redirecting to home).
signup()
An action for signing up the user. This action does not log in the user, you still need to call login().
It takes one argument:
userFields: object required
It has the following fields:
username: string required
password: string required
info
By default, Wasp will only save the username and password fields. If you want to add extra fields to your signup process, read about defining extra signup fields.
You can use it like this:
JavaScript
TypeScript
src/pages/auth.jsx
import { signup, login } from 'wasp/client/auth'
import { useState } from 'react'
import { useHistory } from 'react-router-dom'
import { Link } from 'react-router-dom'
export function Signup() {
const [username, setUsername] = useState('')
const [password, setPassword] = useState('')
const [error, setError] = useState(null)
const history = useHistory()
async function handleSubmit(event) {
event.preventDefault()
try {
await signup({
username,
password,
})
await login(username, password)
history.push(""/"")
} catch (error) {
setError(error)
}
}
return (
);
}
2. Creating your custom sign-up action
The code of your custom sign-up action can look like this:
JavaScript
TypeScript
main.wasp
// ...
action customSignup {
fn: import { signup } from ""@src/auth/signup.js"",
}
src/auth/signup.js
import {
ensurePasswordIsPresent,
ensureValidPassword,
ensureValidUsername,
createProviderId,
sanitizeAndSerializeProviderData,
createUser,
} from 'wasp/server/auth'
export const signup = async (args, _context) => {
ensureValidUsername(args)
ensurePasswordIsPresent(args)
ensureValidPassword(args)
try {
const providerId = createProviderId('username', args.username)
const providerData = await sanitizeAndSerializeProviderData({
hashedPassword: args.password,
})
await createUser(
providerId,
providerData,
// Any additional data you want to store on the User entity
{},
)
} catch (e) {
return {
success: false,
message: e.message,
}
}
// Your custom code after sign-up.
// ...
return {
success: true,
message: 'User created successfully',
}
}
We suggest using the built-in field validators for your authentication flow. You can import them from wasp/server/auth. These are the same validators that Wasp uses internally for the default authentication flow.
Username
ensureValidUsername(args)
Checks if the username is valid and throws an error if it's not. Read more about the validation rules here.
Password
ensurePasswordIsPresent(args)
Checks if the password is present and throws an error if it's not.
ensureValidPassword(args)
Checks if the password is valid and throws an error if it's not. Read more about the validation rules here.
Using Auth
To read more about how to set up the logout button and how to get access to the logged-in user in our client and server code, read the auth overview docs.
getUsername
If you are looking to access the user's username in your code, you can do that by accessing the info about the user that is stored in the user.auth.identities array.
To make things a bit easier for you, Wasp offers the getUsername helper.
The getUsername helper returns the user's username or null if the user doesn't have a username auth identity.
JavaScript
TypeScript
src/MainPage.jsx
import { getUsername } from 'wasp/auth'
const MainPage = ({ user }) => {
const username = getUsername(user)
// ...
}
src/tasks.js
import { getUsername } from 'wasp/auth'
export const createTask = async (args, context) => {
const username = getUsername(context.user)
// ...
}
API Reference
userEntity fields
JavaScript
TypeScript
main.wasp
app myApp {
wasp: {
version: ""^0.13.0""
},
title: ""My App"",
auth: {
userEntity: User,
methods: {
usernameAndPassword: {},
},
onAuthFailedRedirectTo: ""/login""
}
}
entity User {=psl
id Int @id @default(autoincrement())
psl=}
The user entity needs to have the following fields:
id required
It can be of any type, but it needs to be marked with @id
You can add any other fields you want to the user entity. Make sure to also define them in the userSignupFields field if they need to be set during the sign-up process.
Fields in the usernameAndPassword dict
JavaScript
TypeScript
main.wasp
app myApp {
wasp: {
version: ""^0.13.0""
},
title: ""My App"",
auth: {
userEntity: User,
methods: {
usernameAndPassword: {
userSignupFields: import { userSignupFields } from ""@src/auth/email.js"",
},
},
onAuthFailedRedirectTo: ""/login""
}
}
// ...
userSignupFields: ExtImport
userSignupFields defines all the extra fields that need to be set on the User during the sign-up process. For example, if you have address and phone fields on your User entity, you can set them by defining the userSignupFields like this:
JavaScript
TypeScript
src/auth.js
import { defineUserSignupFields } from 'wasp/server/auth'
export const userSignupFields = defineUserSignupFields({
address: (data) => {
if (!data.address) {
throw new Error('Address is required')
}
return data.address
}
phone: (data) => data.phone,
})
Read more about the `userSignupFields` function [here](./overview#1-defining-extra-fields).","https://wasp-lang.dev/docs/auth/username-and-pass"
"1","200","2024-04-23T15:13:47.752Z","https://wasp-lang.dev/docs/auth/overview","https://wasp-lang.dev/docs","browser","## Overview
Auth is an essential piece of any serious application. That's why Wasp provides authentication and authorization support out of the box.
Here's a 1-minute tour of how full-stack auth works in Wasp:
Enabling auth for your app is optional and can be done by configuring the `auth` field of your `app` declaration:
* JavaScript
* TypeScript
main.wasp
```
app MyApp { title: ""My app"", //... auth: { userEntity: User, methods: { usernameAndPassword: {}, // use this or email, not both email: {}, // use this or usernameAndPassword, not both google: {}, gitHub: {}, }, onAuthFailedRedirectTo: ""/someRoute"" }}//...
```
Read more about the `auth` field options in the [API Reference](#api-reference) section.
We will provide a quick overview of auth in Wasp and link to more detailed documentation for each auth method.
## Available auth methods[](#available-auth-methods ""Direct link to Available auth methods"")
Wasp supports the following auth methods:
Click on each auth method for more details.
Let's say we enabled the [Username & password](https://wasp-lang.dev/docs/auth/username-and-pass) authentication.
We get an auth backend with signup and login endpoints. We also get the `user` object in our [Operations](https://wasp-lang.dev/docs/data-model/operations/overview) and we can decide what to do based on whether the user is logged in or not.
We would also get the [Auth UI](https://wasp-lang.dev/docs/auth/ui) generated for us. We can set up our login and signup pages where our users can **create their account** and **login**. We can then protect certain pages by setting `authRequired: true` for them. This will make sure that only logged-in users can access them.
We will also have access to the `user` object in our frontend code, so we can show different UI to logged-in and logged-out users. For example, we can show the user's name in the header alongside a **logout button** or a login button if the user is not logged in.
## Protecting a page with `authRequired`[](#protecting-a-page-with-authrequired ""Direct link to protecting-a-page-with-authrequired"")
When declaring a page, you can set the `authRequired` property.
If you set it to `true`, only authenticated users can access the page. Unauthenticated users are redirected to a route defined by the `app.auth.onAuthFailedRedirectTo` field.
* JavaScript
* TypeScript
main.wasp
```
page MainPage { component: import Main from ""@src/pages/Main"", authRequired: true}
```
Requires auth method
You can only use `authRequired` if your app uses one of the [available auth methods](#available-auth-methods).
If `authRequired` is set to `true`, the page's React component (specified by the `component` property) receives the `user` object as a prop. Read more about the `user` object in the [Accessing the logged-in user section](#accessing-the-logged-in-user).
## Logout action[](#logout-action ""Direct link to Logout action"")
We provide an action for logging out the user. Here's how you can use it:
* JavaScript
* TypeScript
src/components/LogoutButton.jsx
```
import { logout } from 'wasp/client/auth'const LogoutButton = () => { return }
```
## Accessing the logged-in user[](#accessing-the-logged-in-user ""Direct link to Accessing the logged-in user"")
You can get access to the `user` object both on the server and on the client. The `user` object contains the logged-in user's data.
The `user` object has all the fields that you defined in your `User` entity, plus the `auth` field which contains the auth identities connected to the user. For example, if the user signed up with their email, the `user` object might look something like this:
```
const user = { id: ""19c7d164-b5cb-4dde-a0cc-0daea77cf854"", // Your entity's fields. address: ""My address"", // ... // Auth identities connected to the user. auth: { id: ""26ab6f96-ed76-4ee5-9ac3-2fd0bf19711f"", identities: [ { providerName: ""email"", providerUserId: ""some@email.com"", providerData: { ... }, }, ] },}
```
You can read more about how the `User` entity is connected to the rest of the auth system in the [Auth Entities](https://wasp-lang.dev/docs/auth/entities) section of the docs.
### On the client[](#on-the-client ""Direct link to On the client"")
There are two ways to access the `user` object on the client:
* the `user` prop
* the `useAuth` hook
#### Using the `user` prop[](#using-the-user-prop ""Direct link to using-the-user-prop"")
If the page's declaration sets `authRequired` to `true`, the page's React component receives the `user` object as a prop:
* JavaScript
* TypeScript
main.wasp
```
// ...page AccountPage { component: import Account from ""@src/pages/Account"", authRequired: true}
```
src/pages/Account.jsx
```
import Button from './Button'import { logout } from 'wasp/client/auth'const AccountPage = ({ user }) => { return ( {JSON.stringify(user, null, 2)}
)}export default AccountPage
```
#### Using the `useAuth` hook[](#using-the-useauth-hook ""Direct link to using-the-useauth-hook"")
Wasp provides a React hook you can use in the client components - `useAuth`.
This hook is a thin wrapper over Wasp's `useQuery` hook and returns data in the same format.
* JavaScript
* TypeScript
src/pages/MainPage.jsx
```
import { useAuth, logout } from 'wasp/client/auth'import { Link } from 'react-router-dom'import Todo from '../Todo'export function Main() { const { data: user } = useAuth() if (!user) { return ( Please login or{' '} sign up. ) } else { return ( <> ) }}
```
tip
Since the `user` prop is only available in a page's React component: use the `user` prop in the page's React component and the `useAuth` hook in any other React component.
### On the server[](#on-the-server ""Direct link to On the server"")
#### Using the `context.user` object[](#using-the-contextuser-object ""Direct link to using-the-contextuser-object"")
When authentication is enabled, all [queries and actions](https://wasp-lang.dev/docs/data-model/operations/overview) have access to the `user` object through the `context` argument. `context.user` contains all User entity's fields and the auth identities connected to the user. We strip out the `hashedPassword` field from the identities for security reasons.
* JavaScript
* TypeScript
src/actions.js
```
import { HttpError } from 'wasp/server'export const createTask = async (task, context) => { if (!context.user) { throw new HttpError(403) } const Task = context.entities.Task return Task.create({ data: { description: task.description, user: { connect: { id: context.user.id }, }, }, })}
```
To implement access control in your app, each operation must check `context.user` and decide what to do. For example, if `context.user` is `undefined` inside a private operation, the user's access should be denied.
When using WebSockets, the `user` object is also available on the `socket.data` object. Read more in the [WebSockets section](https://wasp-lang.dev/docs/advanced/web-sockets#websocketfn-function).
## Sessions[](#sessions ""Direct link to Sessions"")
Wasp's auth uses sessions to keep track of the logged-in user. The session is stored in `localStorage` on the client and in the database on the server. Under the hood, Wasp uses the excellent [Lucia Auth v3](https://v3.lucia-auth.com/) library for session management.
When users log in, Wasp creates a session for them and stores it in the database. The session is then sent to the client and stored in `localStorage`. When users log out, Wasp deletes the session from the database and from `localStorage`.
## User Entity[](#user-entity ""Direct link to User Entity"")
### Password Hashing[](#password-hashing ""Direct link to Password Hashing"")
If you are saving a user's password in the database, you should **never** save it as plain text. You can use Wasp's helper functions for serializing and deserializing provider data which will automatically hash the password for you:
main.wasp
```
// ...action updatePassword { fn: import { updatePassword } from ""@src/auth"",}
```
* JavaScript
* TypeScript
src/auth.js
```
import { createProviderId, findAuthIdentity, updateAuthIdentityProviderData, deserializeAndSanitizeProviderData,} from 'wasp/server/auth';export const updatePassword = async (args, context) => { const providerId = createProviderId('email', args.email) const authIdentity = await findAuthIdentity(providerId) if (!authIdentity) { throw new HttpError(400, ""Unknown user"") } const providerData = deserializeAndSanitizeProviderData(authIdentity.providerData) // Updates the password and hashes it automatically. await updateAuthIdentityProviderData(providerId, providerData, { hashedPassword: args.password, })}
```
### Default Validations[](#default-validations ""Direct link to Default Validations"")
When you are using the default authentication flow, Wasp validates the fields with some default validations. These validations run if you use Wasp's built-in [Auth UI](https://wasp-lang.dev/docs/auth/ui) or if you use the provided auth actions.
If you decide to create your [custom auth actions](https://wasp-lang.dev/docs/auth/username-and-pass#2-creating-your-custom-sign-up-action), you'll need to run the validations yourself.
Default validations depend on the auth method you use.
#### Username & Password[](#username--password ""Direct link to Username & Password"")
If you use [Username & password](https://wasp-lang.dev/docs/auth/username-and-pass) authentication, the default validations are:
* The `username` must not be empty
* The `password` must not be empty, have at least 8 characters, and contain a number
Note that `username`s are stored in a **case-insensitive** manner.
#### Email[](#email ""Direct link to Email"")
If you use [Email](https://wasp-lang.dev/docs/auth/email) authentication, the default validations are:
* The `email` must not be empty and a valid email address
* The `password` must not be empty, have at least 8 characters, and contain a number
Note that `email`s are stored in a **case-insensitive** manner.
## Customizing the Signup Process[](#customizing-the-signup-process ""Direct link to Customizing the Signup Process"")
Sometimes you want to include **extra fields** in your signup process, like first name and last name and save them in the `User` entity.
For this to happen:
* you need to define the fields that you want saved in the database,
* you need to customize the `SignupForm` (in the case of [Email](https://wasp-lang.dev/docs/auth/email) or [Username & Password](https://wasp-lang.dev/docs/auth/username-and-pass) auth)
Other times, you might need to just add some **extra UI** elements to the form, like a checkbox for terms of service. In this case, customizing only the UI components is enough.
Let's see how to do both.
If we want to **save** some extra fields in our signup process, we need to tell our app they exist.
We do that by defining an object where the keys represent the field name, and the values are functions that receive the data sent from the client\* and return the value of the field.
\* We exclude the `password` field from this object to prevent it from being saved as plain-text in the database. The `password` field is handled by Wasp's auth backend.
First, we add the `auth.methods.{authMethod}.userSignupFields` field in our `main.wasp` file. The `{authMethod}` depends on the auth method you are using.
For example, if you are using [Username & Password](https://wasp-lang.dev/docs/auth/username-and-pass), you would add the `auth.methods.usernameAndPassword.userSignupFields` field:
* JavaScript
* TypeScript
main.wasp
```
app crudTesting { // ... auth: { userEntity: User, methods: { usernameAndPassword: { userSignupFields: import { userSignupFields } from ""@src/auth/signup"", }, }, onAuthFailedRedirectTo: ""/login"", },}entity User {=psl id Int @id @default(autoincrement()) address String?psl=}
```
Then we'll define the `userSignupFields` object in the `src/auth/signup.js` file:
src/auth/signup.js
```
import { defineUserSignupFields } from 'wasp/server/auth'export const userSignupFields = defineUserSignupFields({ address: async (data) => { const address = data.address if (typeof address !== 'string') { throw new Error('Address is required') } if (address.length < 5) { throw new Error('Address must be at least 5 characters long') } return address },})
```
Read more about the `userSignupFields` object in the [API Reference](#signup-fields-customization).
Keep in mind, that these field names need to exist on the `userEntity` you defined in your `main.wasp` file e.g. `address` needs to be a field on the `User` entity.
The field function will receive the data sent from the client and it needs to return the value that will be saved into the database. If the field is invalid, the function should throw an error.
Using Validation Libraries
You can use any validation library you want to validate the fields. For example, you can use `zod` like this:
Click to see the code
Now that we defined the fields, Wasp knows how to:
1. Validate the data sent from the client
2. Save the data to the database
Next, let's see how to customize [Auth UI](https://wasp-lang.dev/docs/auth/ui) to include those fields.
### 2\. Customizing the Signup Component[](#2-customizing-the-signup-component ""Direct link to 2. Customizing the Signup Component"")
Using Custom Signup Component
If you are not using Wasp's Auth UI, you can skip this section. Just make sure to include the extra fields in your custom signup form.
Read more about using the signup actions for:
* email auth [here](https://wasp-lang.dev/docs/auth/email#fields-in-the-email-dict)
* username & password auth [here](https://wasp-lang.dev/docs/auth/username-and-pass#customizing-the-auth-flow)
If you are using Wasp's Auth UI, you can customize the `SignupForm` component by passing the `additionalFields` prop to it. It can be either a list of extra fields or a render function.
When you pass in a list of extra fields to the `SignupForm`, they are added to the form one by one, in the order you pass them in.
Inside the list, there can be either **objects** or **render functions** (you can combine them):
1. Objects are a simple way to describe new fields you need, but a bit less flexible than render functions.
2. Render functions can be used to render any UI you want, but they require a bit more code. The render functions receive the `react-hook-form` object and the form state object as arguments.
* JavaScript
* TypeScript
src/SignupPage.jsx
```
import { SignupForm, FormError, FormInput, FormItemGroup, FormLabel,} from 'wasp/client/auth'export const SignupPage = () => { return ( { return ( Phone Number {form.formState.errors.phoneNumber && ( {form.formState.errors.phoneNumber.message} )} ) }, ]} /> )}
```
Read more about the extra fields in the [API Reference](#signupform-customization).
#### Using a Single Render Function[](#using-a-single-render-function ""Direct link to Using a Single Render Function"")
Instead of passing in a list of extra fields, you can pass in a render function which will receive the `react-hook-form` object and the form state object as arguments. What ever the render function returns, will be rendered below the default fields.
* JavaScript
* TypeScript
src/SignupPage.jsx
```
import { SignupForm, FormItemGroup } from 'wasp/client/auth'export const SignupPage = () => { return ( { const username = form.watch('username') return ( username && ( Hello there {username} 👋 ) ) }} /> )}
```
Read more about the render function in the [API Reference](#signupform-customization).
## API Reference[](#api-reference ""Direct link to API Reference"")
### Auth Fields[](#auth-fields ""Direct link to Auth Fields"")
* JavaScript
* TypeScript
main.wasp
```
title: ""My app"", //... auth: { userEntity: User, methods: { usernameAndPassword: {}, // use this or email, not both email: {}, // use this or usernameAndPassword, not both google: {}, gitHub: {}, }, onAuthFailedRedirectTo: ""/someRoute"", signup: { ... } }}//...
```
`app.auth` is a dictionary with the following fields:
#### `userEntity: entity` required[](#userentity-entity- ""Direct link to userentity-entity-"")
The entity representing the user connected to your business logic.
You can read more about how the `User` entity is connected to the rest of the auth system in the [Auth Entities](https://wasp-lang.dev/docs/auth/entities) section of the docs.
#### `methods: dict` required[](#methods-dict- ""Direct link to methods-dict-"")
A dictionary of auth methods enabled for the app.
Click on each auth method for more details.
#### `onAuthFailedRedirectTo: String` required[](#onauthfailedredirectto-string- ""Direct link to onauthfailedredirectto-string-"")
The route to which Wasp should redirect unauthenticated user when they try to access a private page (i.e., a page that has `authRequired: true`). Check out these [essentials docs on auth](https://wasp-lang.dev/docs/tutorial/auth#adding-auth-to-the-project) to see an example of usage.
#### `onAuthSucceededRedirectTo: String`[](#onauthsucceededredirectto-string ""Direct link to onauthsucceededredirectto-string"")
The route to which Wasp will send a successfully authenticated after a successful login/signup. The default value is `""/""`.
note
Automatic redirect on successful login only works when using the Wasp-provided [Auth UI](https://wasp-lang.dev/docs/auth/ui).
#### `signup: SignupOptions`[](#signup-signupoptions ""Direct link to signup-signupoptions"")
Read more about the signup process customization API in the [Signup Fields Customization](#signup-fields-customization) section.
### Signup Fields Customization[](#signup-fields-customization ""Direct link to Signup Fields Customization"")
If you want to add extra fields to the signup process, the server needs to know how to save them to the database. You do that by defining the `auth.methods.{authMethod}.userSignupFields` field in your `main.wasp` file.
* JavaScript
* TypeScript
main.wasp
```
app crudTesting { // ... auth: { userEntity: User, methods: { usernameAndPassword: { userSignupFields: import { userSignupFields } from ""@src/auth/signup"", }, }, onAuthFailedRedirectTo: ""/login"", },}
```
Then we'll export the `userSignupFields` object from the `src/auth/signup.js` file:
src/auth/signup.js
```
import { defineUserSignupFields } from 'wasp/server/auth'export const userSignupFields = defineUserSignupFields({ address: async (data) => { const address = data.address if (typeof address !== 'string') { throw new Error('Address is required') } if (address.length < 5) { throw new Error('Address must be at least 5 characters long') } return address },})
```
The `userSignupFields` object is an object where the keys represent the field name, and the values are functions that receive the data sent from the client\* and return the value of the field.
If the value that the function received is invalid, the function should throw an error.
\* We exclude the `password` field from this object to prevent it from being saved as plain text in the database. The `password` field is handled by Wasp's auth backend.
### `SignupForm` Customization[](#signupform-customization ""Direct link to signupform-customization"")
To customize the `SignupForm` component, you need to pass in the `additionalFields` prop. It can be either a list of extra fields or a render function.
* JavaScript
* TypeScript
src/SignupPage.jsx
```
import { SignupForm, FormError, FormInput, FormItemGroup, FormLabel,} from 'wasp/client/auth'export const SignupPage = () => { return ( { return ( Phone Number {form.formState.errors.phoneNumber && ( {form.formState.errors.phoneNumber.message} )} ) }, ]} /> )}
```
The extra fields can be either **objects** or **render functions** (you can combine them):
1. Objects are a simple way to describe new fields you need, but a bit less flexible than render functions.
The objects have the following properties:
* `name` required
* the name of the field
* `label` required
* the label of the field (used in the UI)
* `type` required
* the type of the field, which can be `input` or `textarea`
* `validations`
* an object with the validation rules for the field. The keys are the validation names, and the values are the validation error messages. Read more about the available validation rules in the [react-hook-form docs](https://react-hook-form.com/api/useform/register#register).
2. Render functions receive the `react-hook-form` object and the form state as arguments, and they can use them to render arbitrary UI elements.
The render function has the following signature:
```
;(form: UseFormReturn, state: FormState) => React.ReactNode
```
* `form` required
* the `react-hook-form` object, read more about it in the [react-hook-form docs](https://react-hook-form.com/api/useform)
* you need to use the `form.register` function to register your fields
* `state` required
* the form state object which has the following properties:
* `isLoading: boolean`
* whether the form is currently submitting",,"https://wasp-lang.dev/docs/auth/overview","Auth is an essential piece of any serious application. That's why Wasp provides authentication and authorization support out of the box.","*","0","h3="":443""; ma=86400","max-age=600","DYNAMIC","878ecc883b624bcc-BUF",,"br","text/html; charset=utf-8","Tue, 23 Apr 2024 15:13:41 GMT","Tue, 23 Apr 2024 15:23:41 GMT","Thu, 18 Apr 2024 15:50:26 GMT","{""success_fraction"":0, ""report_to"":""cf-nel"", ""max_age"":604800}","{""endpoints"":[{""url"":""https:\/\/a.nel.cloudflare.com\/report\/v4?s=N5Xx1Ny4JuiBSfrf7%2B%2Fd7RYvj8s6oeiULh8OLqOJ7MDN3bpkYV9ggubRv52ADbZplJGSKUrZxJhCCNSTTsVnZG0sAloj421Tn%2BFkJrhgwDNKXiL4CU7WkkI600EOntKs""}], ""group"":""cf-nel"", ""max_age"":604800}","cloudflare",,"Accept-Encoding","1.1 varnish","MISS","0","cb8f22656b26decda94f61ad3e206190e4ae8f7e","h2","83B6:2F9FB7:3A5BBF3:4577AE7:6627D025",,"MISS","cache-nyc-kteb1890087-NYC","S1713885221.167233, VS0, VE32",,,"en","https://wasp-lang.dev/img/wasp_twitter_cover.png","og:image","https://wasp-lang.dev/docs/auth/overview","og:url","Overview | Wasp","og:title","Auth is an essential piece of any serious application. That's why Wasp provides authentication and authorization support out of the box.","og:description","Overview | Wasp",,"Overview
Auth is an essential piece of any serious application. That's why Wasp provides authentication and authorization support out of the box.
Here's a 1-minute tour of how full-stack auth works in Wasp:
Enabling auth for your app is optional and can be done by configuring the auth field of your app declaration:
JavaScript
TypeScript
main.wasp
app MyApp {
title: ""My app"",
//...
auth: {
userEntity: User,
methods: {
usernameAndPassword: {}, // use this or email, not both
email: {}, // use this or usernameAndPassword, not both
google: {},
gitHub: {},
},
onAuthFailedRedirectTo: ""/someRoute""
}
}
//...
Read more about the auth field options in the API Reference section.
We will provide a quick overview of auth in Wasp and link to more detailed documentation for each auth method.
Available auth methods
Wasp supports the following auth methods:
Click on each auth method for more details.
Let's say we enabled the Username & password authentication.
We get an auth backend with signup and login endpoints. We also get the user object in our Operations and we can decide what to do based on whether the user is logged in or not.
We would also get the Auth UI generated for us. We can set up our login and signup pages where our users can create their account and login. We can then protect certain pages by setting authRequired: true for them. This will make sure that only logged-in users can access them.
We will also have access to the user object in our frontend code, so we can show different UI to logged-in and logged-out users. For example, we can show the user's name in the header alongside a logout button or a login button if the user is not logged in.
Protecting a page with authRequired
When declaring a page, you can set the authRequired property.
If you set it to true, only authenticated users can access the page. Unauthenticated users are redirected to a route defined by the app.auth.onAuthFailedRedirectTo field.
JavaScript
TypeScript
main.wasp
page MainPage {
component: import Main from ""@src/pages/Main"",
authRequired: true
}
Requires auth method
You can only use authRequired if your app uses one of the available auth methods.
If authRequired is set to true, the page's React component (specified by the component property) receives the user object as a prop. Read more about the user object in the Accessing the logged-in user section.
Logout action
We provide an action for logging out the user. Here's how you can use it:
JavaScript
TypeScript
src/components/LogoutButton.jsx
import { logout } from 'wasp/client/auth'
const LogoutButton = () => {
return
}
Accessing the logged-in user
You can get access to the user object both on the server and on the client. The user object contains the logged-in user's data.
The user object has all the fields that you defined in your User entity, plus the auth field which contains the auth identities connected to the user. For example, if the user signed up with their email, the user object might look something like this:
const user = {
id: ""19c7d164-b5cb-4dde-a0cc-0daea77cf854"",
// Your entity's fields.
address: ""My address"",
// ...
// Auth identities connected to the user.
auth: {
id: ""26ab6f96-ed76-4ee5-9ac3-2fd0bf19711f"",
identities: [
{
providerName: ""email"",
providerUserId: ""some@email.com"",
providerData: { ... },
},
]
},
}
You can read more about how the User entity is connected to the rest of the auth system in the Auth Entities section of the docs.
On the client
There are two ways to access the user object on the client:
the user prop
the useAuth hook
Using the user prop
If the page's declaration sets authRequired to true, the page's React component receives the user object as a prop:
JavaScript
TypeScript
main.wasp
// ...
page AccountPage {
component: import Account from ""@src/pages/Account"",
authRequired: true
}
src/pages/Account.jsx
import Button from './Button'
import { logout } from 'wasp/client/auth'
const AccountPage = ({ user }) => {
return (
{JSON.stringify(user, null, 2)}
)
}
export default AccountPage
Using the useAuth hook
Wasp provides a React hook you can use in the client components - useAuth.
This hook is a thin wrapper over Wasp's useQuery hook and returns data in the same format.
JavaScript
TypeScript
src/pages/MainPage.jsx
import { useAuth, logout } from 'wasp/client/auth'
import { Link } from 'react-router-dom'
import Todo from '../Todo'
export function Main() {
const { data: user } = useAuth()
if (!user) {
return (
Please login or{' '}
sign up.
)
} else {
return (
<>
)
}
}
tip
Since the user prop is only available in a page's React component: use the user prop in the page's React component and the useAuth hook in any other React component.
On the server
Using the context.user object
When authentication is enabled, all queries and actions have access to the user object through the context argument. context.user contains all User entity's fields and the auth identities connected to the user. We strip out the hashedPassword field from the identities for security reasons.
JavaScript
TypeScript
src/actions.js
import { HttpError } from 'wasp/server'
export const createTask = async (task, context) => {
if (!context.user) {
throw new HttpError(403)
}
const Task = context.entities.Task
return Task.create({
data: {
description: task.description,
user: {
connect: { id: context.user.id },
},
},
})
}
To implement access control in your app, each operation must check context.user and decide what to do. For example, if context.user is undefined inside a private operation, the user's access should be denied.
When using WebSockets, the user object is also available on the socket.data object. Read more in the WebSockets section.
Sessions
Wasp's auth uses sessions to keep track of the logged-in user. The session is stored in localStorage on the client and in the database on the server. Under the hood, Wasp uses the excellent Lucia Auth v3 library for session management.
When users log in, Wasp creates a session for them and stores it in the database. The session is then sent to the client and stored in localStorage. When users log out, Wasp deletes the session from the database and from localStorage.
User Entity
Password Hashing
If you are saving a user's password in the database, you should never save it as plain text. You can use Wasp's helper functions for serializing and deserializing provider data which will automatically hash the password for you:
main.wasp
// ...
action updatePassword {
fn: import { updatePassword } from ""@src/auth"",
}
JavaScript
TypeScript
src/auth.js
import {
createProviderId,
findAuthIdentity,
updateAuthIdentityProviderData,
deserializeAndSanitizeProviderData,
} from 'wasp/server/auth';
export const updatePassword = async (args, context) => {
const providerId = createProviderId('email', args.email)
const authIdentity = await findAuthIdentity(providerId)
if (!authIdentity) {
throw new HttpError(400, ""Unknown user"")
}
const providerData = deserializeAndSanitizeProviderData(authIdentity.providerData)
// Updates the password and hashes it automatically.
await updateAuthIdentityProviderData(providerId, providerData, {
hashedPassword: args.password,
})
}
Default Validations
When you are using the default authentication flow, Wasp validates the fields with some default validations. These validations run if you use Wasp's built-in Auth UI or if you use the provided auth actions.
If you decide to create your custom auth actions, you'll need to run the validations yourself.
Default validations depend on the auth method you use.
Username & Password
If you use Username & password authentication, the default validations are:
The username must not be empty
The password must not be empty, have at least 8 characters, and contain a number
Note that usernames are stored in a case-insensitive manner.
Email
If you use Email authentication, the default validations are:
The email must not be empty and a valid email address
The password must not be empty, have at least 8 characters, and contain a number
Note that emails are stored in a case-insensitive manner.
Customizing the Signup Process
Sometimes you want to include extra fields in your signup process, like first name and last name and save them in the User entity.
For this to happen:
you need to define the fields that you want saved in the database,
you need to customize the SignupForm (in the case of Email or Username & Password auth)
Other times, you might need to just add some extra UI elements to the form, like a checkbox for terms of service. In this case, customizing only the UI components is enough.
Let's see how to do both.
If we want to save some extra fields in our signup process, we need to tell our app they exist.
We do that by defining an object where the keys represent the field name, and the values are functions that receive the data sent from the client* and return the value of the field.
* We exclude the password field from this object to prevent it from being saved as plain-text in the database. The password field is handled by Wasp's auth backend.
First, we add the auth.methods.{authMethod}.userSignupFields field in our main.wasp file. The {authMethod} depends on the auth method you are using.
For example, if you are using Username & Password, you would add the auth.methods.usernameAndPassword.userSignupFields field:
JavaScript
TypeScript
main.wasp
app crudTesting {
// ...
auth: {
userEntity: User,
methods: {
usernameAndPassword: {
userSignupFields: import { userSignupFields } from ""@src/auth/signup"",
},
},
onAuthFailedRedirectTo: ""/login"",
},
}
entity User {=psl
id Int @id @default(autoincrement())
address String?
psl=}
Then we'll define the userSignupFields object in the src/auth/signup.js file:
src/auth/signup.js
import { defineUserSignupFields } from 'wasp/server/auth'
export const userSignupFields = defineUserSignupFields({
address: async (data) => {
const address = data.address
if (typeof address !== 'string') {
throw new Error('Address is required')
}
if (address.length < 5) {
throw new Error('Address must be at least 5 characters long')
}
return address
},
})
Read more about the userSignupFields object in the API Reference.
Keep in mind, that these field names need to exist on the userEntity you defined in your main.wasp file e.g. address needs to be a field on the User entity.
The field function will receive the data sent from the client and it needs to return the value that will be saved into the database. If the field is invalid, the function should throw an error.
Using Validation Libraries
You can use any validation library you want to validate the fields. For example, you can use zod like this:
Click to see the code
Now that we defined the fields, Wasp knows how to:
Validate the data sent from the client
Save the data to the database
Next, let's see how to customize Auth UI to include those fields.
2. Customizing the Signup Component
Using Custom Signup Component
If you are not using Wasp's Auth UI, you can skip this section. Just make sure to include the extra fields in your custom signup form.
Read more about using the signup actions for:
email auth here
username & password auth here
If you are using Wasp's Auth UI, you can customize the SignupForm component by passing the additionalFields prop to it. It can be either a list of extra fields or a render function.
When you pass in a list of extra fields to the SignupForm, they are added to the form one by one, in the order you pass them in.
Inside the list, there can be either objects or render functions (you can combine them):
Objects are a simple way to describe new fields you need, but a bit less flexible than render functions.
Render functions can be used to render any UI you want, but they require a bit more code. The render functions receive the react-hook-form object and the form state object as arguments.
JavaScript
TypeScript
src/SignupPage.jsx
import {
SignupForm,
FormError,
FormInput,
FormItemGroup,
FormLabel,
} from 'wasp/client/auth'
export const SignupPage = () => {
return (
{
return (
Phone Number
{form.formState.errors.phoneNumber && (
{form.formState.errors.phoneNumber.message}
)}
)
},
]}
/>
)
}
Read more about the extra fields in the API Reference.
Using a Single Render Function
Instead of passing in a list of extra fields, you can pass in a render function which will receive the react-hook-form object and the form state object as arguments. What ever the render function returns, will be rendered below the default fields.
JavaScript
TypeScript
src/SignupPage.jsx
import { SignupForm, FormItemGroup } from 'wasp/client/auth'
export const SignupPage = () => {
return (
{
const username = form.watch('username')
return (
username && (
Hello there {username} 👋
)
)
}}
/>
)
}
Read more about the render function in the API Reference.
API Reference
Auth Fields
JavaScript
TypeScript
main.wasp
title: ""My app"",
//...
auth: {
userEntity: User,
methods: {
usernameAndPassword: {}, // use this or email, not both
email: {}, // use this or usernameAndPassword, not both
google: {},
gitHub: {},
},
onAuthFailedRedirectTo: ""/someRoute"",
signup: { ... }
}
}
//...
app.auth is a dictionary with the following fields:
userEntity: entity required
The entity representing the user connected to your business logic.
You can read more about how the User entity is connected to the rest of the auth system in the Auth Entities section of the docs.
methods: dict required
A dictionary of auth methods enabled for the app.
Click on each auth method for more details.
onAuthFailedRedirectTo: String required
The route to which Wasp should redirect unauthenticated user when they try to access a private page (i.e., a page that has authRequired: true). Check out these essentials docs on auth to see an example of usage.
onAuthSucceededRedirectTo: String
The route to which Wasp will send a successfully authenticated after a successful login/signup. The default value is ""/"".
note
Automatic redirect on successful login only works when using the Wasp-provided Auth UI.
signup: SignupOptions
Read more about the signup process customization API in the Signup Fields Customization section.
Signup Fields Customization
If you want to add extra fields to the signup process, the server needs to know how to save them to the database. You do that by defining the auth.methods.{authMethod}.userSignupFields field in your main.wasp file.
JavaScript
TypeScript
main.wasp
app crudTesting {
// ...
auth: {
userEntity: User,
methods: {
usernameAndPassword: {
userSignupFields: import { userSignupFields } from ""@src/auth/signup"",
},
},
onAuthFailedRedirectTo: ""/login"",
},
}
Then we'll export the userSignupFields object from the src/auth/signup.js file:
src/auth/signup.js
import { defineUserSignupFields } from 'wasp/server/auth'
export const userSignupFields = defineUserSignupFields({
address: async (data) => {
const address = data.address
if (typeof address !== 'string') {
throw new Error('Address is required')
}
if (address.length < 5) {
throw new Error('Address must be at least 5 characters long')
}
return address
},
})
The userSignupFields object is an object where the keys represent the field name, and the values are functions that receive the data sent from the client* and return the value of the field.
If the value that the function received is invalid, the function should throw an error.
* We exclude the password field from this object to prevent it from being saved as plain text in the database. The password field is handled by Wasp's auth backend.
SignupForm Customization
To customize the SignupForm component, you need to pass in the additionalFields prop. It can be either a list of extra fields or a render function.
JavaScript
TypeScript
src/SignupPage.jsx
import {
SignupForm,
FormError,
FormInput,
FormItemGroup,
FormLabel,
} from 'wasp/client/auth'
export const SignupPage = () => {
return (
{
return (
Phone Number
{form.formState.errors.phoneNumber && (
{form.formState.errors.phoneNumber.message}
)}
)
},
]}
/>
)
}
The extra fields can be either objects or render functions (you can combine them):
Objects are a simple way to describe new fields you need, but a bit less flexible than render functions.
The objects have the following properties:
name required
the name of the field
label required
the label of the field (used in the UI)
type required
the type of the field, which can be input or textarea
validations
an object with the validation rules for the field. The keys are the validation names, and the values are the validation error messages. Read more about the available validation rules in the react-hook-form docs.
Render functions receive the react-hook-form object and the form state as arguments, and they can use them to render arbitrary UI elements.
The render function has the following signature:
;(form: UseFormReturn, state: FormState) => React.ReactNode
form required
the react-hook-form object, read more about it in the react-hook-form docs
you need to use the form.register function to register your fields
state required
the form state object which has the following properties:
isLoading: boolean
whether the form is currently submitting","https://wasp-lang.dev/docs/auth/overview"
"1",,"2024-04-23T15:13:55.809Z","https://wasp-lang.dev/docs/auth/email","https://wasp-lang.dev/docs","http","## Email
Wasp supports e-mail authentication out of the box, along with email verification and ""forgot your password?"" flows. It provides you with the server-side implementation and email templates for all of these flows.

Using multiple auth identities for a single user
Wasp currently doesn't support multiple auth identities for a single user. This means, for example, that a user can't have both an email-based auth identity and a Google-based auth identity. This is something we will add in the future with the introduction of the [account merging feature](https://github.com/wasp-lang/wasp/issues/954).
Account merging means that multiple auth identities can be merged into a single user account. For example, a user's email and Google identity can be merged into a single user account. Then the user can log in with either their email or Google account and they will be logged into the same account.
## Setting Up Email Authentication[](#setting-up-email-authentication ""Direct link to Setting Up Email Authentication"")
We'll need to take the following steps to set up email authentication:
1. Enable email authentication in the Wasp file
2. Add the `User` entity
3. Add the auth routes and pages
4. Use Auth UI components in our pages
5. Set up the email sender
Structure of the `main.wasp` file we will end up with:
main.wasp
```
// Configuring e-mail authenticationapp myApp { auth: { ... }}// Defining User entityentity User { ... }// Defining routes and pagesroute SignupRoute { ... }page SignupPage { ... }// ...
```
### 1\. Enable Email Authentication in `main.wasp`[](#1-enable-email-authentication-in-mainwasp ""Direct link to 1-enable-email-authentication-in-mainwasp"")
Let's start with adding the following to our `main.wasp` file:
* JavaScript
* TypeScript
main.wasp
```
app myApp { wasp: { version: ""^0.13.0"" }, title: ""My App"", auth: { // 1. Specify the user entity (we'll define it next) userEntity: User, methods: { // 2. Enable email authentication email: { // 3. Specify the email from field fromField: { name: ""My App Postman"", email: ""[email protected]"" }, // 4. Specify the email verification and password reset options (we'll talk about them later) emailVerification: { clientRoute: EmailVerificationRoute, }, passwordReset: { clientRoute: PasswordResetRoute, }, }, }, onAuthFailedRedirectTo: ""/login"", onAuthSucceededRedirectTo: ""/"" },}
```
Read more about the `email` auth method options [here](#fields-in-the-email-dict).
### 2\. Add the User Entity[](#2-add-the-user-entity ""Direct link to 2. Add the User Entity"")
The `User` entity can be as simple as including only the `id` field:
* JavaScript
* TypeScript
main.wasp
```
// 5. Define the user entityentity User {=psl id Int @id @default(autoincrement()) // Add your own fields below // ...psl=}
```
You can read more about how the `User` entity is connected to the rest of the auth system in the [Auth Entities](https://wasp-lang.dev/docs/auth/entities) section of the docs.
### 3\. Add the Routes and Pages[](#3-add-the-routes-and-pages ""Direct link to 3. Add the Routes and Pages"")
Next, we need to define the routes and pages for the authentication pages.
Add the following to the `main.wasp` file:
* JavaScript
* TypeScript
main.wasp
```
// ...// 6. Define the routesroute LoginRoute { path: ""/login"", to: LoginPage }page LoginPage { component: import { Login } from ""@src/pages/auth.jsx""}route SignupRoute { path: ""/signup"", to: SignupPage }page SignupPage { component: import { Signup } from ""@src/pages/auth.jsx""}route RequestPasswordResetRoute { path: ""/request-password-reset"", to: RequestPasswordResetPage }page RequestPasswordResetPage { component: import { RequestPasswordReset } from ""@src/pages/auth.jsx"",}route PasswordResetRoute { path: ""/password-reset"", to: PasswordResetPage }page PasswordResetPage { component: import { PasswordReset } from ""@src/pages/auth.jsx"",}route EmailVerificationRoute { path: ""/email-verification"", to: EmailVerificationPage }page EmailVerificationPage { component: import { EmailVerification } from ""@src/pages/auth.jsx"",}
```
We'll define the React components for these pages in the `src/pages/auth.tsx` file below.
### 4\. Create the Client Pages[](#4-create-the-client-pages ""Direct link to 4. Create the Client Pages"")
info
We are using [Tailwind CSS](https://tailwindcss.com/) to style the pages. Read more about how to add it [here](https://wasp-lang.dev/docs/project/css-frameworks).
Let's create a `auth.tsx` file in the `src/pages` folder and add the following to it:
* JavaScript
* TypeScript
src/pages/auth.jsx
```
import { LoginForm, SignupForm, VerifyEmailForm, ForgotPasswordForm, ResetPasswordForm,} from 'wasp/client/auth'import { Link } from 'react-router-dom'export function Login() { return (
Don't have an account yet? go to signup.
Forgot your password? reset it . );}export function Signup() { return (
I already have an account (go to login). );}export function EmailVerification() { return (
If everything is okay, go to login );}export function RequestPasswordReset() { return ( );}export function PasswordReset() { return (
If everything is okay, go to login );}// A layout component to center the contentexport function Layout({ children }) { return ( );}
```
We imported the generated Auth UI components and used them in our pages. Read more about the Auth UI components [here](https://wasp-lang.dev/docs/auth/ui).
### 5\. Set up an Email Sender[](#5-set-up-an-email-sender ""Direct link to 5. Set up an Email Sender"")
To support e-mail verification and password reset flows, we need an e-mail sender. Luckily, Wasp supports several email providers out of the box.
We'll use the `Dummy` provider to speed up the setup. It just logs the emails to the console instead of sending them. You can use any of the [supported email providers](https://wasp-lang.dev/docs/advanced/email#providers).
To set up the `Dummy` provider to send emails, add the following to the `main.wasp` file:
* JavaScript
* TypeScript
main.wasp
```
app myApp { // ... // 7. Set up the email sender emailSender: { provider: Dummy, }}
```
### Conclusion[](#conclusion ""Direct link to Conclusion"")
That's it! We have set up email authentication in our app. 🎉
Running `wasp db migrate-dev` and then `wasp start` should give you a working app with email authentication. If you want to put some of the pages behind authentication, read the [auth overview](https://wasp-lang.dev/docs/auth/overview).
## Login and Signup Flows[](#login-and-signup-flows ""Direct link to Login and Signup Flows"")
### Login[](#login ""Direct link to Login"")

### Signup[](#signup ""Direct link to Signup"")

Some of the behavior you get out of the box:
1. Rate limiting
We are limiting the rate of sign-up requests to **1 request per minute** per email address. This is done to prevent spamming.
2. Preventing user email leaks
If somebody tries to signup with an email that already exists and it's verified, we _pretend_ that the account was created instead of saying it's an existing account. This is done to prevent leaking the user's email address.
3. Allowing registration for unverified emails
If a user tries to register with an existing but **unverified** email, we'll allow them to do that. This is done to prevent bad actors from locking out other users from registering with their email address.
4. Password validation
Read more about the default password validation rules and how to override them in [auth overview docs](https://wasp-lang.dev/docs/auth/overview).
## Email Verification Flow[](#email-verification-flow ""Direct link to Email Verification Flow"")
Automatic email verification in development
In development mode, you can skip the email verification step by setting the `SKIP_EMAIL_VERIFICATION_IN_DEV` environment variable to `true` in your `.env.server` file:
.env.server
```
SKIP_EMAIL_VERIFICATION_IN_DEV=true
```
This is useful when you are developing your app and don't want to go through the email verification flow every time you sign up. It can be also useful when you are writing automated tests for your app.
By default, Wasp requires the e-mail to be verified before allowing the user to log in. This is done by sending a verification email to the user's email address and requiring the user to click on a link in the email to verify their email address.
Our setup looks like this:
* JavaScript
* TypeScript
main.wasp
```
// ...emailVerification: { clientRoute: EmailVerificationRoute,}
```
When the user receives an e-mail, they receive a link that goes to the client route specified in the `clientRoute` field. In our case, this is the `EmailVerificationRoute` route we defined in the `main.wasp` file.
The content of the e-mail can be customized, read more about it [here](#emailverification-emailverificationconfig-).
### Email Verification Page[](#email-verification-page ""Direct link to Email Verification Page"")
We defined our email verification page in the `auth.tsx` file.

## Password Reset Flow[](#password-reset-flow ""Direct link to Password Reset Flow"")
Users can request a password and then they'll receive an e-mail with a link to reset their password.
Some of the behavior you get out of the box:
1. Rate limiting
We are limiting the rate of sign-up requests to **1 request per minute** per email address. This is done to prevent spamming.
2. Preventing user email leaks
If somebody requests a password reset with an unknown email address, we'll give back the same response as if the user requested a password reset successfully. This is done to prevent leaking information.
Our setup in `main.wasp` looks like this:
* JavaScript
* TypeScript
main.wasp
```
// ...passwordReset: { clientRoute: PasswordResetRoute,}
```
### Request Password Reset Page[](#request-password-reset-page ""Direct link to Request Password Reset Page"")
Users request their password to be reset by going to the `/request-password-reset` route. We defined our request password reset page in the `auth.tsx` file.
### Password Reset Page[](#password-reset-page ""Direct link to Password Reset Page"")
When the user receives an e-mail, they receive a link that goes to the client route specified in the `clientRoute` field. In our case, this is the `PasswordResetRoute` route we defined in the `main.wasp` file.
Users can enter their new password there.
The content of the e-mail can be customized, read more about it [here](#passwordreset-passwordresetconfig-).
## Creating a Custom Sign-up Action[](#creating-a-custom-sign-up-action ""Direct link to Creating a Custom Sign-up Action"")
Creating a custom sign-up action
We don't recommend creating a custom sign-up action unless you have a good reason to do so. It is a complex process and you can easily make a mistake that will compromise the security of your app.
The code of your custom sign-up action can look like this:
* JavaScript
* TypeScript
main.wasp
```
// ...action customSignup { fn: import { signup } from ""@src/auth/signup.js"",}
```
src/auth/signup.js
```
import { ensurePasswordIsPresent, ensureValidPassword, ensureValidEmail, createProviderId, sanitizeAndSerializeProviderData, deserializeAndSanitizeProviderData, findAuthIdentity, createUser, createEmailVerificationLink, sendEmailVerificationEmail,} from 'wasp/server/auth'export const signup = async (args, _context) => { ensureValidEmail(args) ensurePasswordIsPresent(args) ensureValidPassword(args) try { const providerId = createProviderId('email', args.email) const existingAuthIdentity = await findAuthIdentity(providerId) if (existingAuthIdentity) { const providerData = deserializeAndSanitizeProviderData(existingAuthIdentity.providerData) // Your custom code here } else { // sanitizeAndSerializeProviderData will hash the user's password const newUserProviderData = await sanitizeAndSerializeProviderData({ hashedPassword: args.password, isEmailVerified: false, emailVerificationSentAt: null, passwordResetSentAt: null, }) await createUser( providerId, providerData, // Any additional data you want to store on the User entity {}, ) // Verification link links to a client route e.g. /email-verification const verificationLink = await createEmailVerificationLink(args.email, '/email-verification'); try { await sendEmailVerificationEmail( args.email, { from: { name: ""My App Postman"", email: ""[email protected]"", }, to: args.email, subject: ""Verify your email"", text: `Click the link below to verify your email: ${verificationLink}`, html: ` Click the link below to verify your email
Verify email `, } ); } catch (e: unknown) { console.error(""Failed to send email verification email:"", e); throw new HttpError(500, ""Failed to send email verification email.""); } } } catch (e) { return { success: false, message: e.message, } } // Your custom code after sign-up. // ... return { success: true, message: 'User created successfully', }}
```
We suggest using the built-in field validators for your authentication flow. You can import them from `wasp/server/auth`. These are the same validators that Wasp uses internally for the default authentication flow.
#### Email[](#email ""Direct link to Email"")
* `ensureValidEmail(args)`
Checks if the email is valid and throws an error if it's not. Read more about the validation rules [here](https://wasp-lang.dev/docs/auth/overview#default-validations).
#### Password[](#password ""Direct link to Password"")
* `ensurePasswordIsPresent(args)`
Checks if the password is present and throws an error if it's not.
* `ensureValidPassword(args)`
Checks if the password is valid and throws an error if it's not. Read more about the validation rules [here](https://wasp-lang.dev/docs/auth/overview#default-validations).
## Using Auth[](#using-auth ""Direct link to Using Auth"")
To read more about how to set up the logout button and how to get access to the logged-in user in our client and server code, read the [auth overview docs](https://wasp-lang.dev/docs/auth/overview).
### `getEmail`[](#getemail ""Direct link to getemail"")
If you are looking to access the user's email in your code, you can do that by accessing the info about the user that is stored in the `user.auth.identities` array.
To make things a bit easier for you, Wasp offers the `getEmail` helper.
The `getEmail` helper returns the user's email or `null` if the user doesn't have an email auth identity.
* JavaScript
* TypeScript
src/MainPage.jsx
```
import { getEmail } from 'wasp/auth'const MainPage = ({ user }) => { const email = getEmail(user) // ...}
```
src/tasks.js
```
import { getEmail } from 'wasp/auth'export const createTask = async (args, context) => { const email = getEmail(context.user) // ...}
```
## API Reference[](#api-reference ""Direct link to API Reference"")
Let's go over the options we can specify when using email authentication.
### `userEntity` fields[](#userentity-fields ""Direct link to userentity-fields"")
* JavaScript
* TypeScript
main.wasp
```
app myApp { title: ""My app"", // ... auth: { userEntity: User, methods: { email: { // We'll explain these options below }, }, onAuthFailedRedirectTo: ""/someRoute"" }, // ...}entity User {=psl id Int @id @default(autoincrement())psl=}
```
The user entity needs to have the following fields:
* `id` required
It can be of any type, but it needs to be marked with `@id`
You can add any other fields you want to the user entity. Make sure to also define them in the `userSignupFields` field if they need to be set during the sign-up process.
### Fields in the `email` dict[](#fields-in-the-email-dict ""Direct link to fields-in-the-email-dict"")
* JavaScript
* TypeScript
main.wasp
```
app myApp { title: ""My app"", // ... auth: { userEntity: User, methods: { email: { userSignupFields: import { userSignupFields } from ""@src/auth.js"", fromField: { name: ""My App"", email: ""[email protected]"" }, emailVerification: { clientRoute: EmailVerificationRoute, getEmailContentFn: import { getVerificationEmailContent } from ""@src/auth/email.js"", }, passwordReset: { clientRoute: PasswordResetRoute, getEmailContentFn: import { getPasswordResetEmailContent } from ""@src/auth/email.js"", }, }, }, onAuthFailedRedirectTo: ""/someRoute"" }, // ...}
```
#### `userSignupFields: ExtImport`[](#usersignupfields-extimport ""Direct link to usersignupfields-extimport"")
`userSignupFields` defines all the extra fields that need to be set on the `User` during the sign-up process. For example, if you have `address` and `phone` fields on your `User` entity, you can set them by defining the `userSignupFields` like this:
* JavaScript
* TypeScript
src/auth.js
```
import { defineUserSignupFields } from 'wasp/server/auth'export const userSignupFields = defineUserSignupFields({ address: (data) => { if (!data.address) { throw new Error('Address is required') } return data.address } phone: (data) => data.phone,})
```
Read more about the \`userSignupFields\` function \[here\](./overview#1-defining-extra-fields).
#### `fromField: EmailFromField` required[](#fromfield-emailfromfield- ""Direct link to fromfield-emailfromfield-"")
`fromField` is a dict that specifies the name and e-mail address of the sender of the e-mails sent by your app.
It has the following fields:
* `name`: name of the sender
* `email`: e-mail address of the sender required
#### `emailVerification: EmailVerificationConfig` required[](#emailverification-emailverificationconfig- ""Direct link to emailverification-emailverificationconfig-"")
`emailVerification` is a dict that specifies the details of the e-mail verification process.
It has the following fields:
* `clientRoute: Route`: a route that is used for the user to verify their e-mail address. required
Client route should handle the process of taking a token from the URL and sending it to the server to verify the e-mail address. You can use our `verifyEmail` action for that.
* JavaScript
* TypeScript
src/pages/EmailVerificationPage.jsx
```
import { verifyEmail } from 'wasp/client/auth'...await verifyEmail({ token });
```
note
We used Auth UI above to avoid doing this work of sending the token to the server manually.
* `getEmailContentFn: ExtImport`: a function that returns the content of the e-mail that is sent to the user.
Defining `getEmailContentFn` can be done by defining a file in the `src` directory.
* JavaScript
* TypeScript
src/email.js
```
export const getVerificationEmailContent = ({ verificationLink }) => ({ subject: 'Verify your email', text: `Click the link below to verify your email: ${verificationLink}`, html: ` Click the link below to verify your email
Verify email `,})
```
This is the default content of the e-mail, you can customize it to your liking.
#### `passwordReset: PasswordResetConfig` required[](#passwordreset-passwordresetconfig- ""Direct link to passwordreset-passwordresetconfig-"")
`passwordReset` is a dict that specifies the password reset process.
It has the following fields:
* `clientRoute: Route`: a route that is used for the user to reset their password. required
Client route should handle the process of taking a token from the URL and a new password from the user and sending it to the server. You can use our `requestPasswordReset` and `resetPassword` actions to do that.
* JavaScript
* TypeScript
src/pages/ForgotPasswordPage.jsx
```
import { requestPasswordReset } from 'wasp/client/auth'...await requestPasswordReset({ email });
```
src/pages/PasswordResetPage.jsx
```
import { resetPassword } from 'wasp/client/auth'...await resetPassword({ password, token })
```
note
We used Auth UI above to avoid doing this work of sending the password request and the new password to the server manually.
* `getEmailContentFn: ExtImport`: a function that returns the content of the e-mail that is sent to the user.
Defining `getEmailContentFn` is done by defining a function that looks like this:
* JavaScript
* TypeScript
src/email.js
```
export const getPasswordResetEmailContent = ({ passwordResetLink }) => ({ subject: 'Password reset', text: `Click the link below to reset your password: ${passwordResetLink}`, html: ` Click the link below to reset your password
Reset password `,})
```
This is the default content of the e-mail, you can customize it to your liking.",,"https://wasp-lang.dev/docs/auth/email","Wasp supports e-mail authentication out of the box, along with email verification and ""forgot your password?"" flows. It provides you with the server-side implementation and email templates for all of these flows.","*","0","h3="":443""; ma=86400","max-age=600","DYNAMIC","878ecce24e983982-IAD","close","br","text/html; charset=utf-8","Tue, 23 Apr 2024 15:13:55 GMT","Tue, 23 Apr 2024 15:23:55 GMT","Thu, 18 Apr 2024 15:50:27 GMT","{""success_fraction"":0,""report_to"":""cf-nel"",""max_age"":604800}","{""endpoints"":[{""url"":""https:\/\/a.nel.cloudflare.com\/report\/v4?s=VIQeKF6tWOVy24y5pOdxcPQgWhS4SLYgbmzwh1pEEaPlxkdI%2BSLgCSwd%2BdoxhthaBPo6FLgsBHVcMB9bEmF2J4KFbL3wTBTgK4FcLn2NFqsoVYOP%2FGSFAOvMDFxSAP7B""}],""group"":""cf-nel"",""max_age"":604800}","cloudflare","chunked","Accept-Encoding","1.1 varnish","MISS","0","1ae5506f73c980f040e9601147119c39d061ad23",,"44E4:651DA:3D35A3C:485664D:6627D032","HIT","MISS","cache-iad-kiad7000099-IAD","S1713885236.592105,VS0,VE23",,,"en","https://wasp-lang.dev/img/wasp_twitter_cover.png","og:image","https://wasp-lang.dev/docs/auth/email","og:url","Email | Wasp","og:title","Wasp supports e-mail authentication out of the box, along with email verification and ""forgot your password?"" flows. It provides you with the server-side implementation and email templates for all of these flows.","og:description","Email | Wasp",,"Email
Wasp supports e-mail authentication out of the box, along with email verification and ""forgot your password?"" flows. It provides you with the server-side implementation and email templates for all of these flows.
Using multiple auth identities for a single user
Wasp currently doesn't support multiple auth identities for a single user. This means, for example, that a user can't have both an email-based auth identity and a Google-based auth identity. This is something we will add in the future with the introduction of the account merging feature.
Account merging means that multiple auth identities can be merged into a single user account. For example, a user's email and Google identity can be merged into a single user account. Then the user can log in with either their email or Google account and they will be logged into the same account.
Setting Up Email Authentication
We'll need to take the following steps to set up email authentication:
Enable email authentication in the Wasp file
Add the User entity
Add the auth routes and pages
Use Auth UI components in our pages
Set up the email sender
Structure of the main.wasp file we will end up with:
main.wasp
// Configuring e-mail authentication
app myApp {
auth: { ... }
}
// Defining User entity
entity User { ... }
// Defining routes and pages
route SignupRoute { ... }
page SignupPage { ... }
// ...
1. Enable Email Authentication in main.wasp
Let's start with adding the following to our main.wasp file:
JavaScript
TypeScript
main.wasp
app myApp {
wasp: {
version: ""^0.13.0""
},
title: ""My App"",
auth: {
// 1. Specify the user entity (we'll define it next)
userEntity: User,
methods: {
// 2. Enable email authentication
email: {
// 3. Specify the email from field
fromField: {
name: ""My App Postman"",
email: ""[email protected]""
},
// 4. Specify the email verification and password reset options (we'll talk about them later)
emailVerification: {
clientRoute: EmailVerificationRoute,
},
passwordReset: {
clientRoute: PasswordResetRoute,
},
},
},
onAuthFailedRedirectTo: ""/login"",
onAuthSucceededRedirectTo: ""/""
},
}
Read more about the email auth method options here.
2. Add the User Entity
The User entity can be as simple as including only the id field:
JavaScript
TypeScript
main.wasp
// 5. Define the user entity
entity User {=psl
id Int @id @default(autoincrement())
// Add your own fields below
// ...
psl=}
You can read more about how the User entity is connected to the rest of the auth system in the Auth Entities section of the docs.
3. Add the Routes and Pages
Next, we need to define the routes and pages for the authentication pages.
Add the following to the main.wasp file:
JavaScript
TypeScript
main.wasp
// ...
// 6. Define the routes
route LoginRoute { path: ""/login"", to: LoginPage }
page LoginPage {
component: import { Login } from ""@src/pages/auth.jsx""
}
route SignupRoute { path: ""/signup"", to: SignupPage }
page SignupPage {
component: import { Signup } from ""@src/pages/auth.jsx""
}
route RequestPasswordResetRoute { path: ""/request-password-reset"", to: RequestPasswordResetPage }
page RequestPasswordResetPage {
component: import { RequestPasswordReset } from ""@src/pages/auth.jsx"",
}
route PasswordResetRoute { path: ""/password-reset"", to: PasswordResetPage }
page PasswordResetPage {
component: import { PasswordReset } from ""@src/pages/auth.jsx"",
}
route EmailVerificationRoute { path: ""/email-verification"", to: EmailVerificationPage }
page EmailVerificationPage {
component: import { EmailVerification } from ""@src/pages/auth.jsx"",
}
We'll define the React components for these pages in the src/pages/auth.tsx file below.
4. Create the Client Pages
info
We are using Tailwind CSS to style the pages. Read more about how to add it here.
Let's create a auth.tsx file in the src/pages folder and add the following to it:
JavaScript
TypeScript
src/pages/auth.jsx
import {
LoginForm,
SignupForm,
VerifyEmailForm,
ForgotPasswordForm,
ResetPasswordForm,
} from 'wasp/client/auth'
import { Link } from 'react-router-dom'
export function Login() {
return (
Don't have an account yet? go to signup.
Forgot your password? reset it
.
);
}
export function Signup() {
return (
I already have an account (go to login).
);
}
export function EmailVerification() {
return (
If everything is okay, go to login
);
}
export function RequestPasswordReset() {
return (
);
}
export function PasswordReset() {
return (
If everything is okay, go to login
);
}
// A layout component to center the content
export function Layout({ children }) {
return (
);
}
We imported the generated Auth UI components and used them in our pages. Read more about the Auth UI components here.
5. Set up an Email Sender
To support e-mail verification and password reset flows, we need an e-mail sender. Luckily, Wasp supports several email providers out of the box.
We'll use the Dummy provider to speed up the setup. It just logs the emails to the console instead of sending them. You can use any of the supported email providers.
To set up the Dummy provider to send emails, add the following to the main.wasp file:
JavaScript
TypeScript
main.wasp
app myApp {
// ...
// 7. Set up the email sender
emailSender: {
provider: Dummy,
}
}
Conclusion
That's it! We have set up email authentication in our app. 🎉
Running wasp db migrate-dev and then wasp start should give you a working app with email authentication. If you want to put some of the pages behind authentication, read the auth overview.
Login and Signup Flows
Login
Signup
Some of the behavior you get out of the box:
Rate limiting
We are limiting the rate of sign-up requests to 1 request per minute per email address. This is done to prevent spamming.
Preventing user email leaks
If somebody tries to signup with an email that already exists and it's verified, we pretend that the account was created instead of saying it's an existing account. This is done to prevent leaking the user's email address.
Allowing registration for unverified emails
If a user tries to register with an existing but unverified email, we'll allow them to do that. This is done to prevent bad actors from locking out other users from registering with their email address.
Password validation
Read more about the default password validation rules and how to override them in auth overview docs.
Email Verification Flow
Automatic email verification in development
In development mode, you can skip the email verification step by setting the SKIP_EMAIL_VERIFICATION_IN_DEV environment variable to true in your .env.server file:
.env.server
SKIP_EMAIL_VERIFICATION_IN_DEV=true
This is useful when you are developing your app and don't want to go through the email verification flow every time you sign up. It can be also useful when you are writing automated tests for your app.
By default, Wasp requires the e-mail to be verified before allowing the user to log in. This is done by sending a verification email to the user's email address and requiring the user to click on a link in the email to verify their email address.
Our setup looks like this:
JavaScript
TypeScript
main.wasp
// ...
emailVerification: {
clientRoute: EmailVerificationRoute,
}
When the user receives an e-mail, they receive a link that goes to the client route specified in the clientRoute field. In our case, this is the EmailVerificationRoute route we defined in the main.wasp file.
The content of the e-mail can be customized, read more about it here.
Email Verification Page
We defined our email verification page in the auth.tsx file.
Password Reset Flow
Users can request a password and then they'll receive an e-mail with a link to reset their password.
Some of the behavior you get out of the box:
Rate limiting
We are limiting the rate of sign-up requests to 1 request per minute per email address. This is done to prevent spamming.
Preventing user email leaks
If somebody requests a password reset with an unknown email address, we'll give back the same response as if the user requested a password reset successfully. This is done to prevent leaking information.
Our setup in main.wasp looks like this:
JavaScript
TypeScript
main.wasp
// ...
passwordReset: {
clientRoute: PasswordResetRoute,
}
Request Password Reset Page
Users request their password to be reset by going to the /request-password-reset route. We defined our request password reset page in the auth.tsx file.
Password Reset Page
When the user receives an e-mail, they receive a link that goes to the client route specified in the clientRoute field. In our case, this is the PasswordResetRoute route we defined in the main.wasp file.
Users can enter their new password there.
The content of the e-mail can be customized, read more about it here.
Creating a Custom Sign-up Action
Creating a custom sign-up action
We don't recommend creating a custom sign-up action unless you have a good reason to do so. It is a complex process and you can easily make a mistake that will compromise the security of your app.
The code of your custom sign-up action can look like this:
JavaScript
TypeScript
main.wasp
// ...
action customSignup {
fn: import { signup } from ""@src/auth/signup.js"",
}
src/auth/signup.js
import {
ensurePasswordIsPresent,
ensureValidPassword,
ensureValidEmail,
createProviderId,
sanitizeAndSerializeProviderData,
deserializeAndSanitizeProviderData,
findAuthIdentity,
createUser,
createEmailVerificationLink,
sendEmailVerificationEmail,
} from 'wasp/server/auth'
export const signup = async (args, _context) => {
ensureValidEmail(args)
ensurePasswordIsPresent(args)
ensureValidPassword(args)
try {
const providerId = createProviderId('email', args.email)
const existingAuthIdentity = await findAuthIdentity(providerId)
if (existingAuthIdentity) {
const providerData = deserializeAndSanitizeProviderData(existingAuthIdentity.providerData)
// Your custom code here
} else {
// sanitizeAndSerializeProviderData will hash the user's password
const newUserProviderData = await sanitizeAndSerializeProviderData({
hashedPassword: args.password,
isEmailVerified: false,
emailVerificationSentAt: null,
passwordResetSentAt: null,
})
await createUser(
providerId,
providerData,
// Any additional data you want to store on the User entity
{},
)
// Verification link links to a client route e.g. /email-verification
const verificationLink = await createEmailVerificationLink(args.email, '/email-verification');
try {
await sendEmailVerificationEmail(
args.email,
{
from: {
name: ""My App Postman"",
email: ""[email protected]"",
},
to: args.email,
subject: ""Verify your email"",
text: `Click the link below to verify your email: ${verificationLink}`,
html: `
Click the link below to verify your email
Verify email
`,
}
);
} catch (e: unknown) {
console.error(""Failed to send email verification email:"", e);
throw new HttpError(500, ""Failed to send email verification email."");
}
}
} catch (e) {
return {
success: false,
message: e.message,
}
}
// Your custom code after sign-up.
// ...
return {
success: true,
message: 'User created successfully',
}
}
We suggest using the built-in field validators for your authentication flow. You can import them from wasp/server/auth. These are the same validators that Wasp uses internally for the default authentication flow.
Email
ensureValidEmail(args)
Checks if the email is valid and throws an error if it's not. Read more about the validation rules here.
Password
ensurePasswordIsPresent(args)
Checks if the password is present and throws an error if it's not.
ensureValidPassword(args)
Checks if the password is valid and throws an error if it's not. Read more about the validation rules here.
Using Auth
To read more about how to set up the logout button and how to get access to the logged-in user in our client and server code, read the auth overview docs.
getEmail
If you are looking to access the user's email in your code, you can do that by accessing the info about the user that is stored in the user.auth.identities array.
To make things a bit easier for you, Wasp offers the getEmail helper.
The getEmail helper returns the user's email or null if the user doesn't have an email auth identity.
JavaScript
TypeScript
src/MainPage.jsx
import { getEmail } from 'wasp/auth'
const MainPage = ({ user }) => {
const email = getEmail(user)
// ...
}
src/tasks.js
import { getEmail } from 'wasp/auth'
export const createTask = async (args, context) => {
const email = getEmail(context.user)
// ...
}
API Reference
Let's go over the options we can specify when using email authentication.
userEntity fields
JavaScript
TypeScript
main.wasp
app myApp {
title: ""My app"",
// ...
auth: {
userEntity: User,
methods: {
email: {
// We'll explain these options below
},
},
onAuthFailedRedirectTo: ""/someRoute""
},
// ...
}
entity User {=psl
id Int @id @default(autoincrement())
psl=}
The user entity needs to have the following fields:
id required
It can be of any type, but it needs to be marked with @id
You can add any other fields you want to the user entity. Make sure to also define them in the userSignupFields field if they need to be set during the sign-up process.
Fields in the email dict
JavaScript
TypeScript
main.wasp
app myApp {
title: ""My app"",
// ...
auth: {
userEntity: User,
methods: {
email: {
userSignupFields: import { userSignupFields } from ""@src/auth.js"",
fromField: {
name: ""My App"",
email: ""[email protected]""
},
emailVerification: {
clientRoute: EmailVerificationRoute,
getEmailContentFn: import { getVerificationEmailContent } from ""@src/auth/email.js"",
},
passwordReset: {
clientRoute: PasswordResetRoute,
getEmailContentFn: import { getPasswordResetEmailContent } from ""@src/auth/email.js"",
},
},
},
onAuthFailedRedirectTo: ""/someRoute""
},
// ...
}
userSignupFields: ExtImport
userSignupFields defines all the extra fields that need to be set on the User during the sign-up process. For example, if you have address and phone fields on your User entity, you can set them by defining the userSignupFields like this:
JavaScript
TypeScript
src/auth.js
import { defineUserSignupFields } from 'wasp/server/auth'
export const userSignupFields = defineUserSignupFields({
address: (data) => {
if (!data.address) {
throw new Error('Address is required')
}
return data.address
}
phone: (data) => data.phone,
})
Read more about the `userSignupFields` function [here](./overview#1-defining-extra-fields).
fromField: EmailFromField required
fromField is a dict that specifies the name and e-mail address of the sender of the e-mails sent by your app.
It has the following fields:
name: name of the sender
email: e-mail address of the sender required
emailVerification: EmailVerificationConfig required
emailVerification is a dict that specifies the details of the e-mail verification process.
It has the following fields:
clientRoute: Route: a route that is used for the user to verify their e-mail address. required
Client route should handle the process of taking a token from the URL and sending it to the server to verify the e-mail address. You can use our verifyEmail action for that.
JavaScript
TypeScript
src/pages/EmailVerificationPage.jsx
import { verifyEmail } from 'wasp/client/auth'
...
await verifyEmail({ token });
note
We used Auth UI above to avoid doing this work of sending the token to the server manually.
getEmailContentFn: ExtImport: a function that returns the content of the e-mail that is sent to the user.
Defining getEmailContentFn can be done by defining a file in the src directory.
JavaScript
TypeScript
src/email.js
export const getVerificationEmailContent = ({ verificationLink }) => ({
subject: 'Verify your email',
text: `Click the link below to verify your email: ${verificationLink}`,
html: `
Click the link below to verify your email
Verify email
`,
})
This is the default content of the e-mail, you can customize it to your liking.
passwordReset: PasswordResetConfig required
passwordReset is a dict that specifies the password reset process.
It has the following fields:
clientRoute: Route: a route that is used for the user to reset their password. required
Client route should handle the process of taking a token from the URL and a new password from the user and sending it to the server. You can use our requestPasswordReset and resetPassword actions to do that.
JavaScript
TypeScript
src/pages/ForgotPasswordPage.jsx
import { requestPasswordReset } from 'wasp/client/auth'
...
await requestPasswordReset({ email });
src/pages/PasswordResetPage.jsx
import { resetPassword } from 'wasp/client/auth'
...
await resetPassword({ password, token })
note
We used Auth UI above to avoid doing this work of sending the password request and the new password to the server manually.
getEmailContentFn: ExtImport: a function that returns the content of the e-mail that is sent to the user.
Defining getEmailContentFn is done by defining a function that looks like this:
JavaScript
TypeScript
src/email.js
export const getPasswordResetEmailContent = ({ passwordResetLink }) => ({
subject: 'Password reset',
text: `Click the link below to reset your password: ${passwordResetLink}`,
html: `
Click the link below to reset your password
Reset password
`,
})
This is the default content of the e-mail, you can customize it to your liking.","https://wasp-lang.dev/docs/auth/email"
"1",,"2024-04-23T15:14:04.506Z","https://wasp-lang.dev/docs/auth/social-auth/overview","https://wasp-lang.dev/docs","http","## Overview
Social login options (e.g., _Log in with Google_) are a great (maybe even the best) solution for handling user accounts. A famous old developer joke tells us _""The best auth system is the one you never have to make.""_
Wasp wants to make adding social login options to your app as painless as possible.
Using different social providers gives users a chance to sign into your app via their existing accounts on other platforms (Google, GitHub, etc.).
This page goes through the common behaviors between all supported social login providers and shows you how to customize them. It also gives an overview of Wasp's UI helpers - the quickest possible way to get started with social auth.
## Available Providers[](#available-providers ""Direct link to Available Providers"")
Wasp currently supports the following social login providers:
## User Entity[](#user-entity ""Direct link to User Entity"")
Wasp requires you to declare a `userEntity` for all `auth` methods (social or otherwise). This field tells Wasp which Entity represents the user.
Here's what the full setup looks like:
* JavaScript
* TypeScript
main.wasp
```
app myApp { wasp: { version: ""^0.13.0"" }, title: ""My App"", auth: { userEntity: User, methods: { google: {} }, onAuthFailedRedirectTo: ""/login"" },}entity User {=psl id Int @id @default(autoincrement()) //...psl=}
```
To learn more about what the fields on these entities represent, look at the [API Reference](#api-reference).
## Default Behavior[](#default-behavior ""Direct link to Default Behavior"")
When a user **signs in for the first time**, Wasp creates a new user account and links it to the chosen auth provider account for future logins.
## Overrides[](#overrides ""Direct link to Overrides"")
By default, Wasp doesn't store any information it receives from the social login provider. It only stores the user's ID specific to the provider.
If you wish to store more information about the user, you can override the default behavior. You can do this by defining the `userSignupFields` and `configFn` fields in `main.wasp` for each provider.
You can create custom signup setups, such as allowing users to define a custom username after they sign up with a social provider.
### Example: Allowing User to Set Their Username[](#example-allowing-user-to-set-their-username ""Direct link to Example: Allowing User to Set Their Username"")
If you want to modify the signup flow (e.g., let users choose their own usernames), you will need to go through three steps:
1. The first step is adding a `isSignupComplete` property to your `User` Entity. This field will signal whether the user has completed the signup process.
2. The second step is overriding the default signup behavior.
3. The third step is implementing the rest of your signup flow and redirecting users where appropriate.
Let's go through both steps in more detail.
#### 1\. Adding the `isSignupComplete` Field to the `User` Entity[](#1-adding-the-issignupcomplete-field-to-the-user-entity ""Direct link to 1-adding-the-issignupcomplete-field-to-the-user-entity"")
* JavaScript
* TypeScript
main.wasp
```
entity User {=psl id Int @id @default(autoincrement()) username String? @unique isSignupComplete Boolean @default(false)psl=}
```
#### 2\. Overriding the Default Behavior[](#2-overriding-the-default-behavior ""Direct link to 2. Overriding the Default Behavior"")
Declare an import under `app.auth.methods.google.userSignupFields` (the example assumes you're using Google):
* JavaScript
* TypeScript
main.wasp
```
app myApp { wasp: { version: ""^0.13.0"" }, title: ""My App"", auth: { userEntity: User, methods: { google: { userSignupFields: import { userSignupFields } from ""@src/auth/google.js"" } }, onAuthFailedRedirectTo: ""/login"" },}// ...
```
And implement the imported function.
src/auth/google.js
```
export const userSignupFields = { isSignupComplete: () => false,}
```
#### 3\. Showing the Correct State on the Client[](#3-showing-the-correct-state-on-the-client ""Direct link to 3. Showing the Correct State on the Client"")
You can query the user's `isSignupComplete` flag on the client with the [`useAuth()`](https://wasp-lang.dev/docs/auth/overview) hook. Depending on the flag's value, you can redirect users to the appropriate signup step.
For example:
1. When the user lands on the homepage, check the value of `user.isSignupComplete`.
2. If it's `false`, it means the user has started the signup process but hasn't yet chosen their username. Therefore, you can redirect them to `EditUserDetailsPage` where they can edit the `username` property.
* JavaScript
* TypeScript
src/HomePage.jsx
```
import { useAuth } from 'wasp/client/auth'import { Redirect } from 'react-router-dom'export function HomePage() { const { data: user } = useAuth() if (user.isSignupComplete === false) { return } // ...}
```
### Using the User's Provider Account Details[](#using-the-users-provider-account-details ""Direct link to Using the User's Provider Account Details"")
Account details are provider-specific. Each provider has their own rules for defining the `userSignupFields` and `configFn` fields:
## UI Helpers[](#ui-helpers ""Direct link to UI Helpers"")
Use Auth UI
[Auth UI](https://wasp-lang.dev/docs/auth/ui) is a common name for all high-level auth forms that come with Wasp.
These include fully functional auto-generated login and signup forms with working social login buttons. If you're looking for the fastest way to get your auth up and running, that's where you should look.
The UI helpers described below are lower-level and are useful for creating your custom forms.
Wasp provides sign-in buttons and URLs for each of the supported social login providers.
* JavaScript
* TypeScript
src/LoginPage.jsx
```
import { GoogleSignInButton, googleSignInUrl, GitHubSignInButton, gitHubSignInUrl,} from 'wasp/client/auth'export const LoginPage = () => { return ( <> {/* or */} Sign in with Google Sign in with GitHub )}
```
If you need even more customization, you can create your custom components using `signInUrl`s.
## API Reference[](#api-reference ""Direct link to API Reference"")
### Fields in the `app.auth` Dictionary and Overrides[](#fields-in-the-appauth-dictionary-and-overrides ""Direct link to fields-in-the-appauth-dictionary-and-overrides"")
For more information on:
* Allowed fields in `app.auth`
* `userSignupFields` and `configFn` functions
Check the provider-specific API References:",,"https://wasp-lang.dev/docs/auth/social-auth/overview","Social login options (e.g., Log in with Google) are a great (maybe even the best) solution for handling user accounts.","*","0","h3="":443""; ma=86400","max-age=600","DYNAMIC","878ecd1918cb6fe6-IAD","close","br","text/html; charset=utf-8","Tue, 23 Apr 2024 15:14:04 GMT","Tue, 23 Apr 2024 15:24:04 GMT","Thu, 18 Apr 2024 15:50:26 GMT","{""success_fraction"":0,""report_to"":""cf-nel"",""max_age"":604800}","{""endpoints"":[{""url"":""https:\/\/a.nel.cloudflare.com\/report\/v4?s=5bBgnEVW9wUmJua33z%2FsNwM4odF4y3o2T0ppHyBTPUALIQ5IUagXmJ0CsoLVHBE%2FGDPb1UVGaYq%2BZEFhHhju4hJ3ZqhPPQ9AbktmZZHt5uoeSmv7i6CK9Qzu%2BN8GXlNx""}],""group"":""cf-nel"",""max_age"":604800}","cloudflare","chunked","Accept-Encoding","1.1 varnish","MISS","0","032545ff354f1968a8c4e5411675cdf2d7399ec4",,"937A:83772:39907E5:44AD426:6627D03B",,"MISS","cache-iad-kiad7000124-IAD","S1713885244.358845,VS0,VE17",,,"en","https://wasp-lang.dev/img/wasp_twitter_cover.png","og:image","https://wasp-lang.dev/docs/auth/social-auth/overview","og:url","Overview | Wasp","og:title","Social login options (e.g., Log in with Google) are a great (maybe even the best) solution for handling user accounts.","og:description","Overview | Wasp",,"Overview
Social login options (e.g., Log in with Google) are a great (maybe even the best) solution for handling user accounts. A famous old developer joke tells us ""The best auth system is the one you never have to make.""
Wasp wants to make adding social login options to your app as painless as possible.
Using different social providers gives users a chance to sign into your app via their existing accounts on other platforms (Google, GitHub, etc.).
This page goes through the common behaviors between all supported social login providers and shows you how to customize them. It also gives an overview of Wasp's UI helpers - the quickest possible way to get started with social auth.
Available Providers
Wasp currently supports the following social login providers:
User Entity
Wasp requires you to declare a userEntity for all auth methods (social or otherwise). This field tells Wasp which Entity represents the user.
Here's what the full setup looks like:
JavaScript
TypeScript
main.wasp
app myApp {
wasp: {
version: ""^0.13.0""
},
title: ""My App"",
auth: {
userEntity: User,
methods: {
google: {}
},
onAuthFailedRedirectTo: ""/login""
},
}
entity User {=psl
id Int @id @default(autoincrement())
//...
psl=}
To learn more about what the fields on these entities represent, look at the API Reference.
Default Behavior
When a user signs in for the first time, Wasp creates a new user account and links it to the chosen auth provider account for future logins.
Overrides
By default, Wasp doesn't store any information it receives from the social login provider. It only stores the user's ID specific to the provider.
If you wish to store more information about the user, you can override the default behavior. You can do this by defining the userSignupFields and configFn fields in main.wasp for each provider.
You can create custom signup setups, such as allowing users to define a custom username after they sign up with a social provider.
Example: Allowing User to Set Their Username
If you want to modify the signup flow (e.g., let users choose their own usernames), you will need to go through three steps:
The first step is adding a isSignupComplete property to your User Entity. This field will signal whether the user has completed the signup process.
The second step is overriding the default signup behavior.
The third step is implementing the rest of your signup flow and redirecting users where appropriate.
Let's go through both steps in more detail.
1. Adding the isSignupComplete Field to the User Entity
JavaScript
TypeScript
main.wasp
entity User {=psl
id Int @id @default(autoincrement())
username String? @unique
isSignupComplete Boolean @default(false)
psl=}
2. Overriding the Default Behavior
Declare an import under app.auth.methods.google.userSignupFields (the example assumes you're using Google):
JavaScript
TypeScript
main.wasp
app myApp {
wasp: {
version: ""^0.13.0""
},
title: ""My App"",
auth: {
userEntity: User,
methods: {
google: {
userSignupFields: import { userSignupFields } from ""@src/auth/google.js""
}
},
onAuthFailedRedirectTo: ""/login""
},
}
// ...
And implement the imported function.
src/auth/google.js
export const userSignupFields = {
isSignupComplete: () => false,
}
3. Showing the Correct State on the Client
You can query the user's isSignupComplete flag on the client with the useAuth() hook. Depending on the flag's value, you can redirect users to the appropriate signup step.
For example:
When the user lands on the homepage, check the value of user.isSignupComplete.
If it's false, it means the user has started the signup process but hasn't yet chosen their username. Therefore, you can redirect them to EditUserDetailsPage where they can edit the username property.
JavaScript
TypeScript
src/HomePage.jsx
import { useAuth } from 'wasp/client/auth'
import { Redirect } from 'react-router-dom'
export function HomePage() {
const { data: user } = useAuth()
if (user.isSignupComplete === false) {
return
}
// ...
}
Using the User's Provider Account Details
Account details are provider-specific. Each provider has their own rules for defining the userSignupFields and configFn fields:
UI Helpers
Use Auth UI
Auth UI is a common name for all high-level auth forms that come with Wasp.
These include fully functional auto-generated login and signup forms with working social login buttons. If you're looking for the fastest way to get your auth up and running, that's where you should look.
The UI helpers described below are lower-level and are useful for creating your custom forms.
Wasp provides sign-in buttons and URLs for each of the supported social login providers.
JavaScript
TypeScript
src/LoginPage.jsx
import {
GoogleSignInButton,
googleSignInUrl,
GitHubSignInButton,
gitHubSignInUrl,
} from 'wasp/client/auth'
export const LoginPage = () => {
return (
<>
{/* or */}
Sign in with Google
Sign in with GitHub
)
}
If you need even more customization, you can create your custom components using signInUrls.
API Reference
Fields in the app.auth Dictionary and Overrides
For more information on:
Allowed fields in app.auth
userSignupFields and configFn functions
Check the provider-specific API References:","https://wasp-lang.dev/docs/auth/social-auth/overview"
"1",,"2024-04-23T15:14:08.715Z","https://wasp-lang.dev/docs/auth/social-auth/google","https://wasp-lang.dev/docs","http","## Google
Wasp supports Google Authentication out of the box. Google Auth is arguably the best external auth option, as most users on the web already have Google accounts.
Enabling it lets your users log in using their existing Google accounts, greatly simplifying the process and enhancing the user experience.
Let's walk through enabling Google authentication, explain some of the default settings, and show how to override them.
## Setting up Google Auth[](#setting-up-google-auth ""Direct link to Setting up Google Auth"")
Enabling Google Authentication comes down to a series of steps:
1. Enabling Google authentication in the Wasp file.
2. Adding the `User` entity.
3. Creating a Google OAuth app.
4. Adding the necessary Routes and Pages
5. Using Auth UI components in our Pages.
Here's a skeleton of how our `main.wasp` should look like after we're done:
main.wasp
```
// Configuring the social authenticationapp myApp { auth: { ... }}// Defining entitiesentity User { ... }// Defining routes and pagesroute LoginRoute { ... }page LoginPage { ... }
```
### 1\. Adding Google Auth to Your Wasp File[](#1-adding-google-auth-to-your-wasp-file ""Direct link to 1. Adding Google Auth to Your Wasp File"")
Let's start by properly configuring the Auth object:
* JavaScript
* TypeScript
main.wasp
```
app myApp { wasp: { version: ""^0.13.0"" }, title: ""My App"", auth: { // 1. Specify the User entity (we'll define it next) userEntity: User, methods: { // 2. Enable Google Auth google: {} }, onAuthFailedRedirectTo: ""/login"" },}
```
`userEntity` is explained in [the social auth overview](https://wasp-lang.dev/docs/auth/social-auth/overview#social-login-entity).
### 2\. Adding the User Entity[](#2-adding-the-user-entity ""Direct link to 2. Adding the User Entity"")
Let's now define the `app.auth.userEntity` entity:
* JavaScript
* TypeScript
main.wasp
```
// ...// 3. Define the User entityentity User {=psl id Int @id @default(autoincrement()) // ...psl=}
```
### 3\. Creating a Google OAuth App[](#3-creating-a-google-oauth-app ""Direct link to 3. Creating a Google OAuth App"")
To use Google as an authentication method, you'll first need to create a Google project and provide Wasp with your client key and secret. Here's how you do it:
1. Create a Google Cloud Platform account if you do not already have one: [https://cloud.google.com/](https://cloud.google.com/)
2. Create and configure a new Google project here: [https://console.cloud.google.com/home/dashboard](https://console.cloud.google.com/home/dashboard)
3. Search for **OAuth** in the top bar, click on **OAuth consent screen**.
* Select what type of app you want, we will go with **External**.
* Fill out applicable information on Page 1.
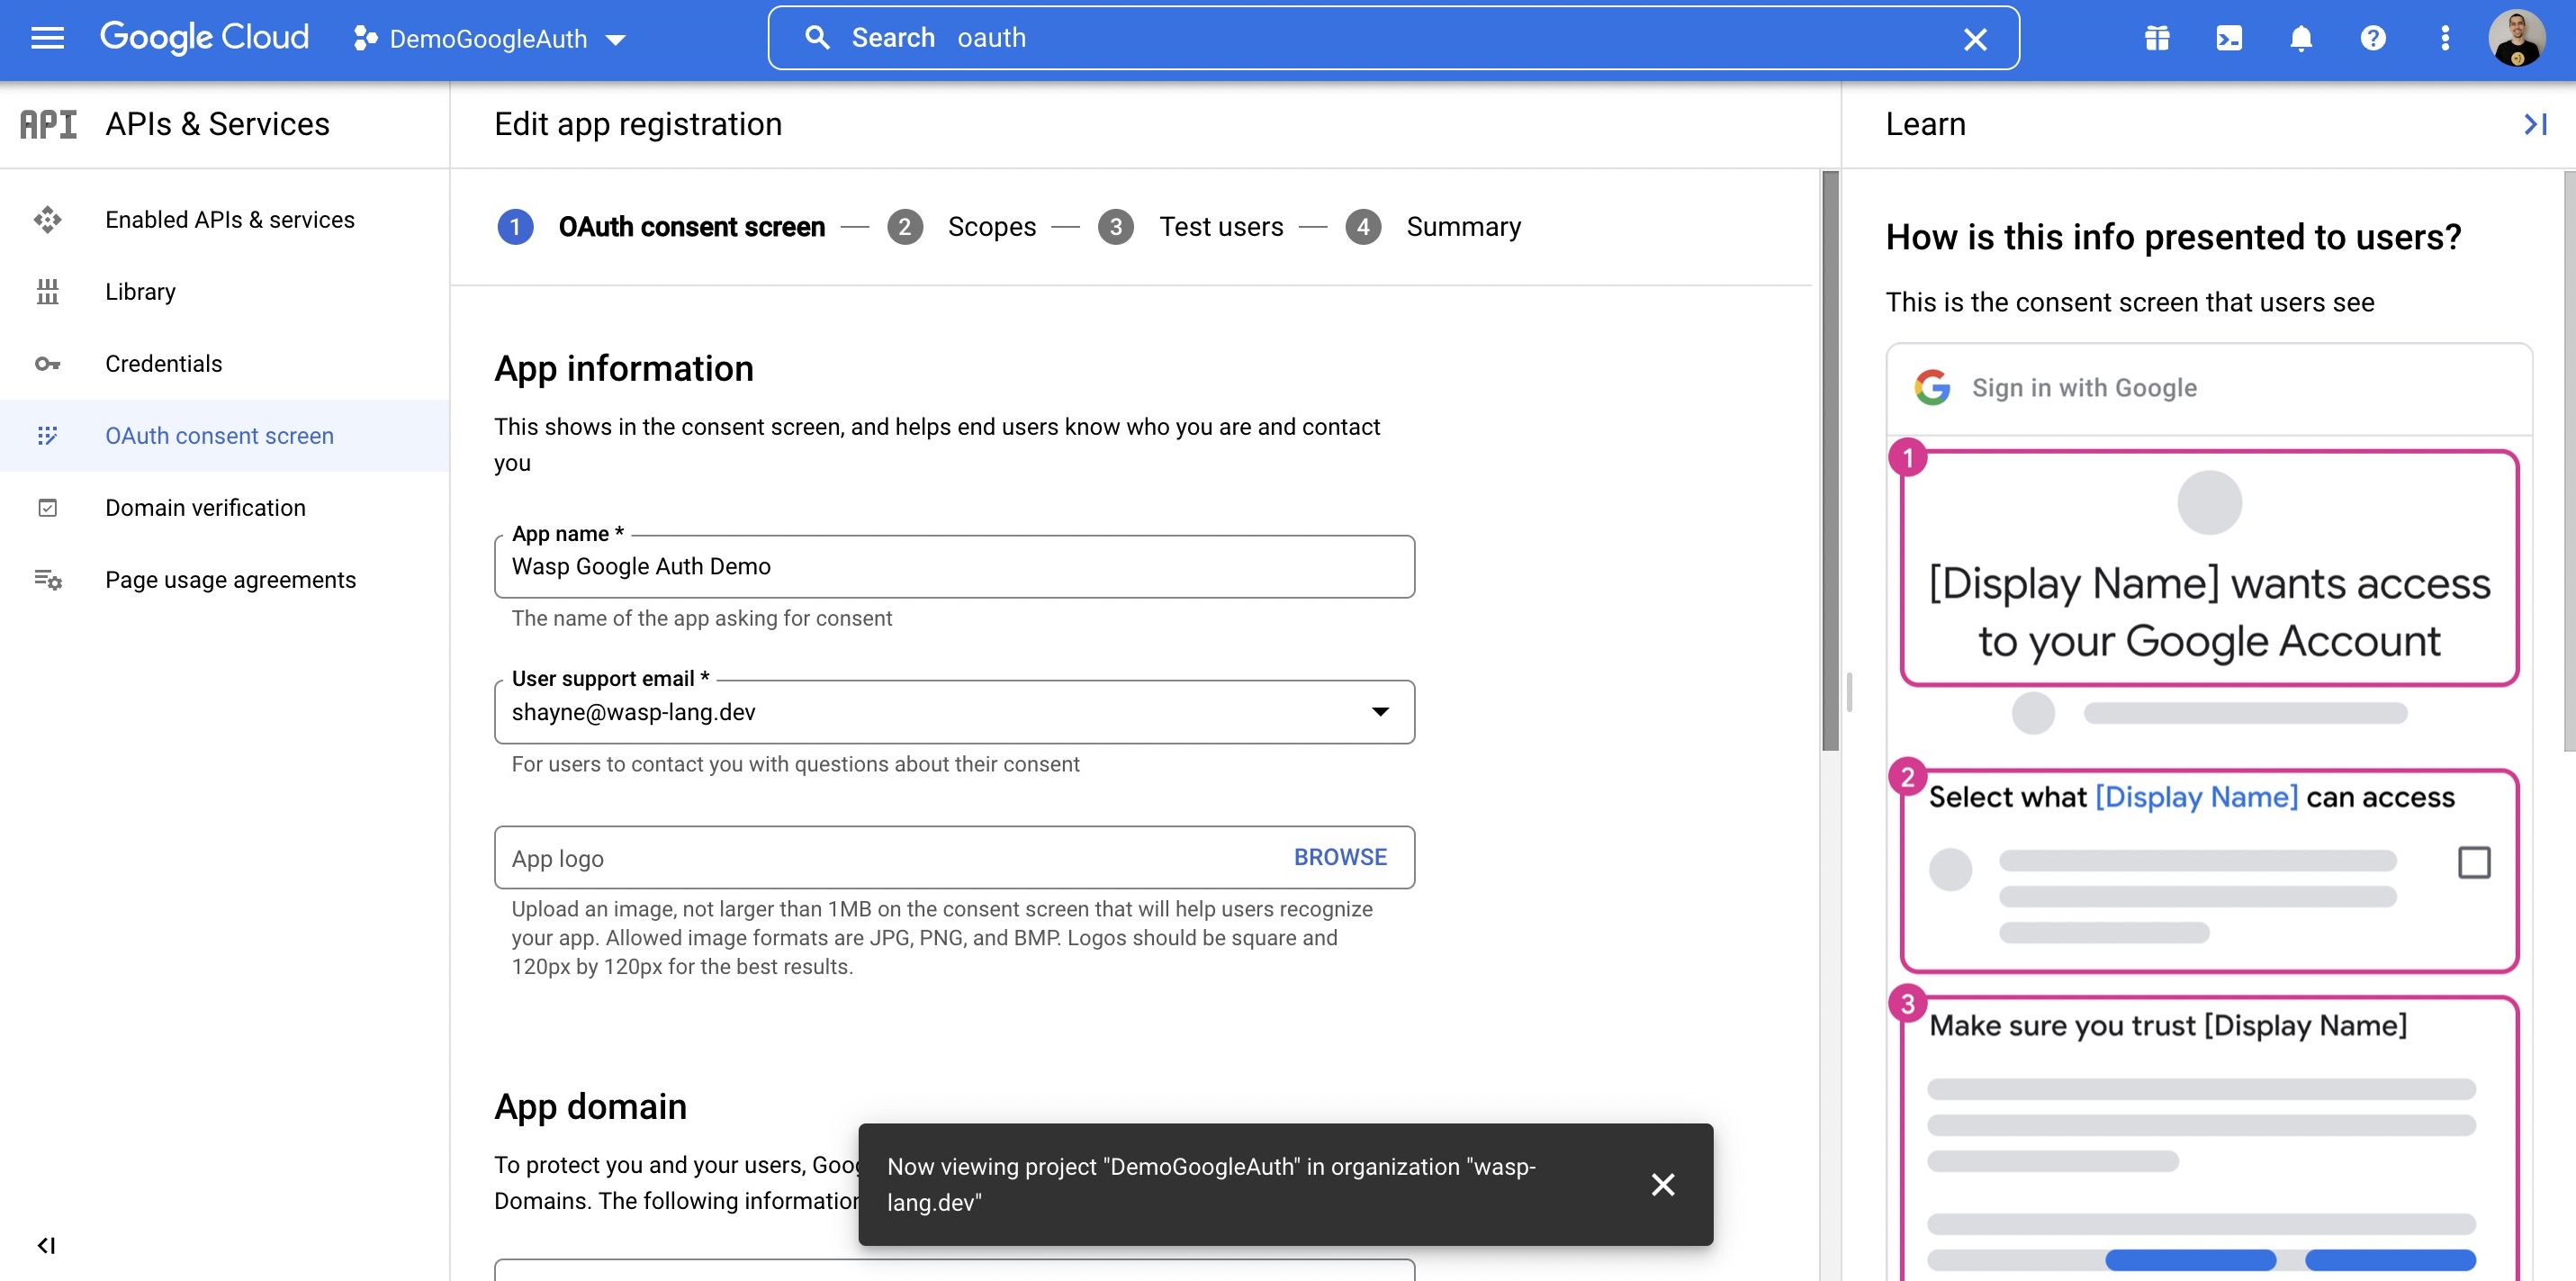
* On Page 2, Scopes, you should select `userinfo.profile`. You can optionally search for other things, like `email`.
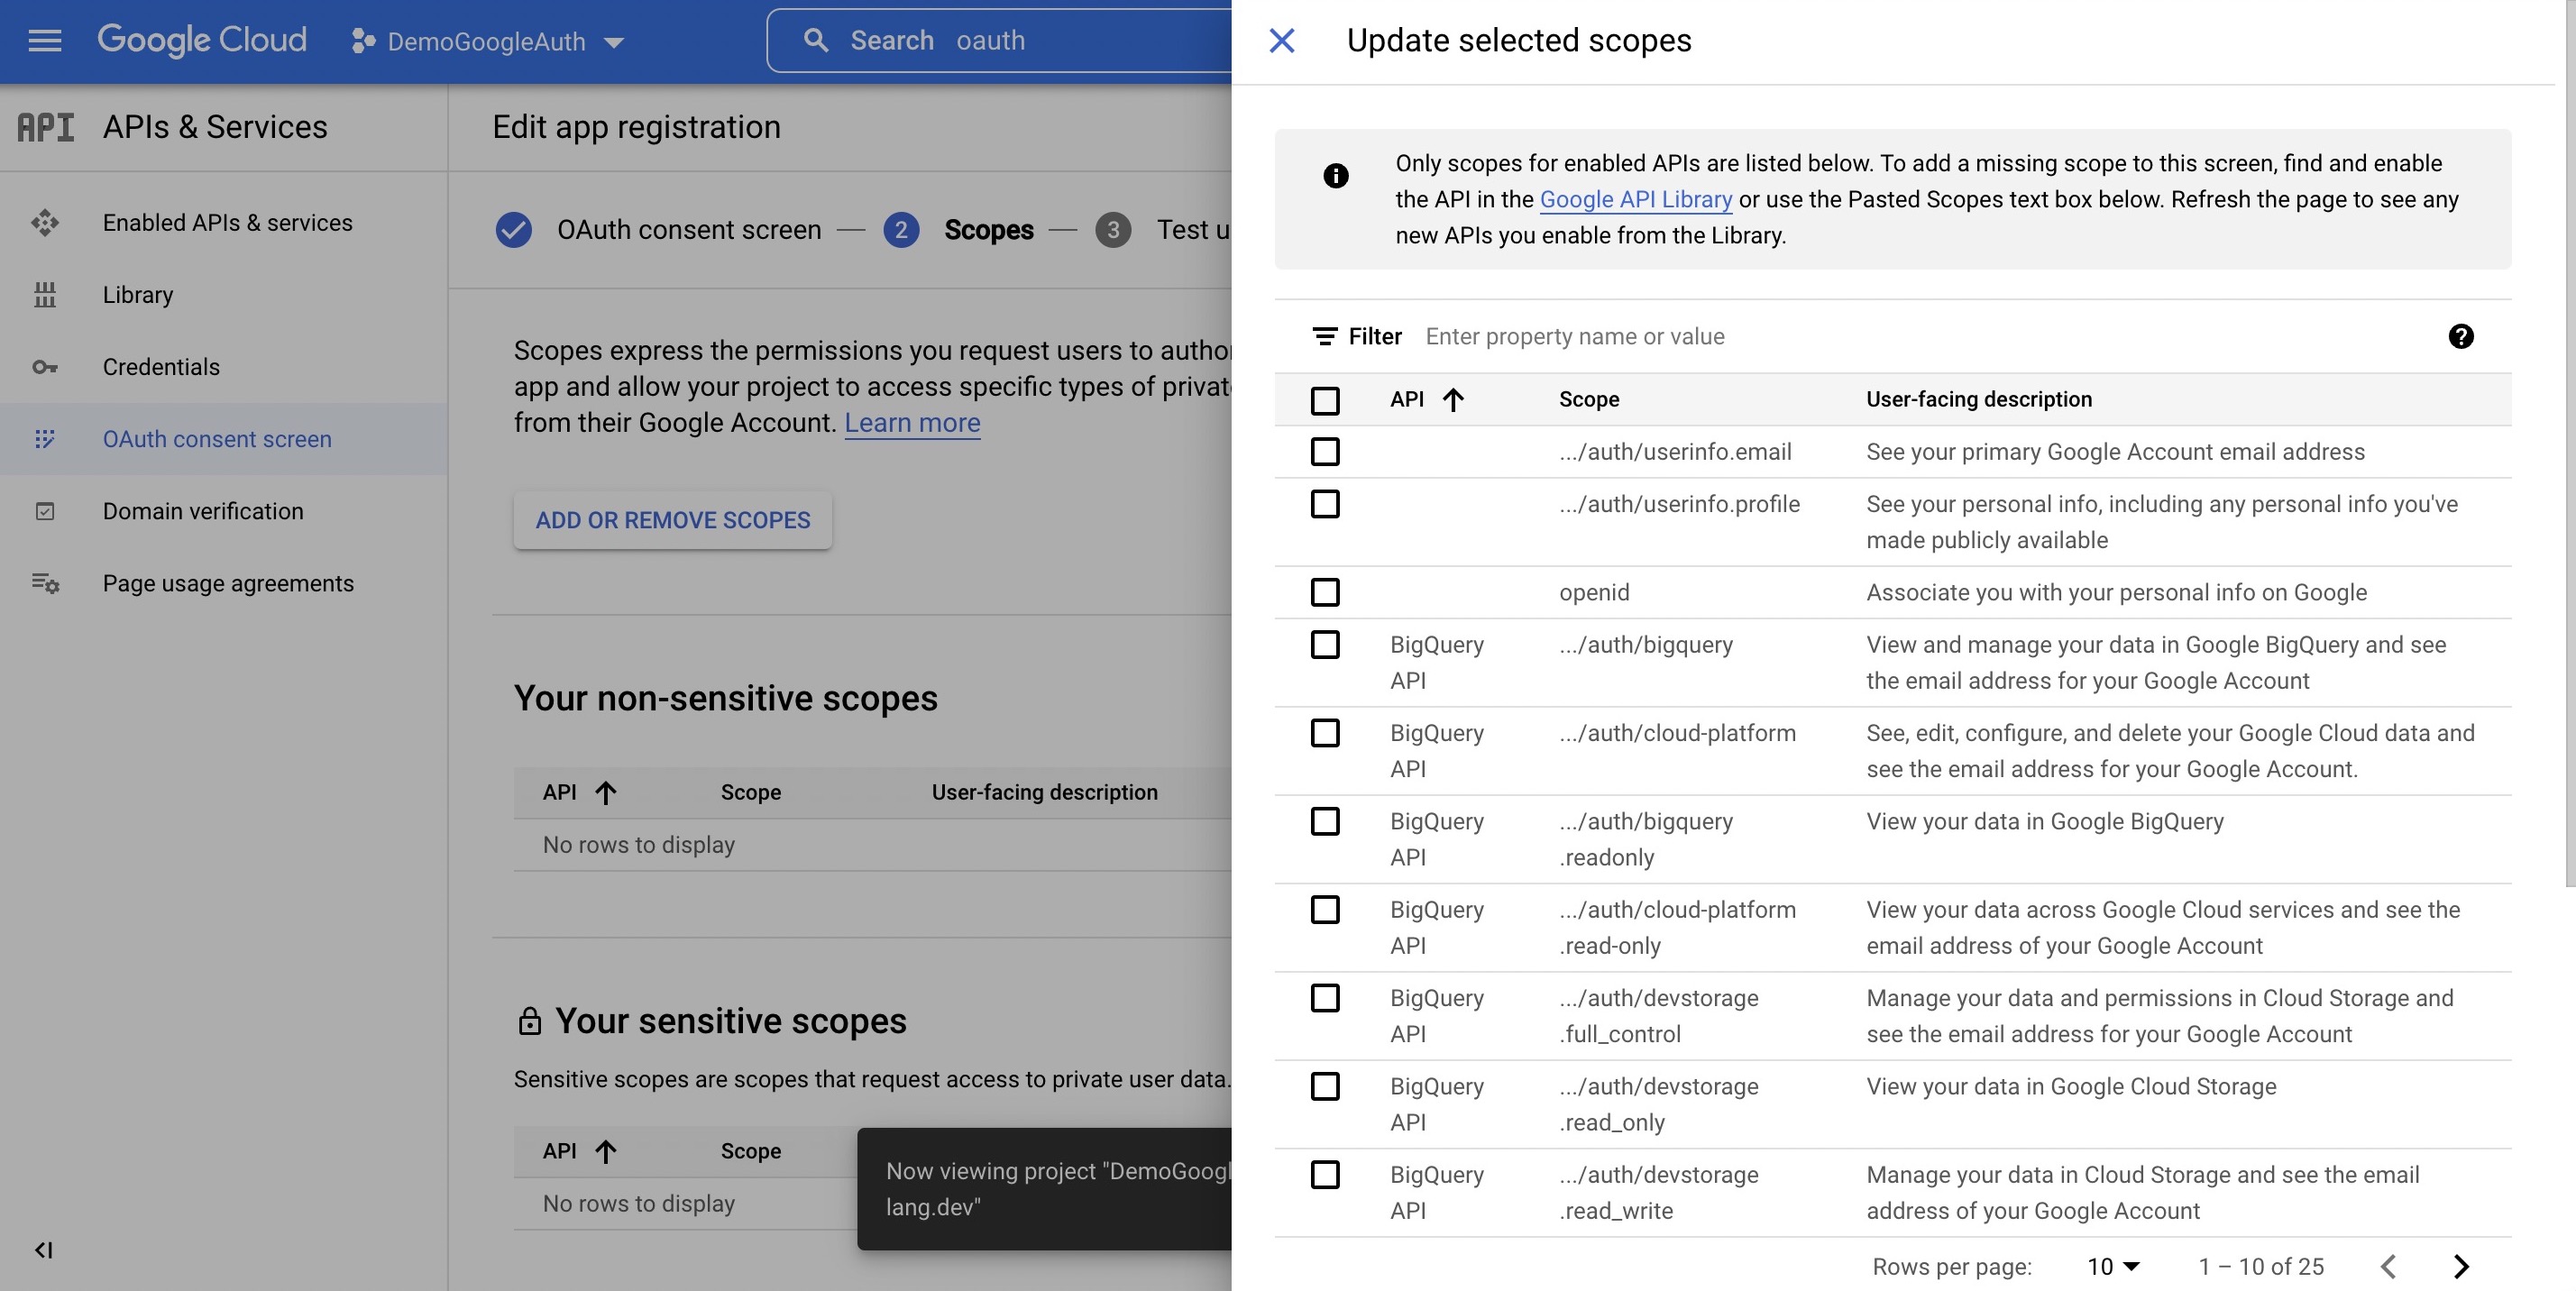
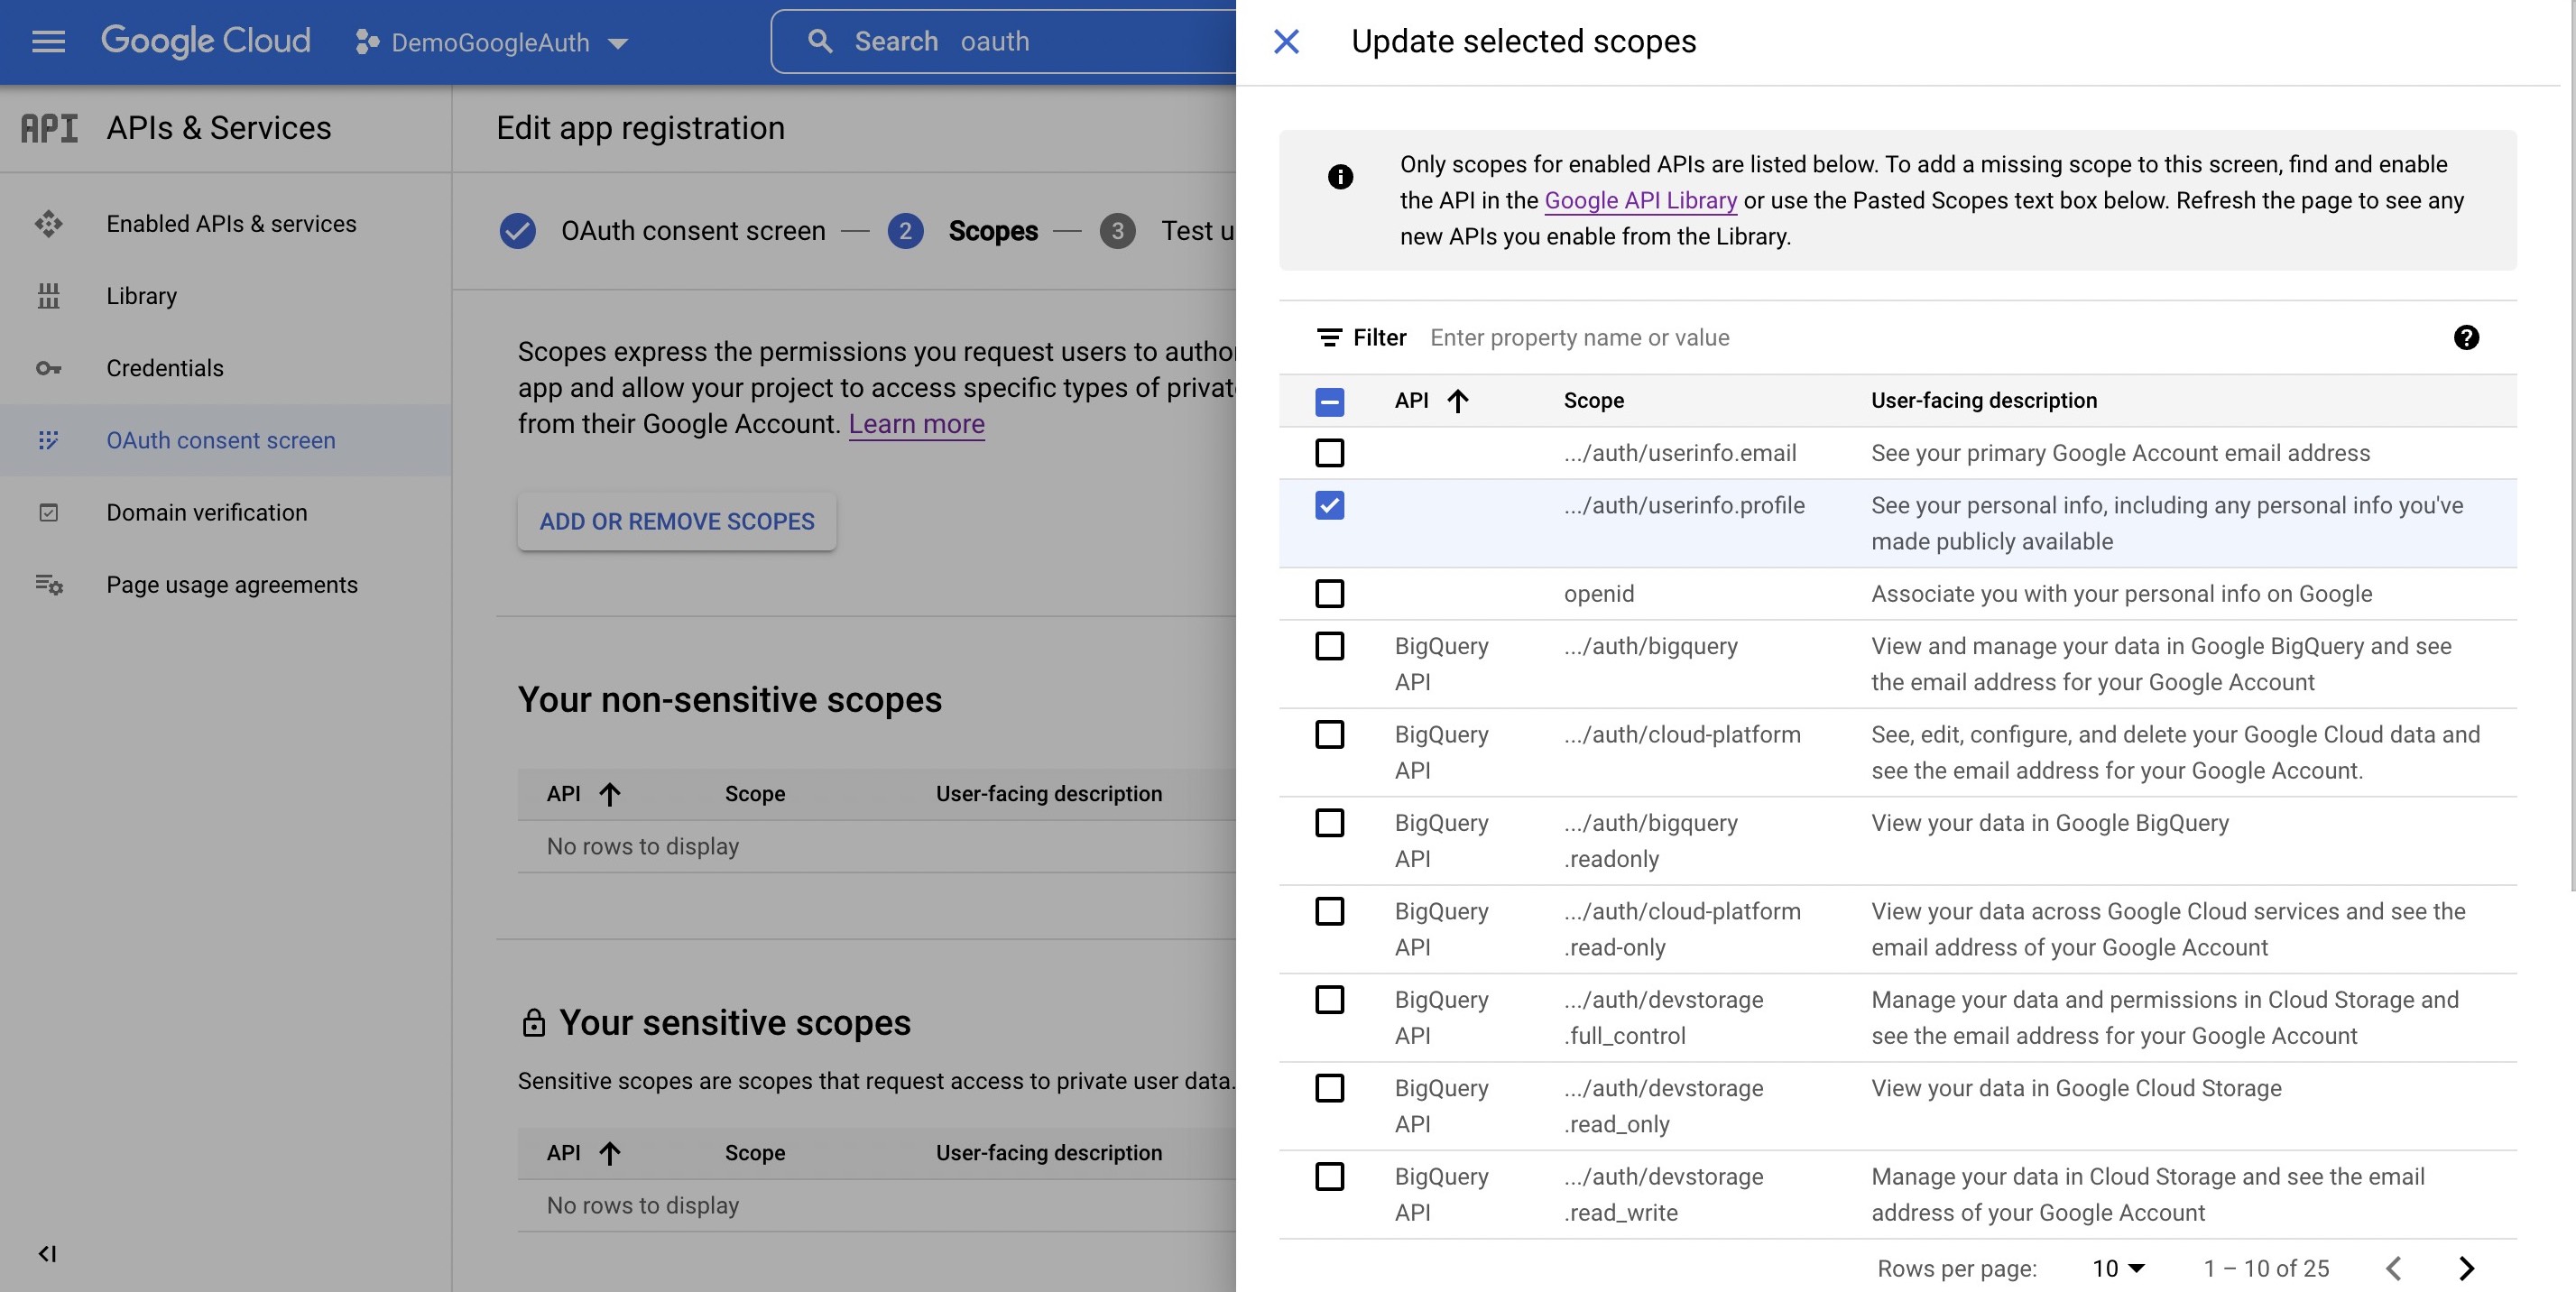
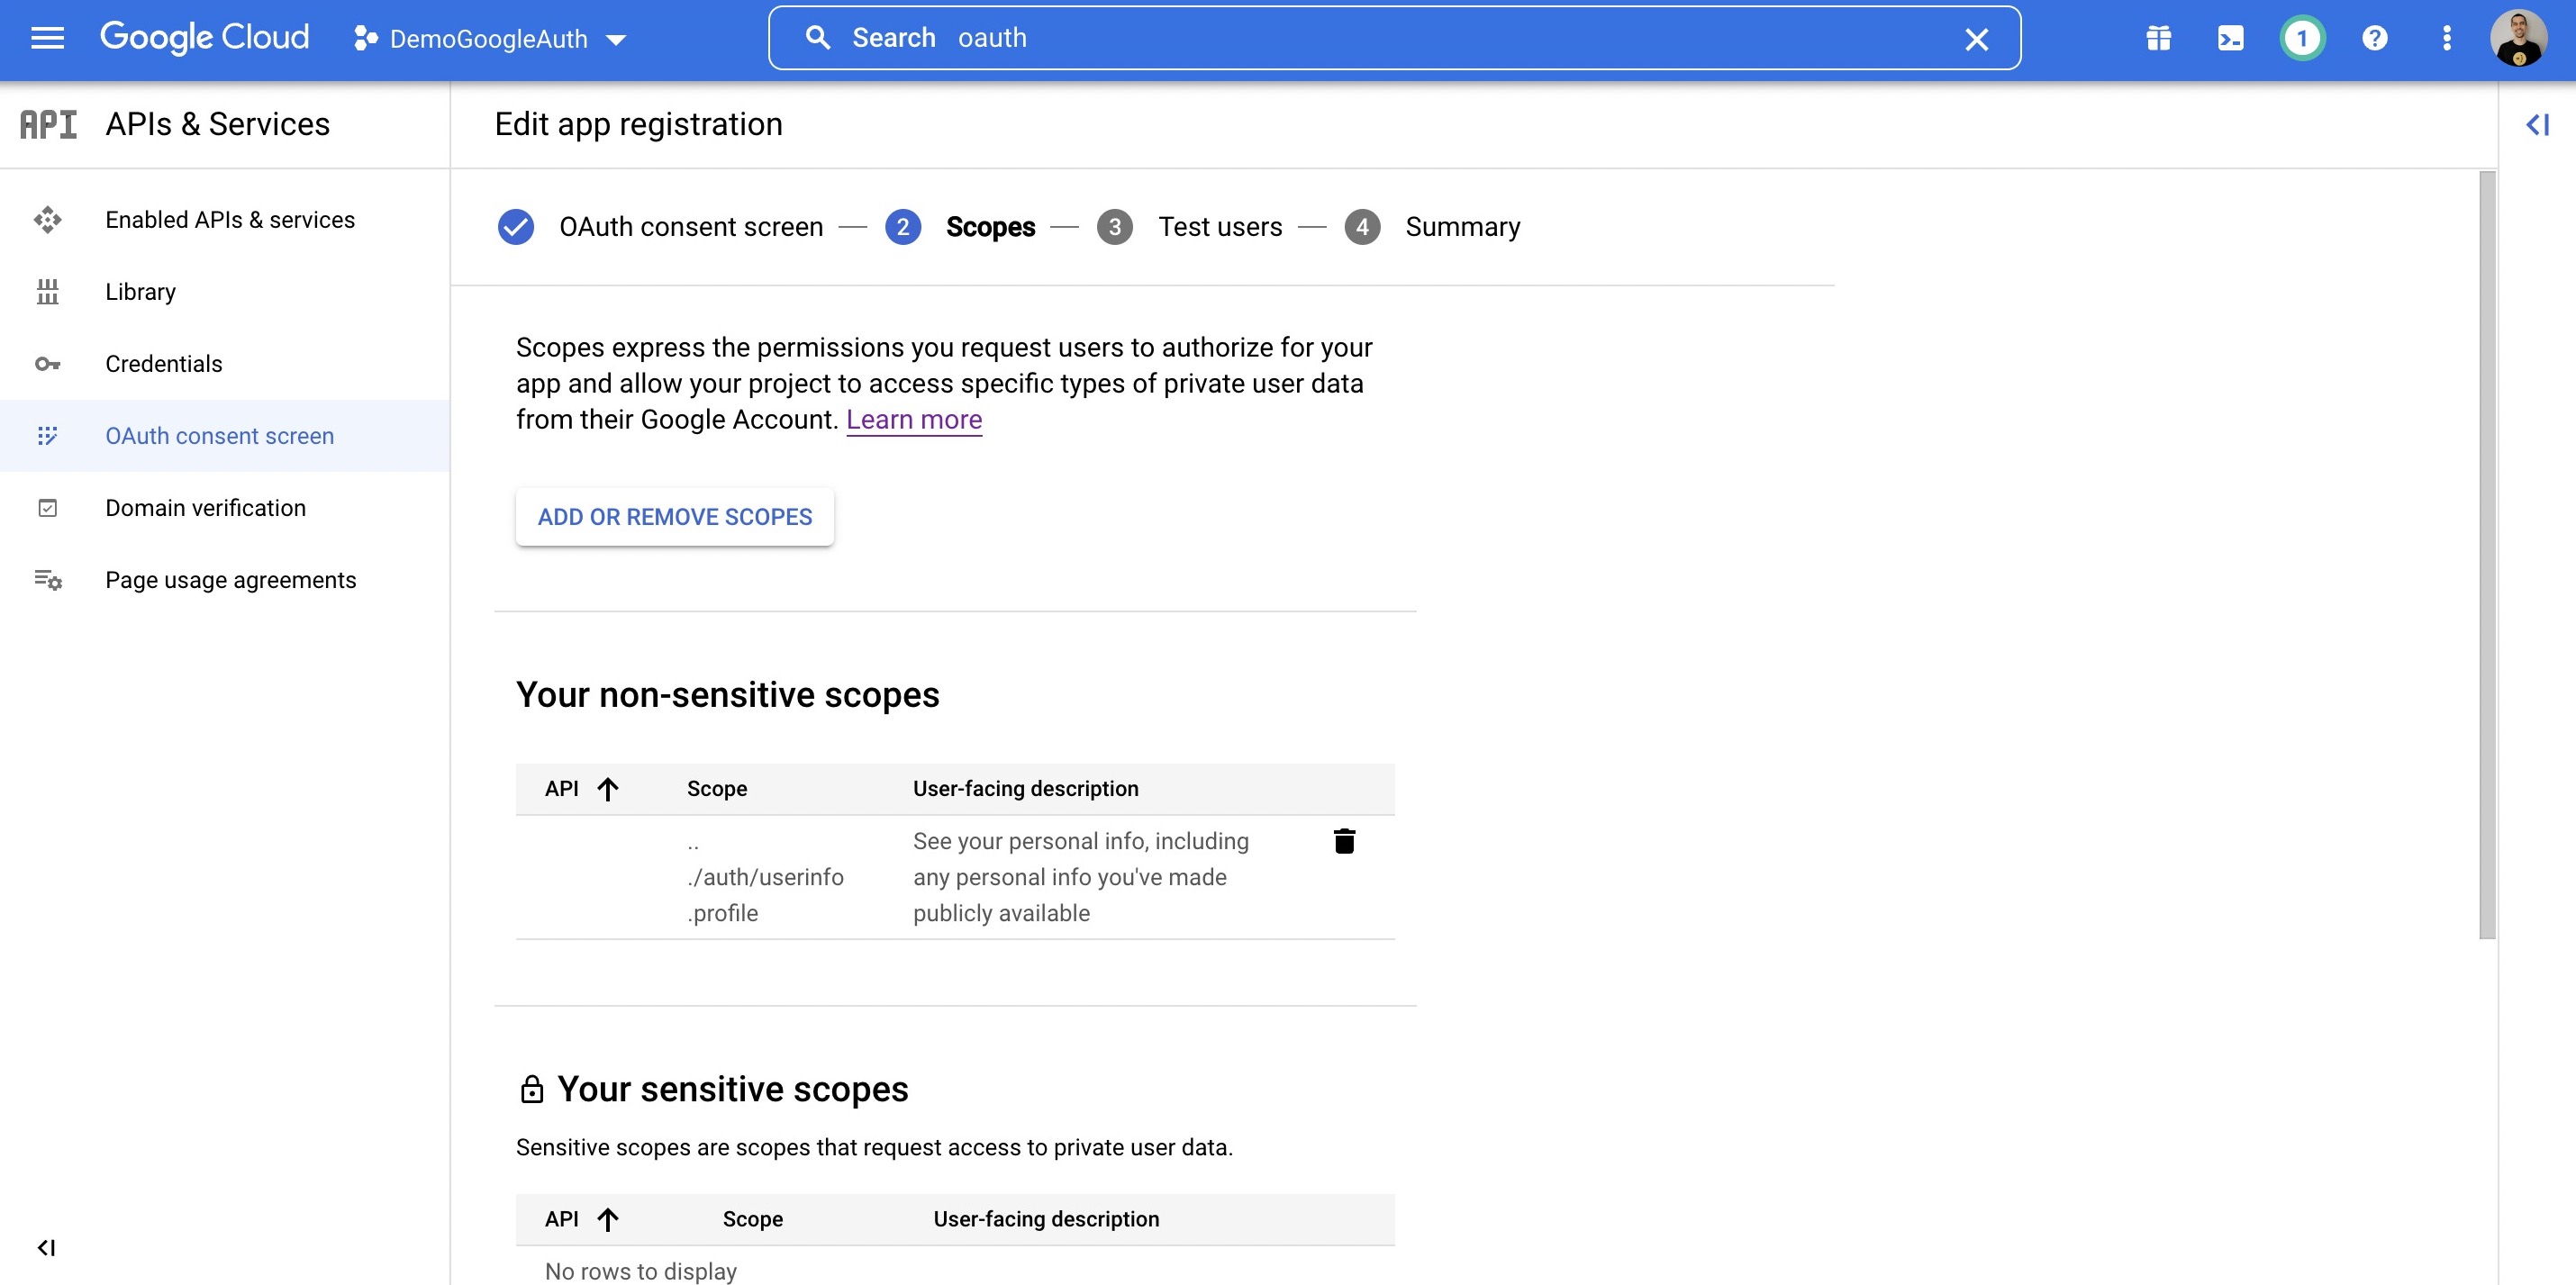
* Add any test users you want on Page 3.
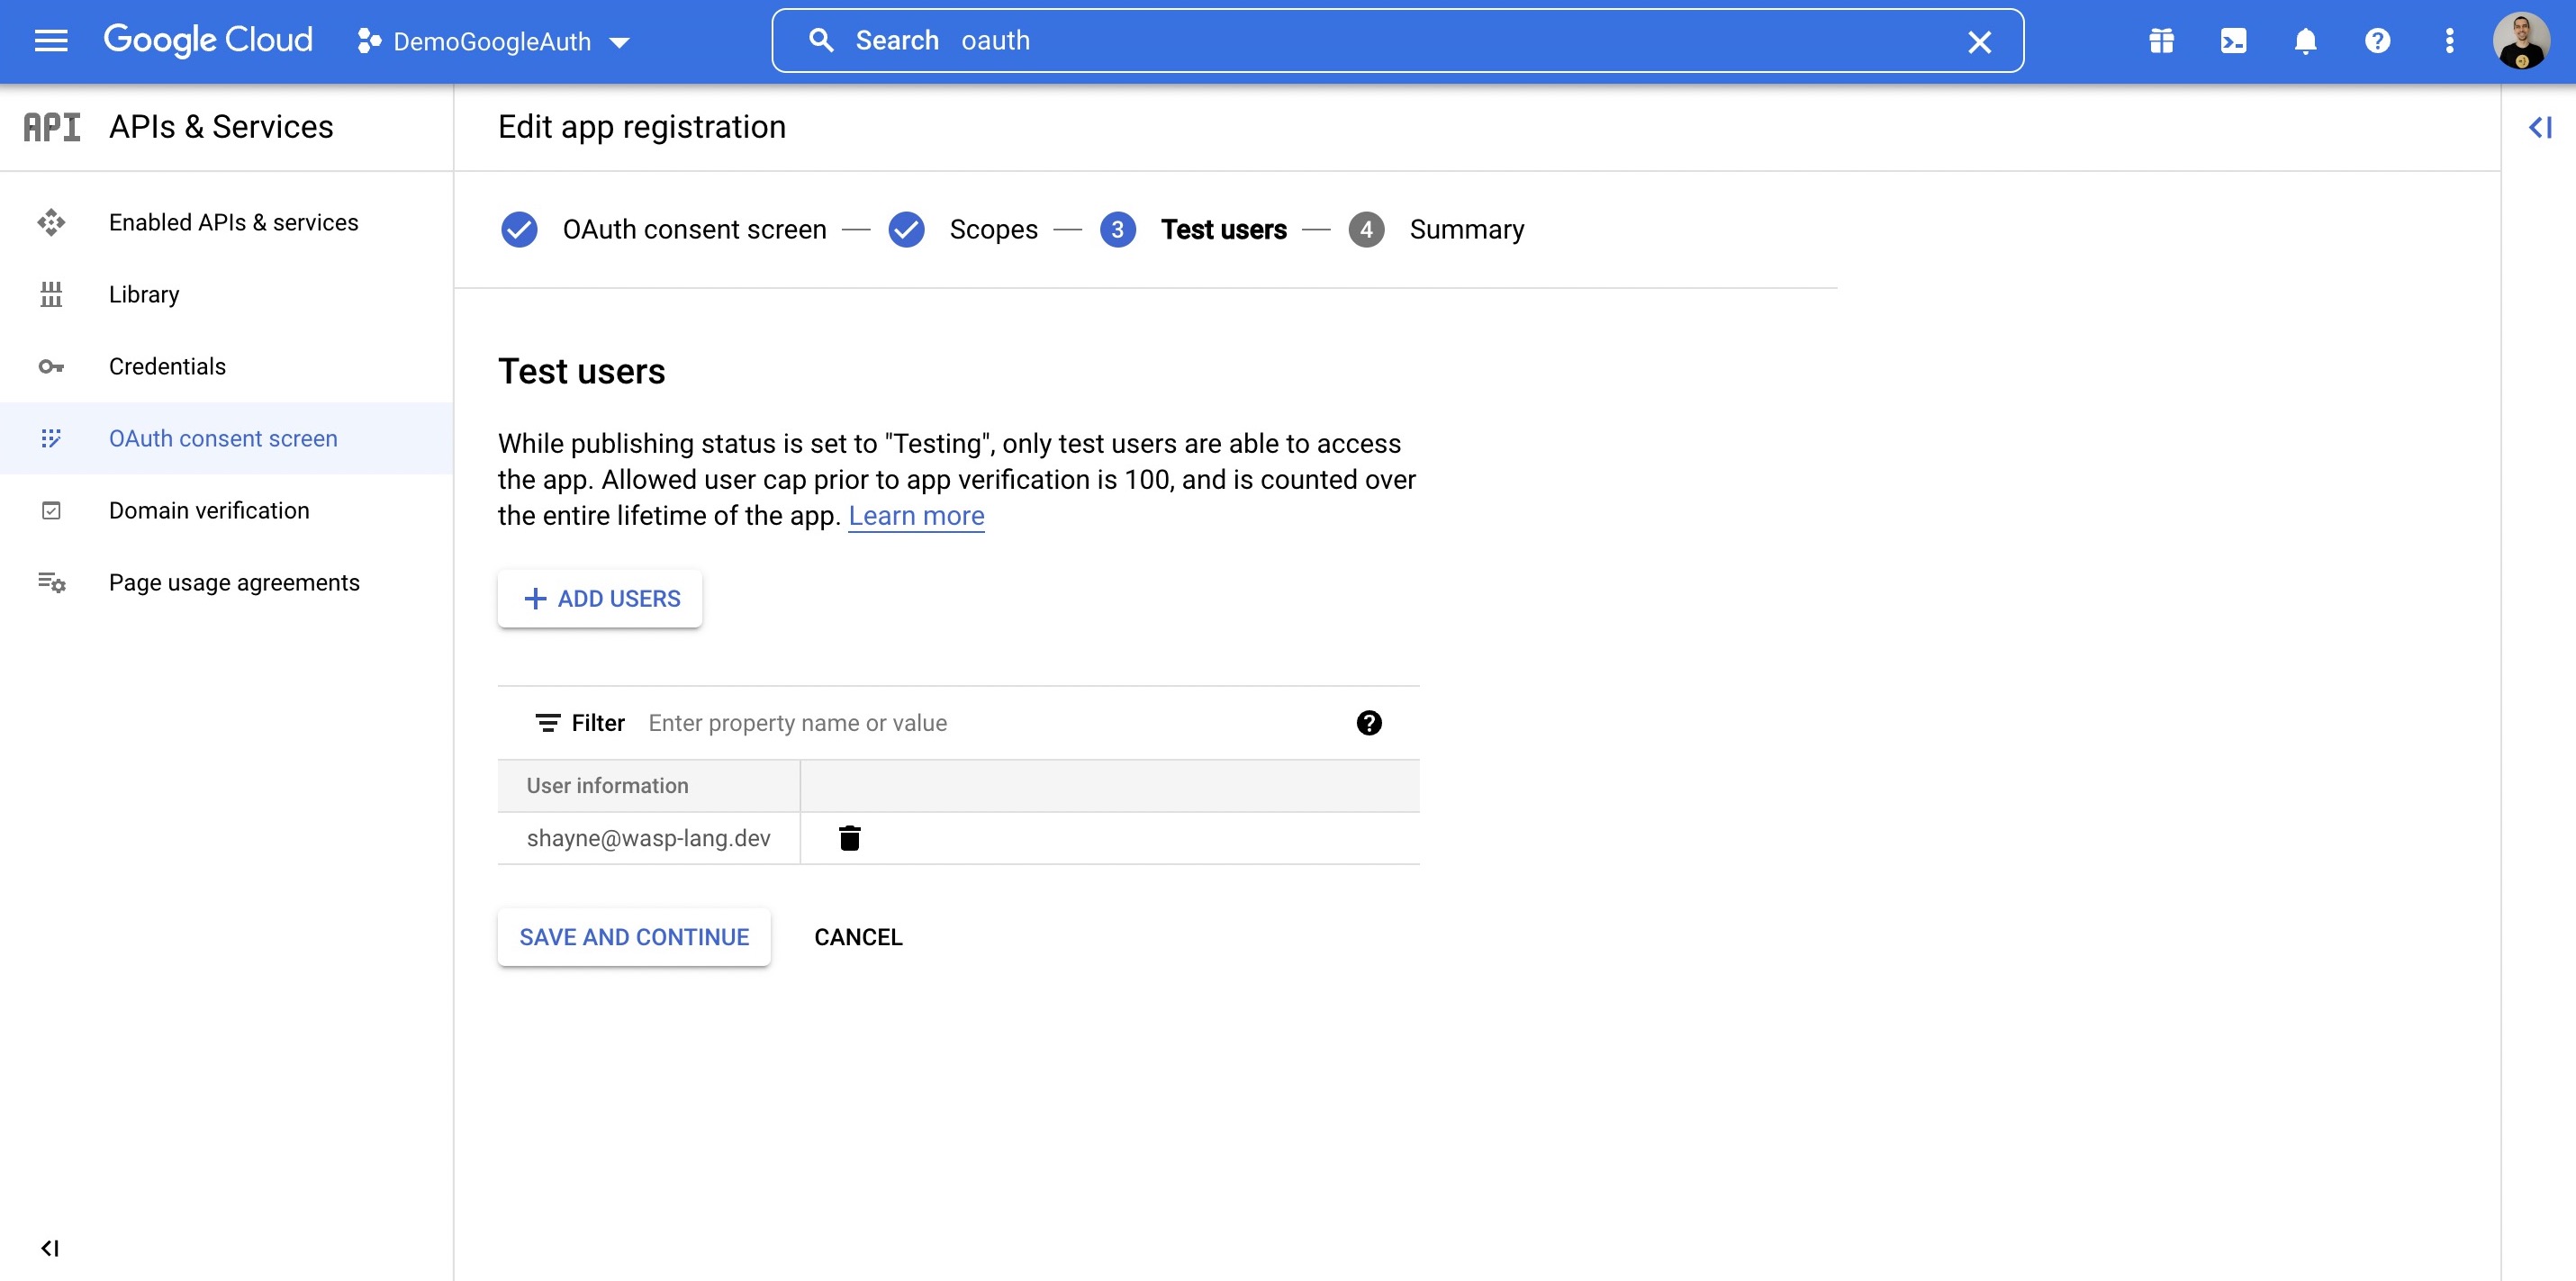
4. Next, click **Credentials**.
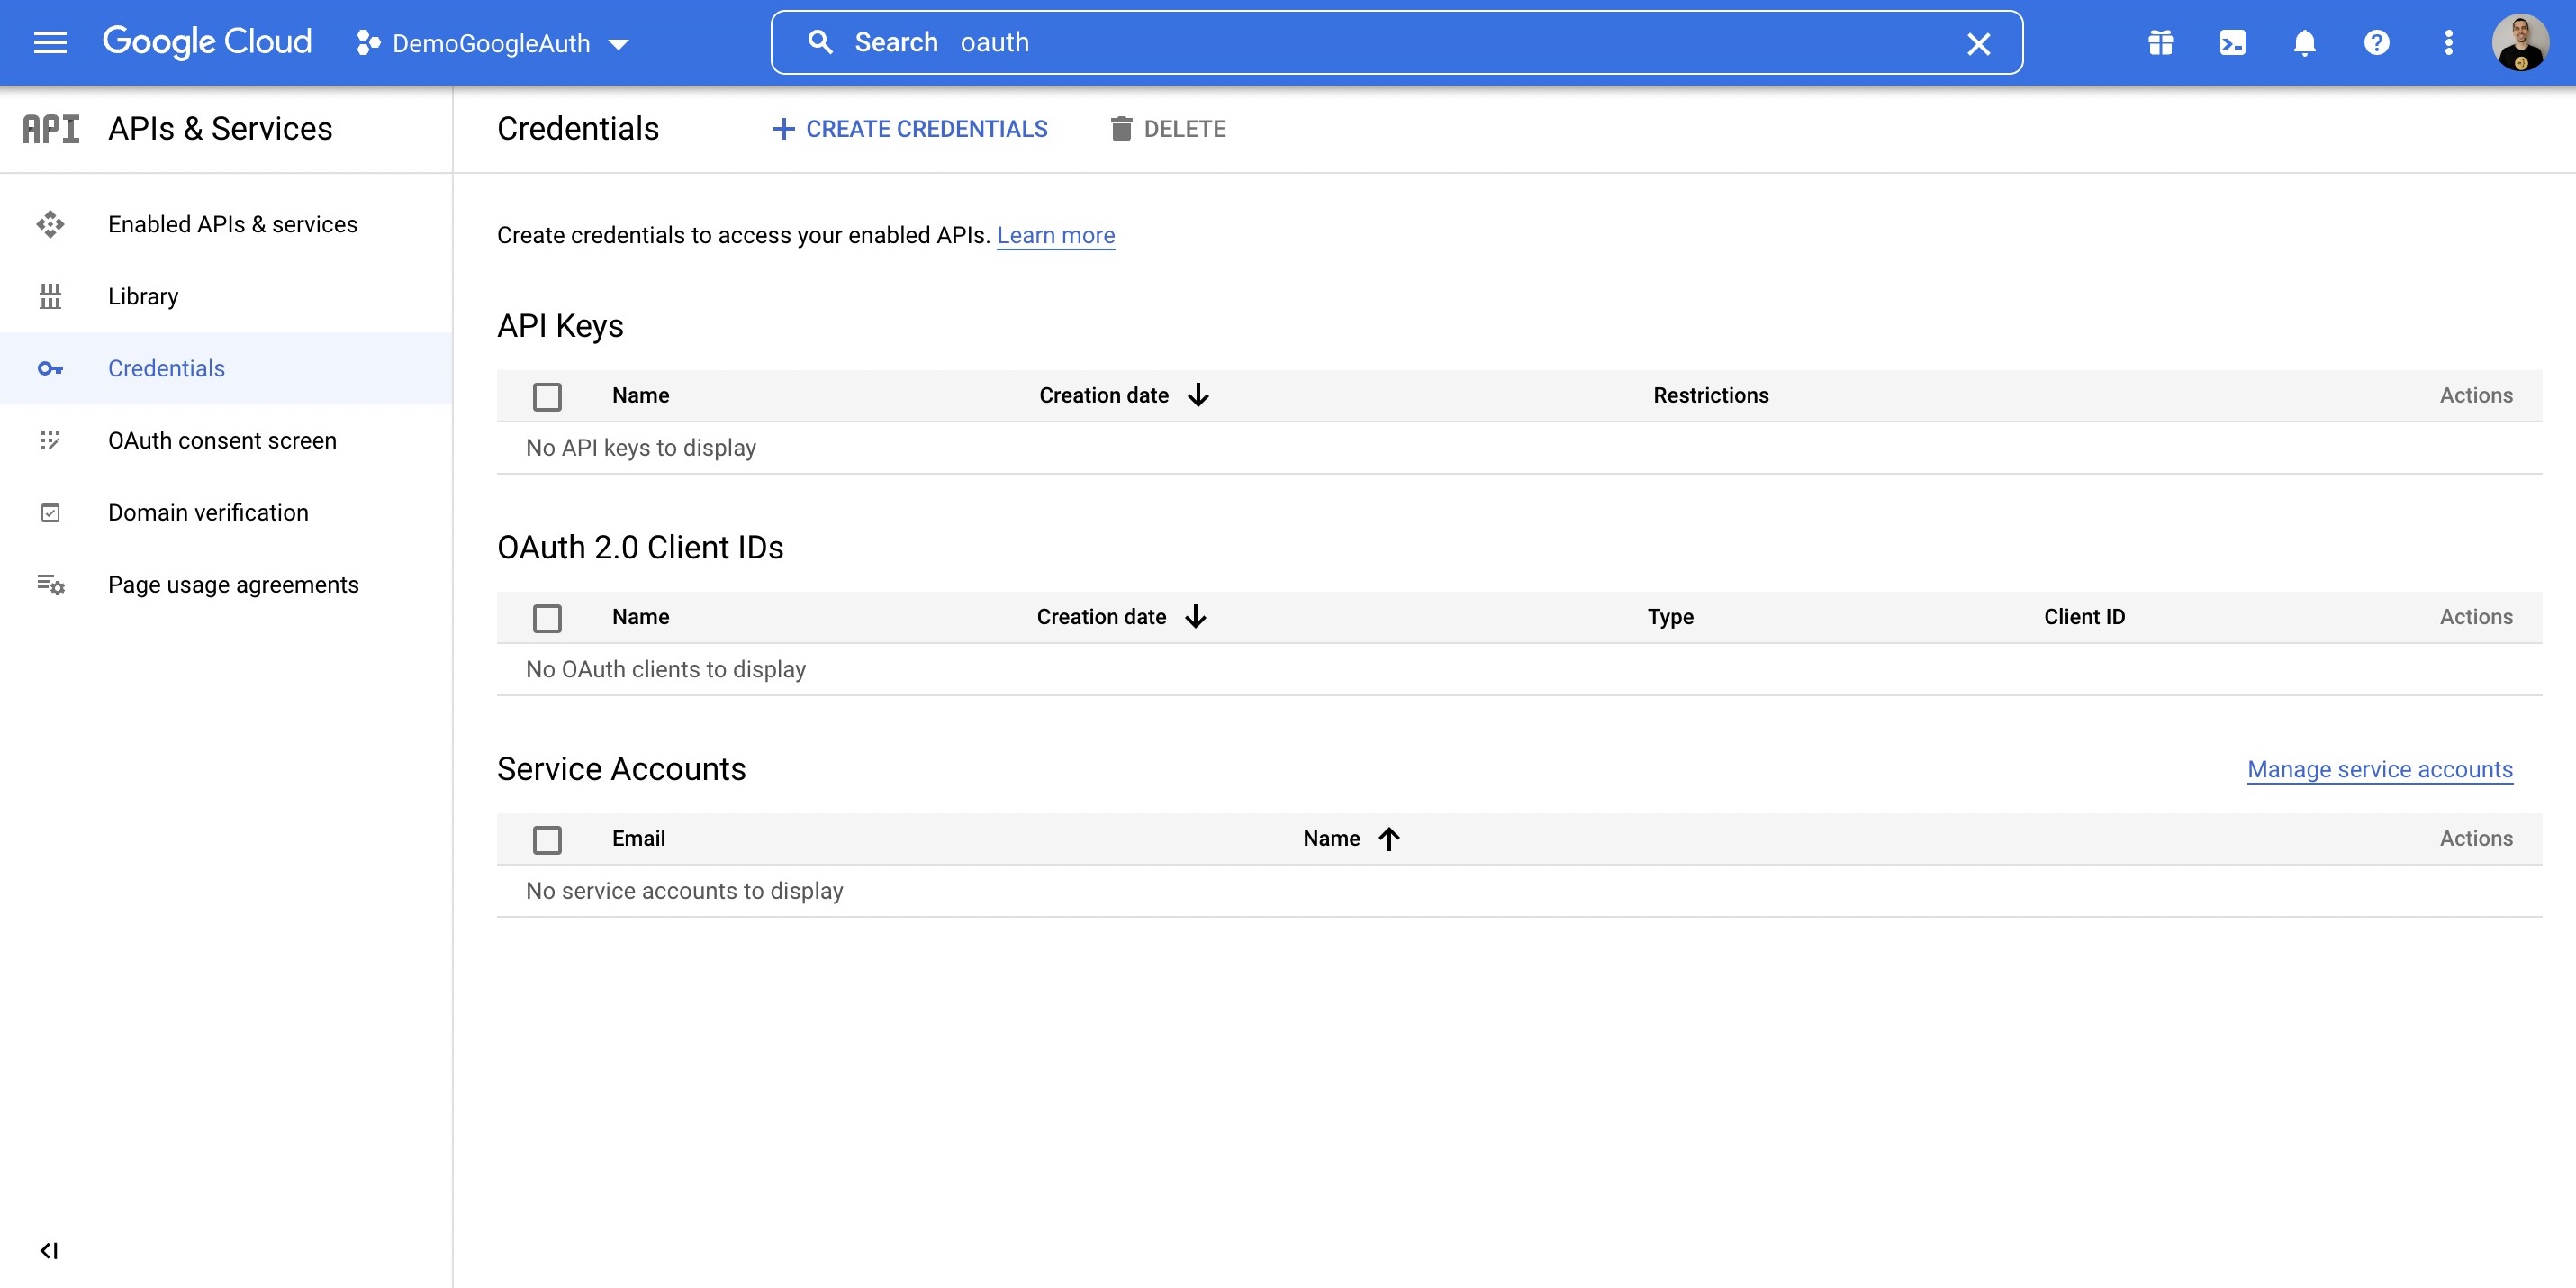
* Select **Create Credentials**.
* Select **OAuth client ID**.
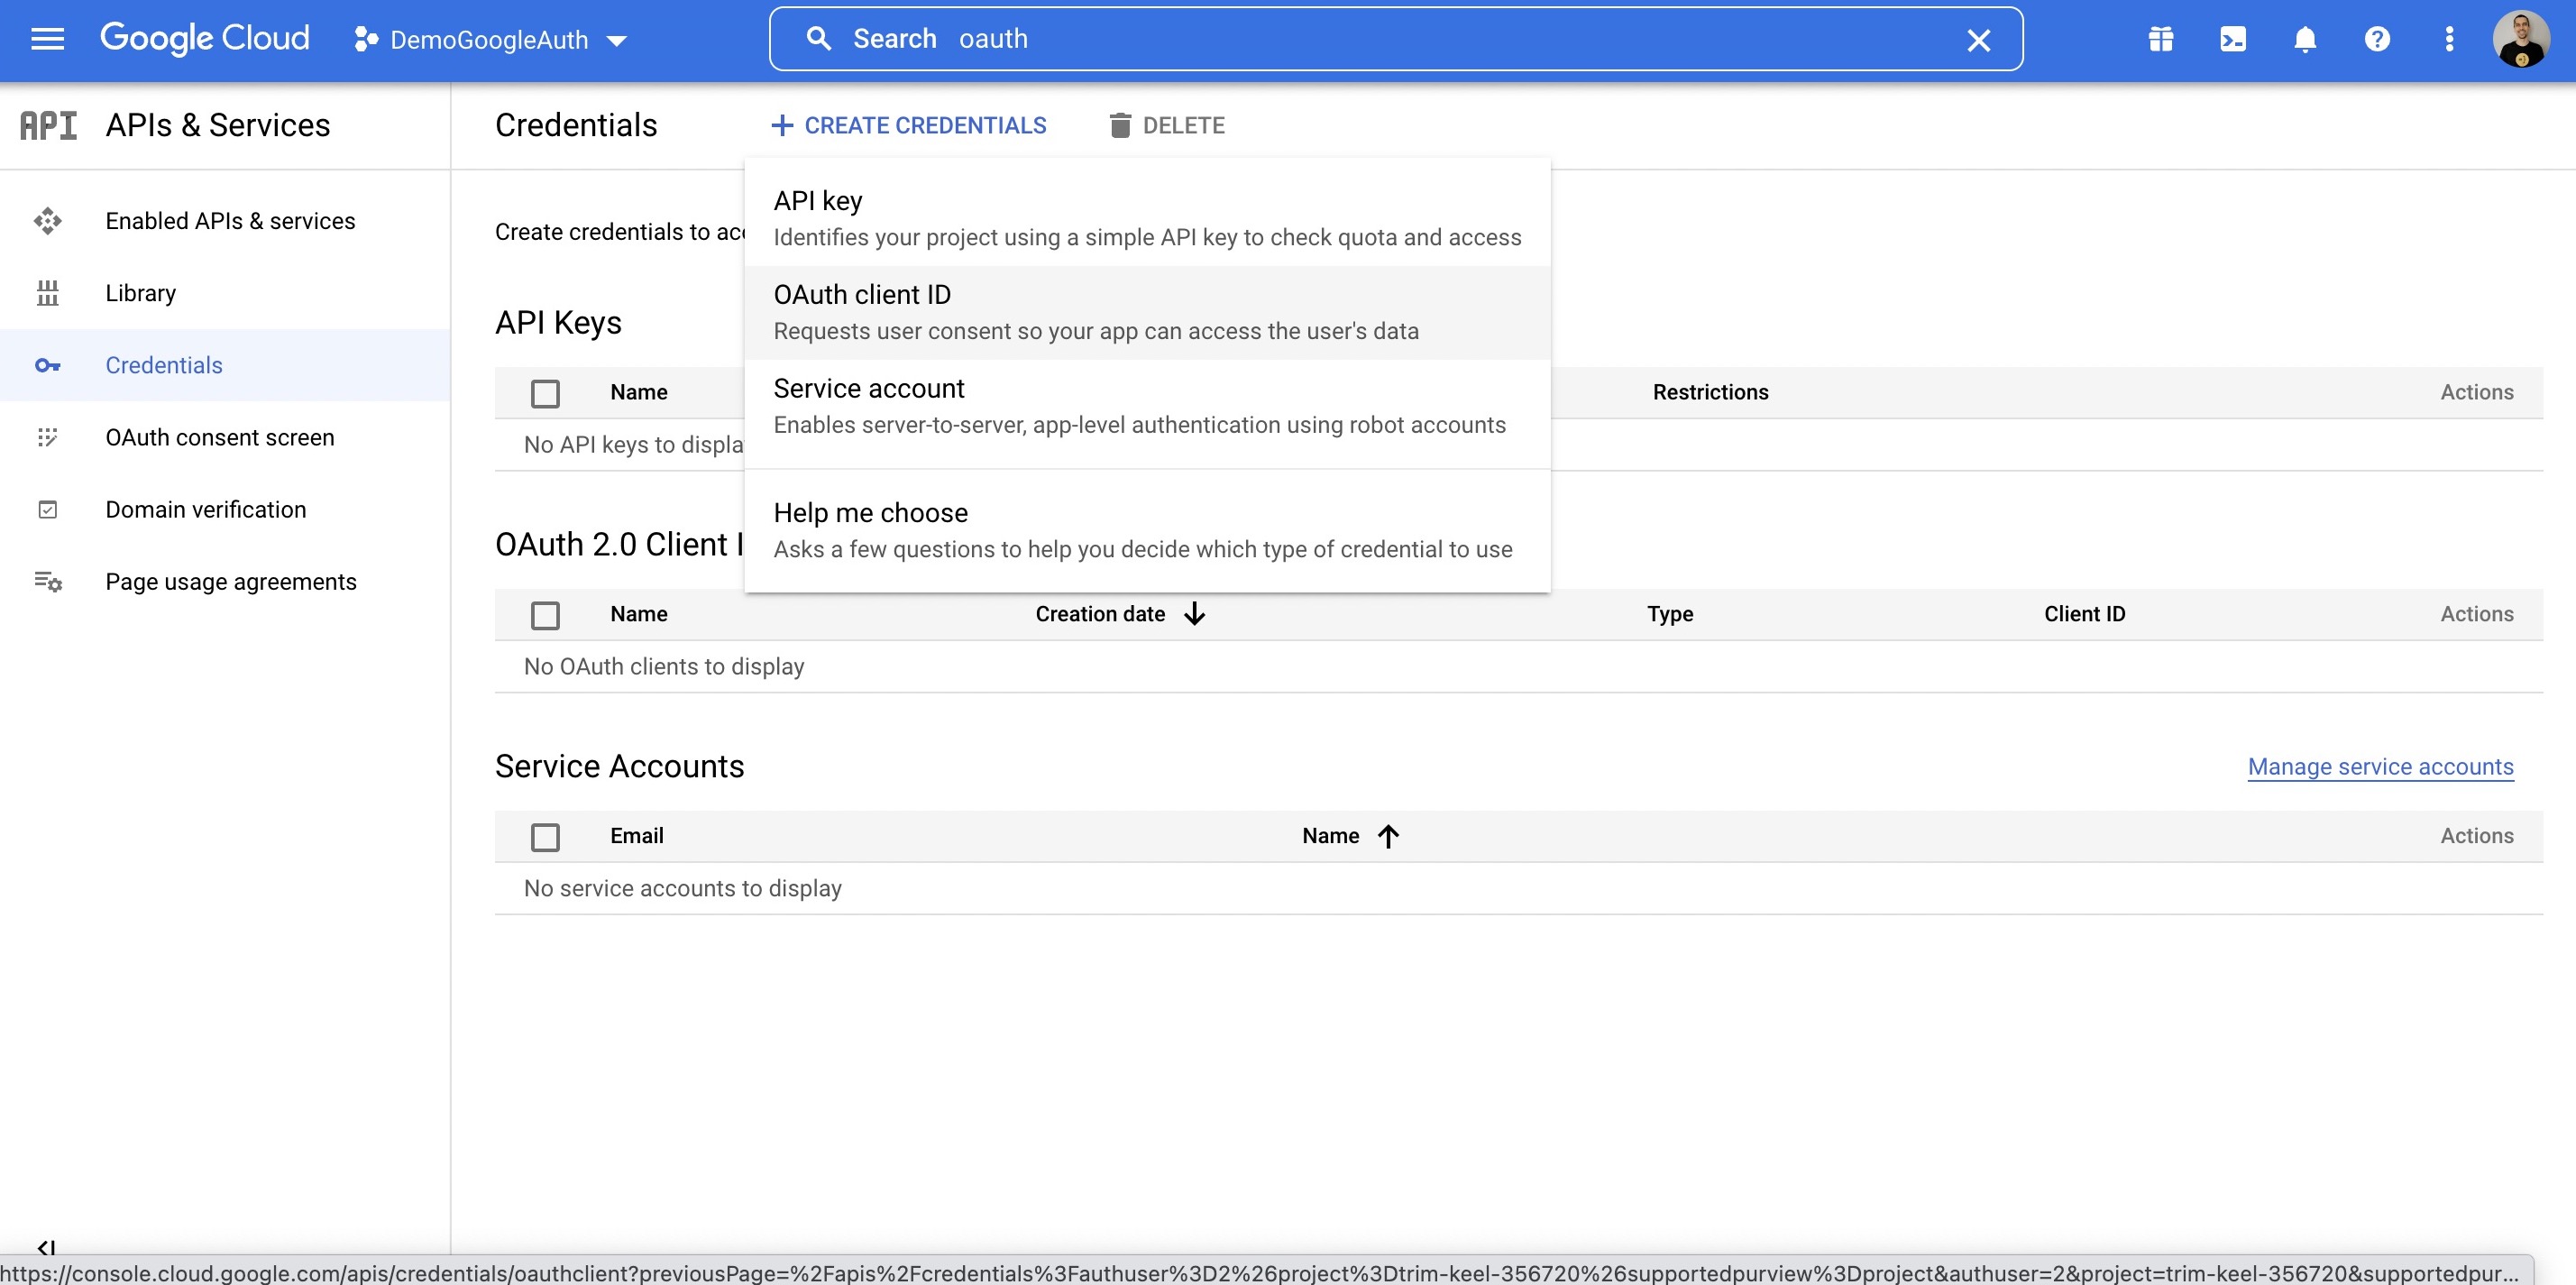
* Complete the form
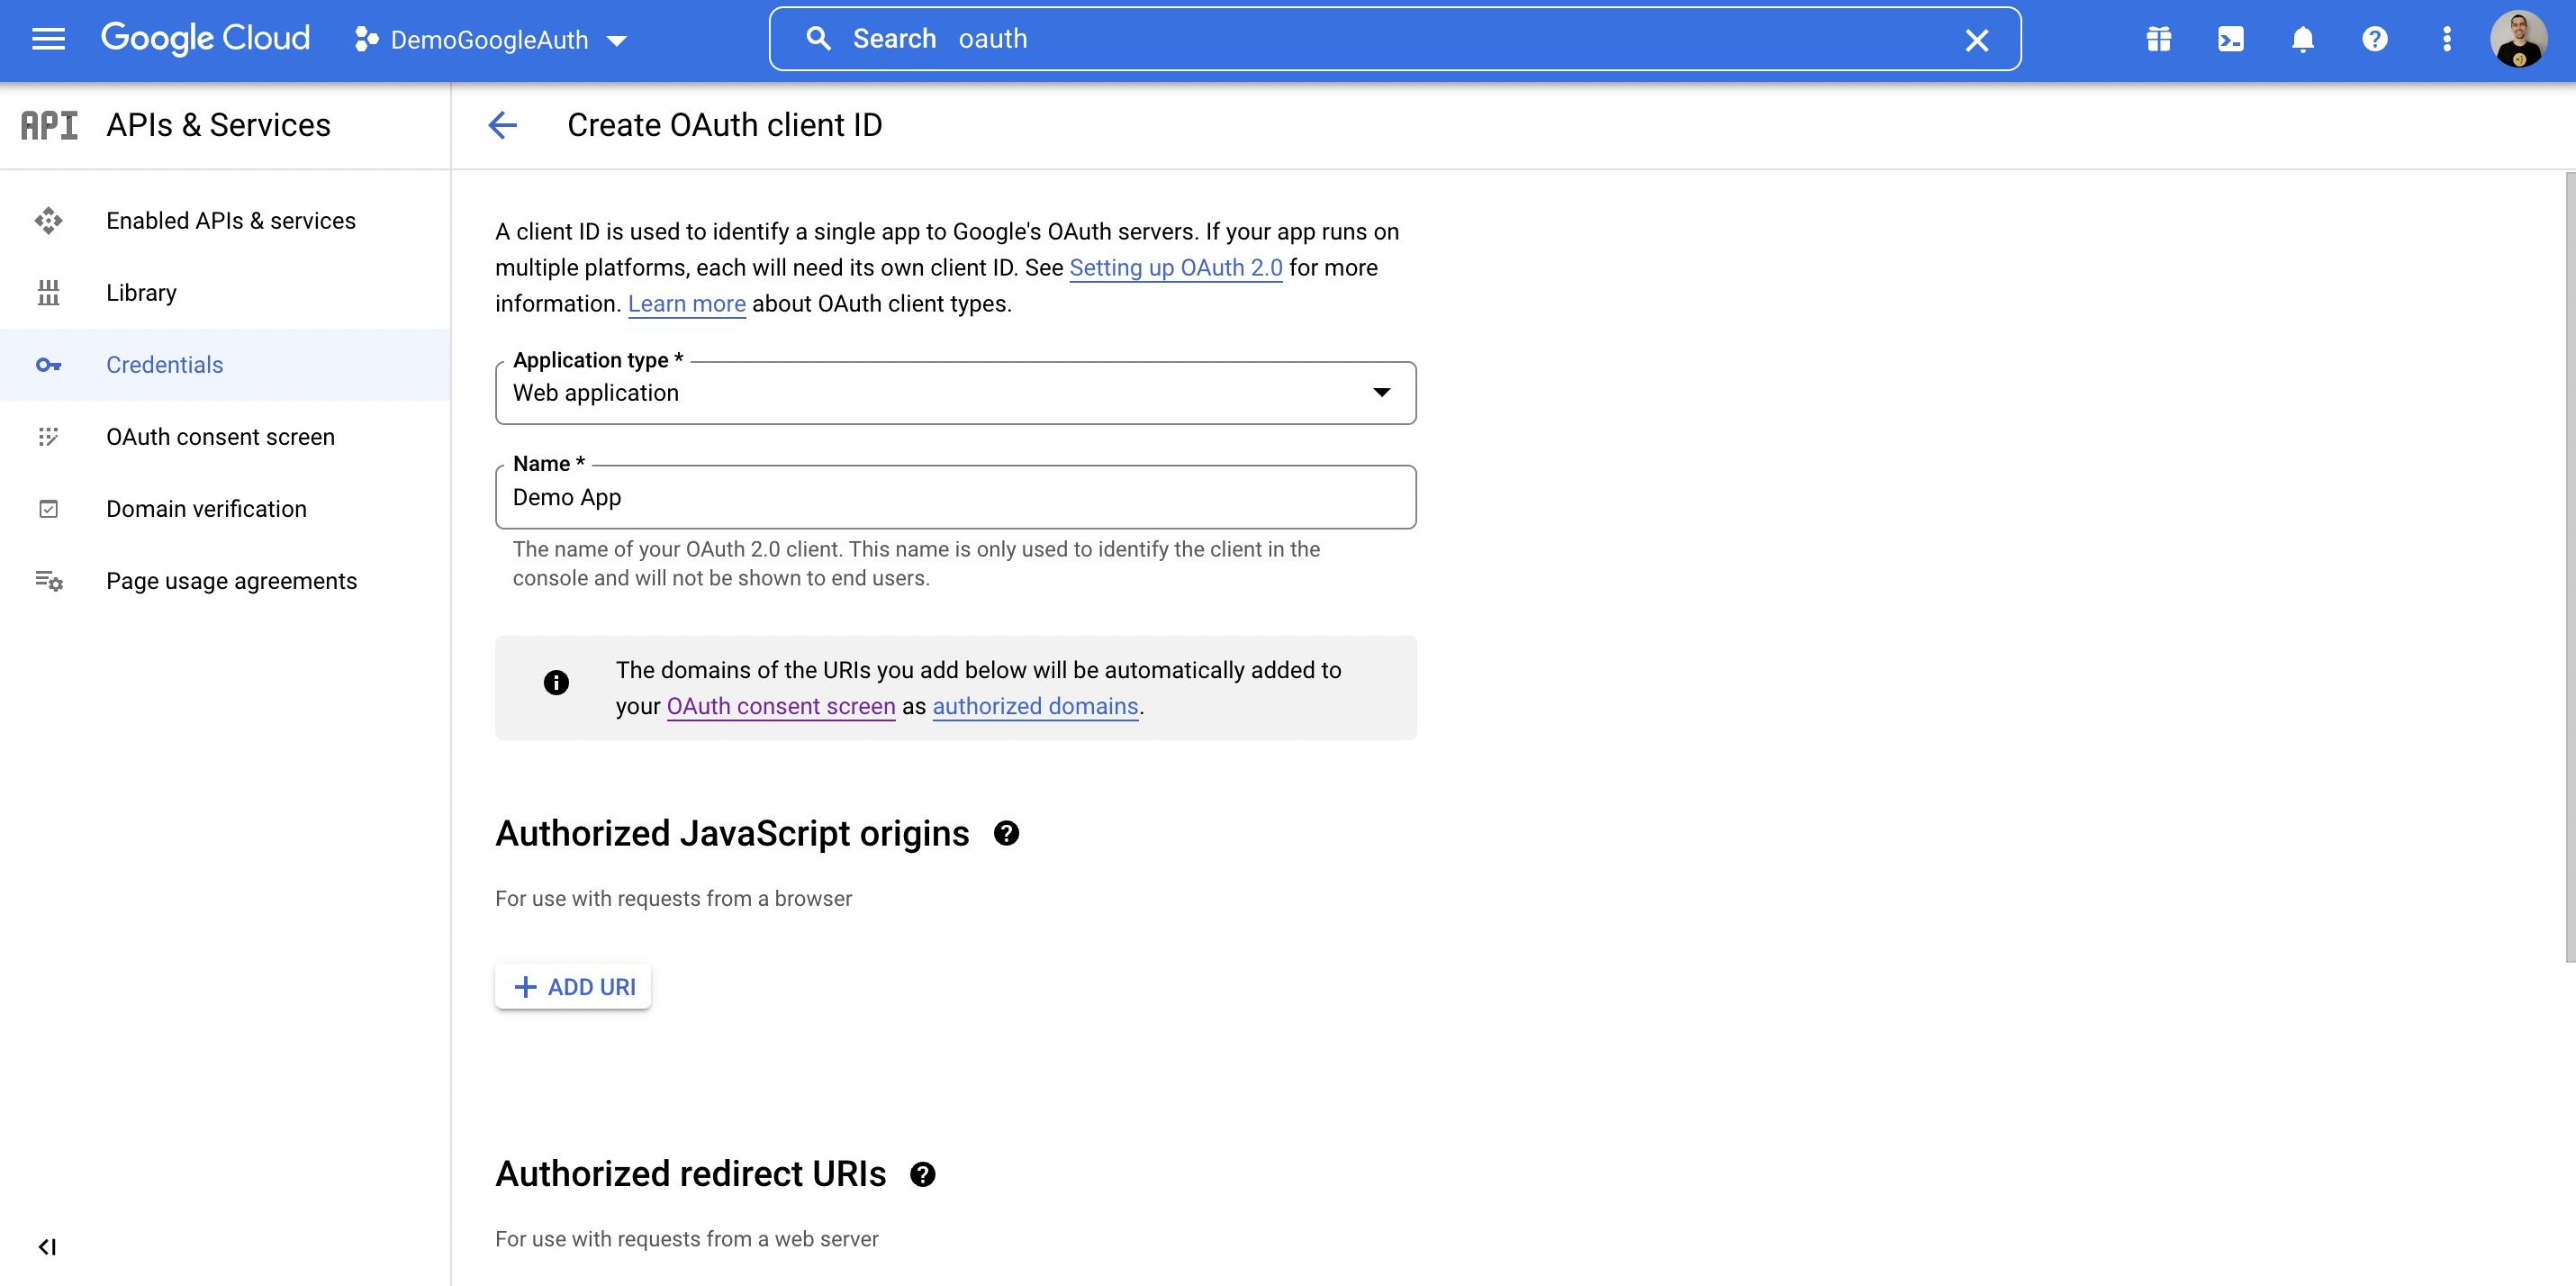
* Under Authorized redirect URIs, put in: `http://localhost:3001/auth/google/callback`
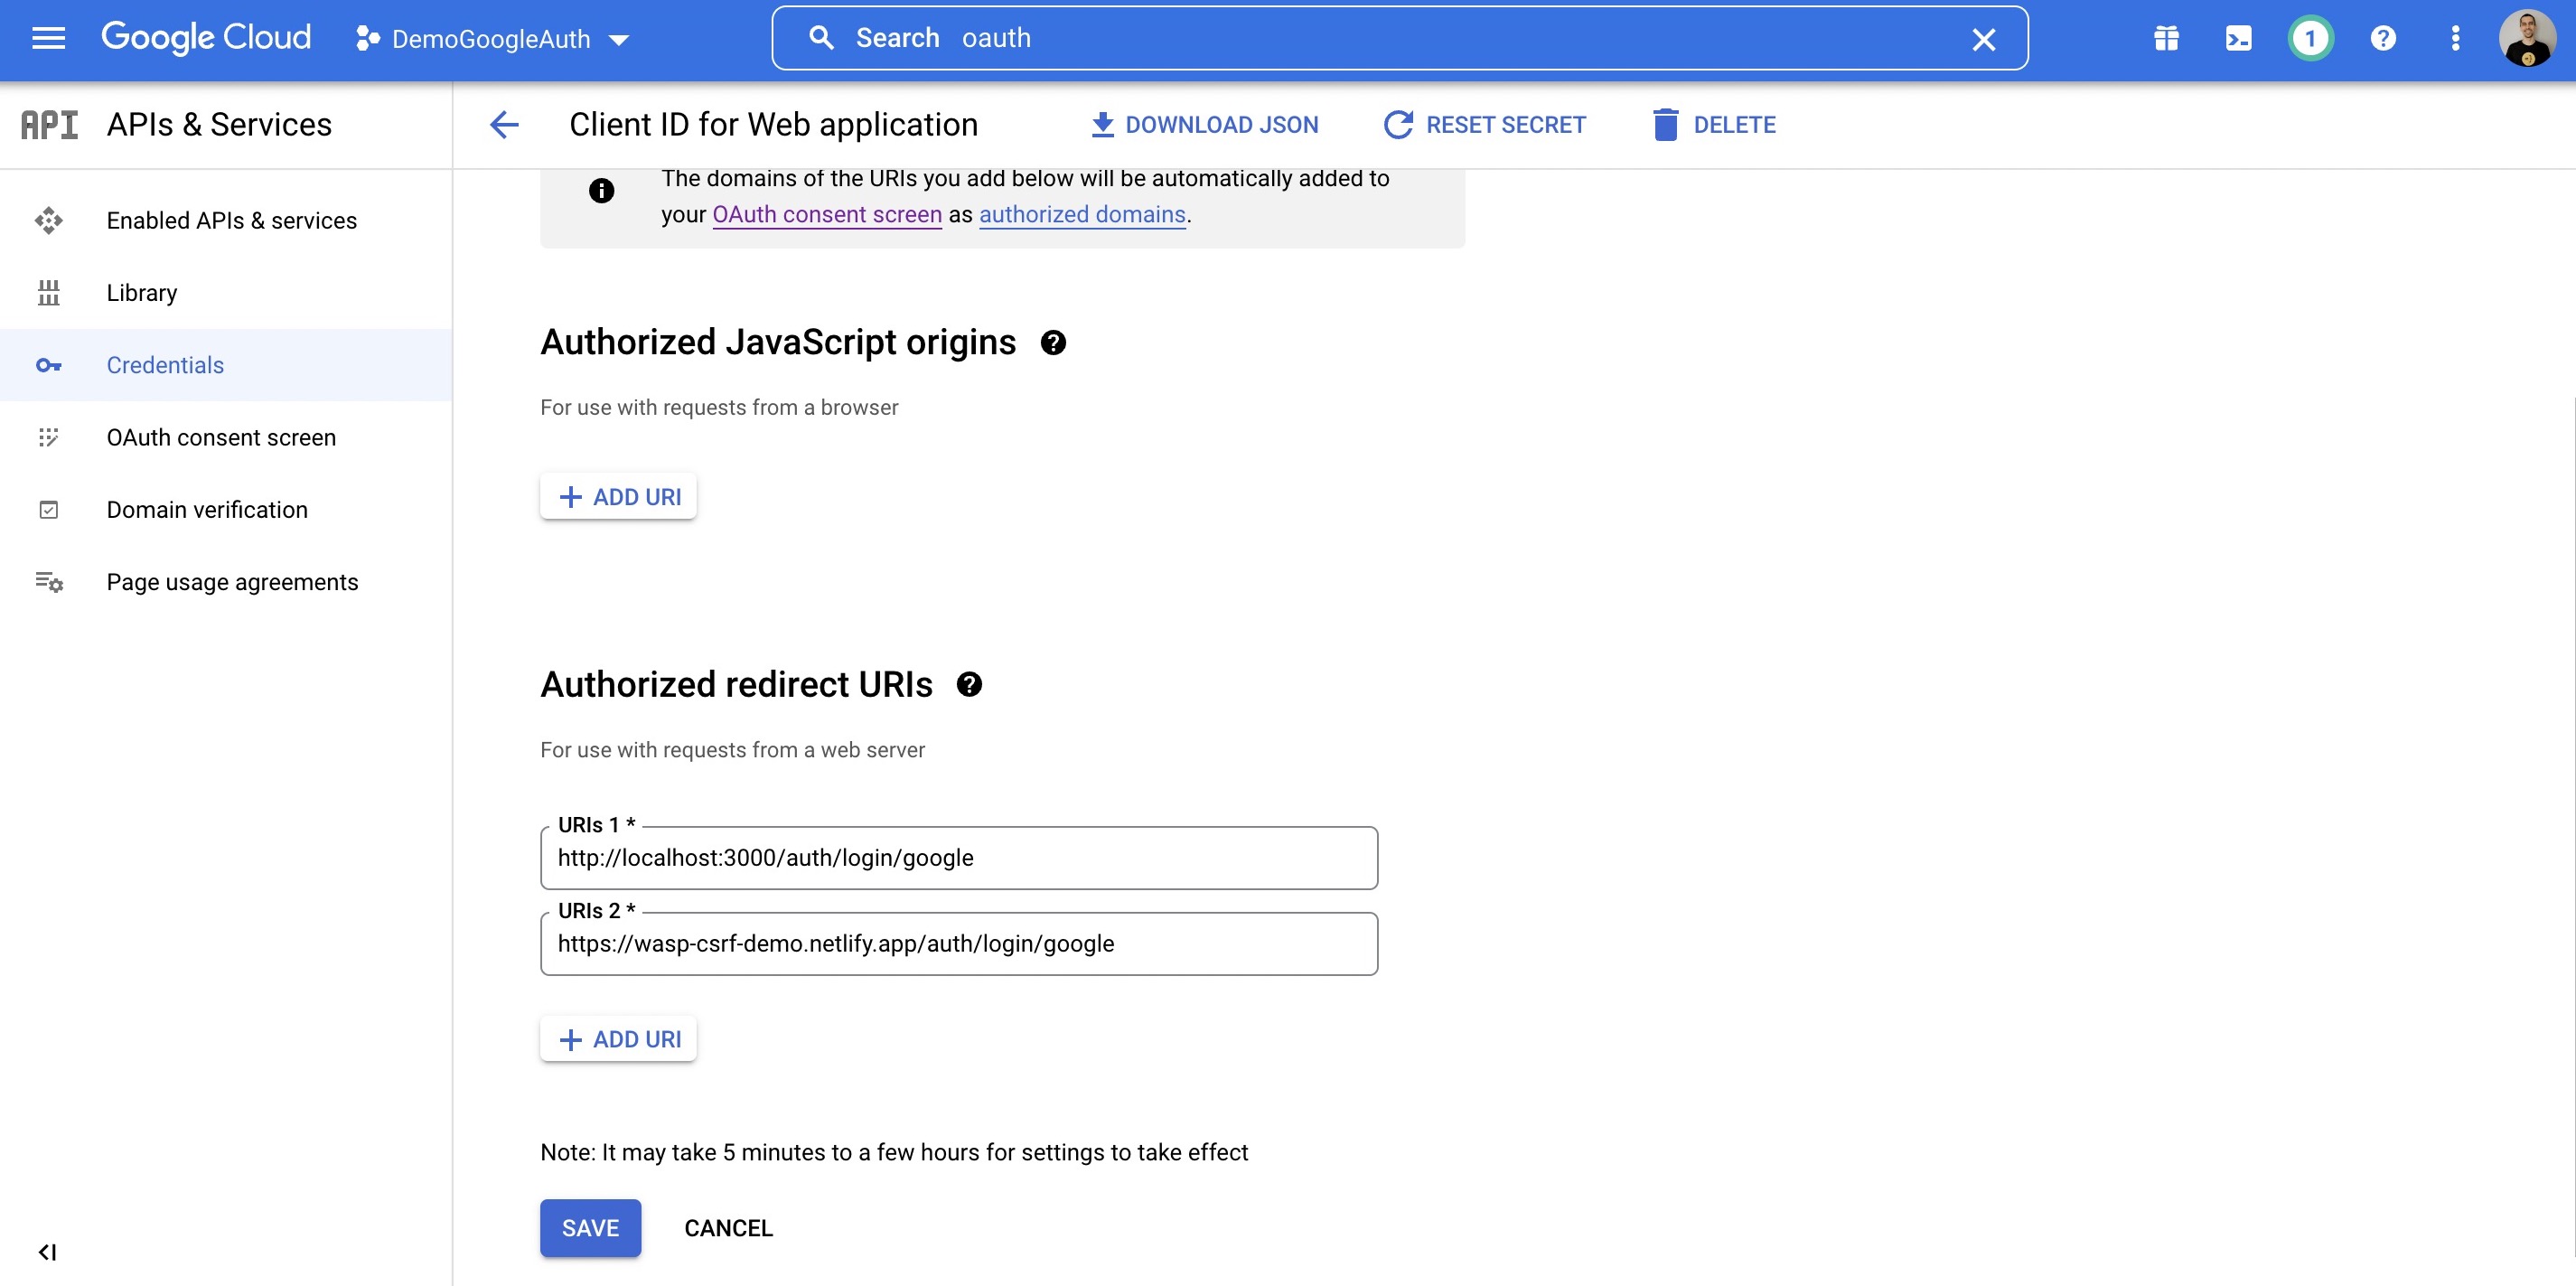
* Once you know on which URL(s) your API server will be deployed, also add those URL(s).
* For example: `https://your-server-url.com/auth/google/callback`
* When you save, you can click the Edit icon and your credentials will be shown.
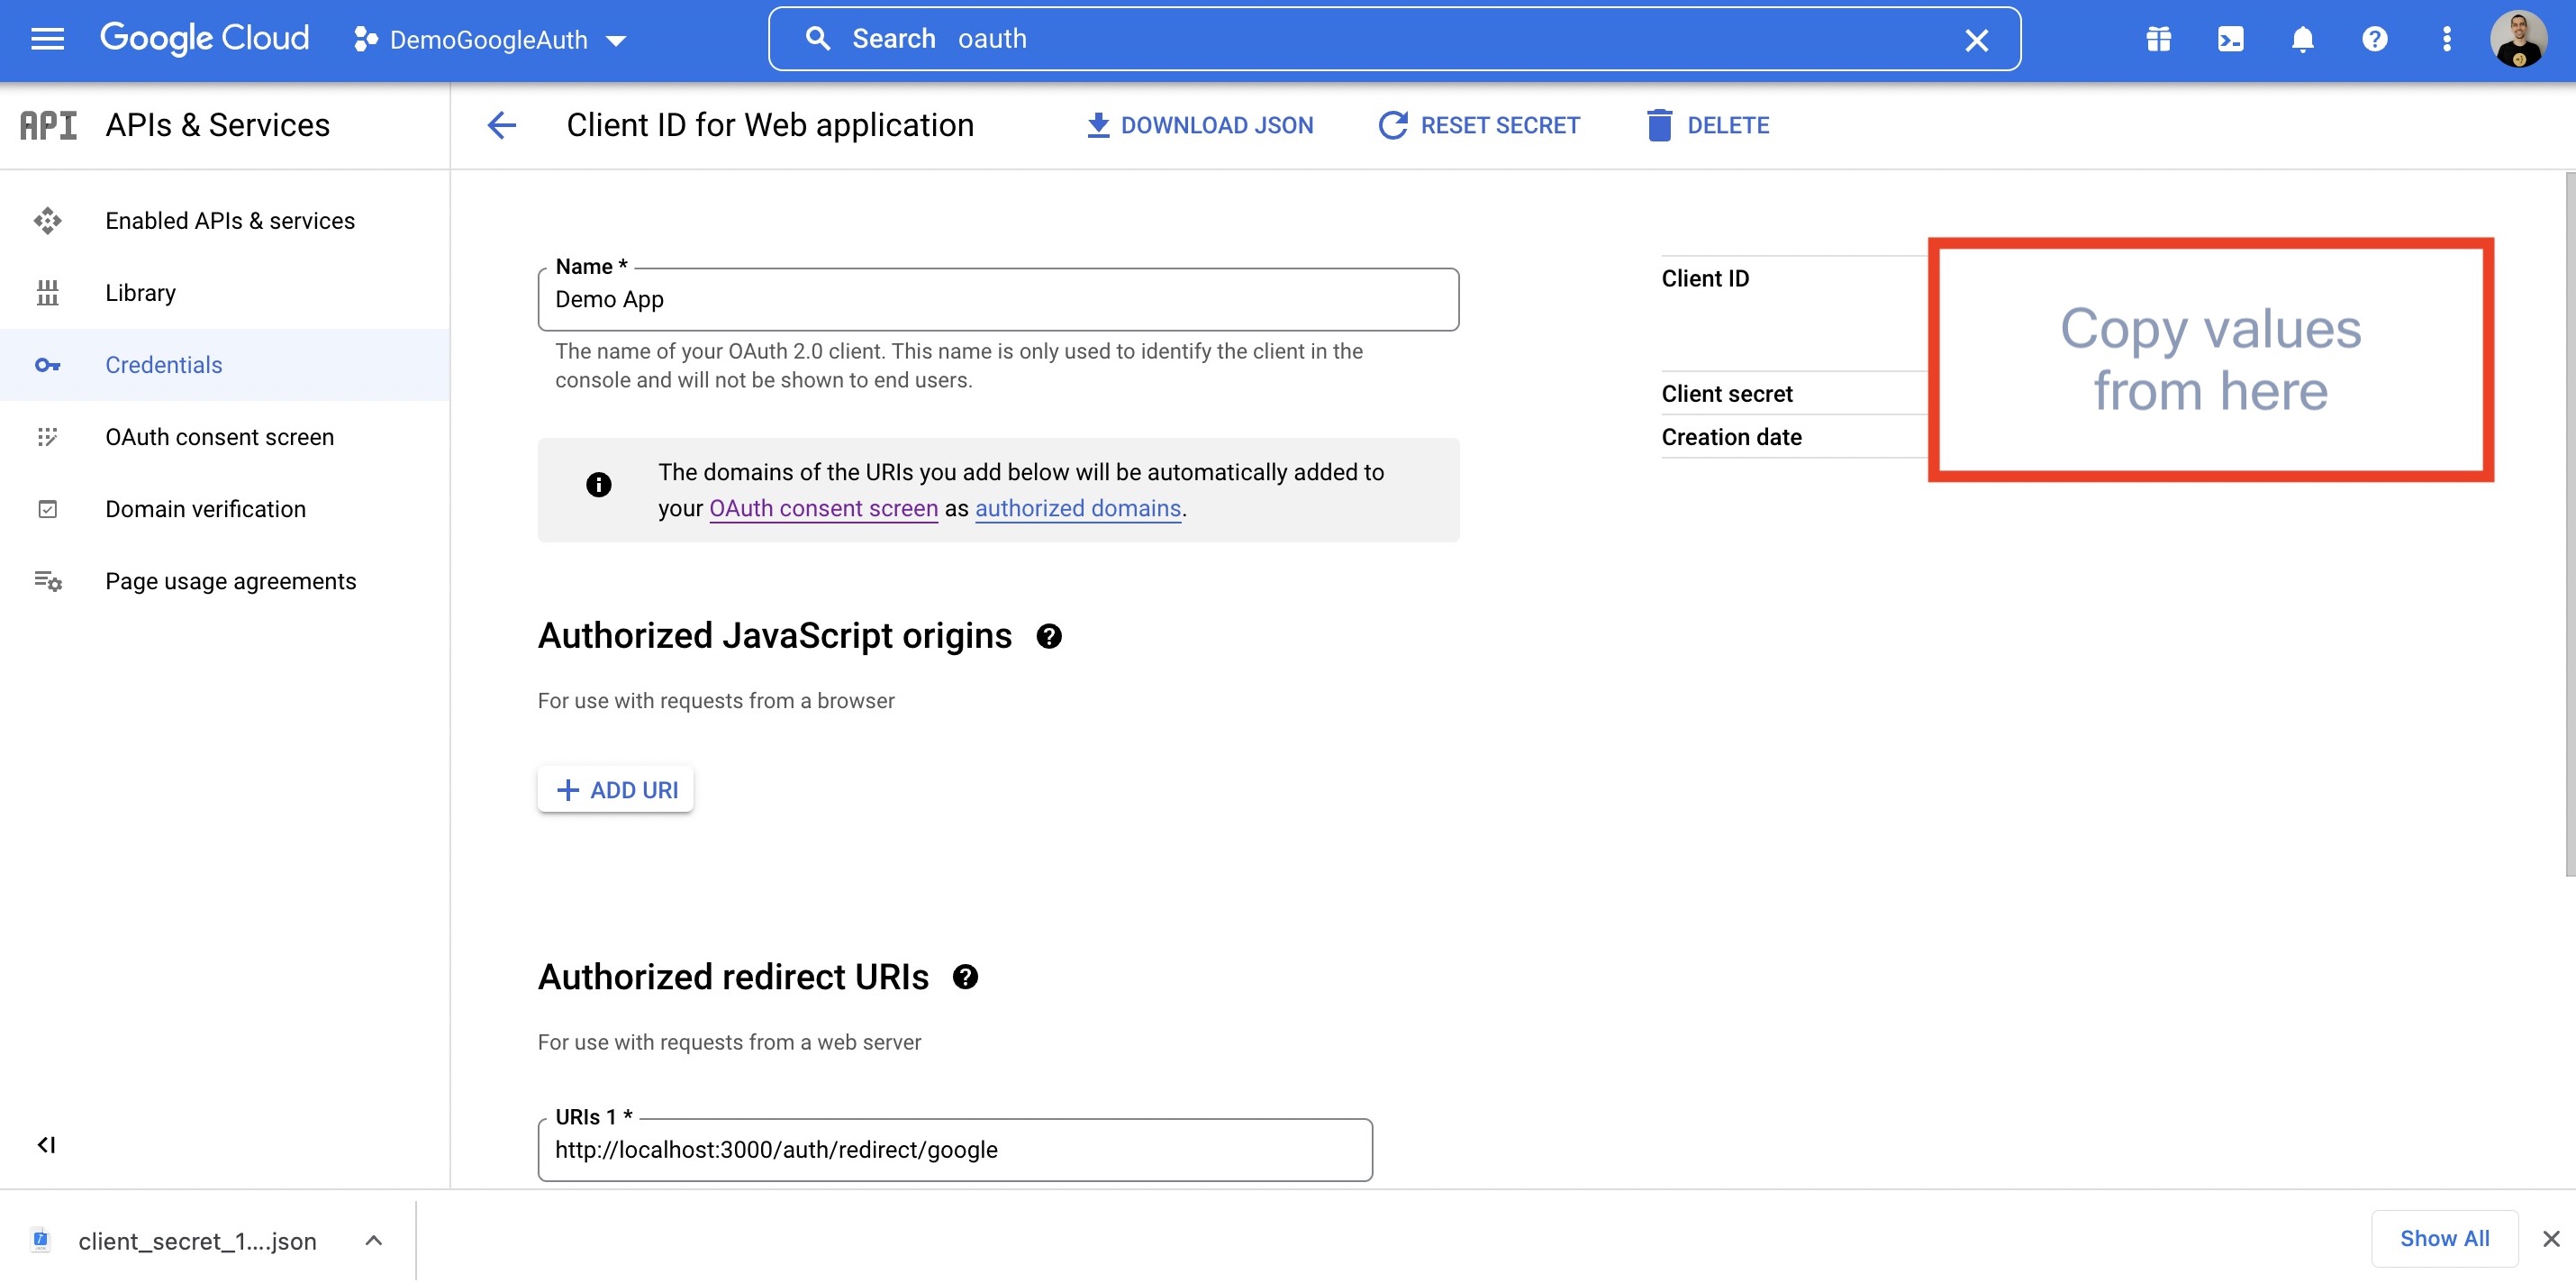
5. Copy your Client ID and Client secret as you will need them in the next step.
### 4\. Adding Environment Variables[](#4-adding-environment-variables ""Direct link to 4. Adding Environment Variables"")
Add these environment variables to the `.env.server` file at the root of your project (take their values from the previous step):
.env.server
```
GOOGLE_CLIENT_ID=your-google-client-idGOOGLE_CLIENT_SECRET=your-google-client-secret
```
### 5\. Adding the Necessary Routes and Pages[](#5-adding-the-necessary-routes-and-pages ""Direct link to 5. Adding the Necessary Routes and Pages"")
Let's define the necessary authentication Routes and Pages.
Add the following code to your `main.wasp` file:
* JavaScript
* TypeScript
main.wasp
```
// ...// 6. Define the routesroute LoginRoute { path: ""/login"", to: LoginPage }page LoginPage { component: import { Login } from ""@src/pages/auth.jsx""}
```
We'll define the React components for these pages in the `src/pages/auth.tsx` file below.
### 6\. Create the Client Pages[](#6-create-the-client-pages ""Direct link to 6. Create the Client Pages"")
info
We are using [Tailwind CSS](https://tailwindcss.com/) to style the pages. Read more about how to add it [here](https://wasp-lang.dev/docs/project/css-frameworks).
Let's now create a `auth.tsx` file in the `src/pages`. It should have the following code:
* JavaScript
* TypeScript
src/pages/auth.jsx
```
import { LoginForm } from 'wasp/client/auth'export function Login() { return ( )}// A layout component to center the contentexport function Layout({ children }) { return ( )}
```
Auth UI
Our pages use an automatically-generated Auth UI component. Read more about Auth UI components [here](https://wasp-lang.dev/docs/auth/ui).
### Conclusion[](#conclusion ""Direct link to Conclusion"")
Yay, we've successfully set up Google Auth! 🎉

Running `wasp db migrate-dev` and `wasp start` should now give you a working app with authentication. To see how to protect specific pages (i.e., hide them from non-authenticated users), read the docs on [using auth](https://wasp-lang.dev/docs/auth/overview).
## Default Behaviour[](#default-behaviour ""Direct link to Default Behaviour"")
Add `google: {}` to the `auth.methods` dictionary to use it with default settings:
* JavaScript
* TypeScript
main.wasp
```
app myApp { wasp: { version: ""^0.13.0"" }, title: ""My App"", auth: { userEntity: User, methods: { google: {} }, onAuthFailedRedirectTo: ""/login"" },}
```
When a user **signs in for the first time**, Wasp creates a new user account and links it to the chosen auth provider account for future logins.
## Overrides[](#overrides ""Direct link to Overrides"")
By default, Wasp doesn't store any information it receives from the social login provider. It only stores the user's ID specific to the provider.
There are two mechanisms used for overriding the default behavior:
* `userSignupFields`
* `configFn`
Let's explore them in more detail.
### Data Received From Google[](#data-received-from-google ""Direct link to Data Received From Google"")
We are using Google's API and its `/userinfo` endpoint to fetch the user's data.
The data received from Google is an object which can contain the following fields:
```
[ ""name"", ""given_name"", ""family_name"", ""email"", ""email_verified"", ""aud"", ""exp"", ""iat"", ""iss"", ""locale"", ""picture"", ""sub""]
```
The fields you receive depend on the scopes you request. The default scope is set to `profile` only. If you want to get the user's email, you need to specify the `email` scope in the `configFn` function.
For an up to date info about the data received from Google, please refer to the [Google API documentation](https://developers.google.com/identity/openid-connect/openid-connect#an-id-tokens-payload).
### Using the Data Received From Google[](#using-the-data-received-from-google ""Direct link to Using the Data Received From Google"")
When a user logs in using a social login provider, the backend receives some data about the user. Wasp lets you access this data inside the `userSignupFields` getters.
For example, the User entity can include a `displayName` field which you can set based on the details received from the provider.
Wasp also lets you customize the configuration of the providers' settings using the `configFn` function.
Let's use this example to show both fields in action:
* JavaScript
* TypeScript
main.wasp
```
app myApp { wasp: { version: ""^0.13.0"" }, title: ""My App"", auth: { userEntity: User, methods: { google: { configFn: import { getConfig } from ""@src/auth/google.js"", userSignupFields: import { userSignupFields } from ""@src/auth/google.js"" } }, onAuthFailedRedirectTo: ""/login"" },}entity User {=psl id Int @id @default(autoincrement()) username String @unique displayName Stringpsl=}// ...
```
src/auth/google.js
```
export const userSignupFields = { username: () => ""hardcoded-username"", displayName: (data) => data.profile.name,}export function getConfig() { return { scopes: ['profile', 'email'], }}
```
## Using Auth[](#using-auth ""Direct link to Using Auth"")
To read more about how to set up the logout button and get access to the logged-in user in both client and server code, read the docs on [using auth](https://wasp-lang.dev/docs/auth/overview).
## API Reference[](#api-reference ""Direct link to API Reference"")
Provider-specific behavior comes down to implementing two functions.
* `configFn`
* `userSignupFields`
The reference shows how to define both.
For behavior common to all providers, check the general [API Reference](https://wasp-lang.dev/docs/auth/overview#api-reference).
* JavaScript
* TypeScript
main.wasp
```
app myApp { wasp: { version: ""^0.13.0"" }, title: ""My App"", auth: { userEntity: User, methods: { google: { configFn: import { getConfig } from ""@src/auth/google.js"", userSignupFields: import { userSignupFields } from ""@src/auth/google.js"" } }, onAuthFailedRedirectTo: ""/login"" },}
```
The `google` dict has the following properties:
* #### `configFn: ExtImport`[](#configfn-extimport ""Direct link to configfn-extimport"")
This function must return an object with the scopes for the OAuth provider.
* JavaScript
* TypeScript
src/auth/google.js
```
export function getConfig() { return { scopes: ['profile', 'email'], }}
```
* #### `userSignupFields: ExtImport`[](#usersignupfields-extimport ""Direct link to usersignupfields-extimport"")
`userSignupFields` defines all the extra fields that need to be set on the `User` during the sign-up process. For example, if you have `address` and `phone` fields on your `User` entity, you can set them by defining the `userSignupFields` like this:
* JavaScript
* TypeScript
src/auth.js
```
import { defineUserSignupFields } from 'wasp/server/auth'export const userSignupFields = defineUserSignupFields({ address: (data) => { if (!data.address) { throw new Error('Address is required') } return data.address } phone: (data) => data.phone,})
```
Read more about the `userSignupFields` function [here](https://wasp-lang.dev/docs/auth/overview#1-defining-extra-fields).",,"https://wasp-lang.dev/docs/auth/social-auth/google","Wasp supports Google Authentication out of the box.","*","0","h3="":443""; ma=86400","max-age=600","DYNAMIC","878ecd3399827fb2-IAD","close","br","text/html; charset=utf-8","Tue, 23 Apr 2024 15:14:08 GMT","Tue, 23 Apr 2024 15:24:08 GMT","Thu, 18 Apr 2024 15:50:27 GMT","{""success_fraction"":0,""report_to"":""cf-nel"",""max_age"":604800}","{""endpoints"":[{""url"":""https:\/\/a.nel.cloudflare.com\/report\/v4?s=CTmDyHgQspUTbOFP4M6O6LjEjv1bLqeCDzjo6tMo1evPba0feHSgcqHjP%2FAdjJ4V7rsgdqM8HJ2VmXBbf5NKfgpTgo%2FmKPqb9L9TuCflF1%2FMLhl51aLkKEpfMV1uYjUG""}],""group"":""cf-nel"",""max_age"":604800}","cloudflare","chunked","Accept-Encoding","1.1 varnish","MISS","0","302071ee8ef4c438e91f7a311c4c23ef9a21b595",,"6154:2C39F4:3B2ABE2:4646C95:6627D03F","HIT","MISS","cache-iad-kiad7000029-IAD","S1713885249.608864,VS0,VE17",,,"en","https://wasp-lang.dev/img/wasp_twitter_cover.png","og:image","https://wasp-lang.dev/docs/auth/social-auth/google","og:url","Google | Wasp","og:title","Wasp supports Google Authentication out of the box.","og:description","Google | Wasp",,"Google
Wasp supports Google Authentication out of the box. Google Auth is arguably the best external auth option, as most users on the web already have Google accounts.
Enabling it lets your users log in using their existing Google accounts, greatly simplifying the process and enhancing the user experience.
Let's walk through enabling Google authentication, explain some of the default settings, and show how to override them.
Setting up Google Auth
Enabling Google Authentication comes down to a series of steps:
Enabling Google authentication in the Wasp file.
Adding the User entity.
Creating a Google OAuth app.
Adding the necessary Routes and Pages
Using Auth UI components in our Pages.
Here's a skeleton of how our main.wasp should look like after we're done:
main.wasp
// Configuring the social authentication
app myApp {
auth: { ... }
}
// Defining entities
entity User { ... }
// Defining routes and pages
route LoginRoute { ... }
page LoginPage { ... }
1. Adding Google Auth to Your Wasp File
Let's start by properly configuring the Auth object:
JavaScript
TypeScript
main.wasp
app myApp {
wasp: {
version: ""^0.13.0""
},
title: ""My App"",
auth: {
// 1. Specify the User entity (we'll define it next)
userEntity: User,
methods: {
// 2. Enable Google Auth
google: {}
},
onAuthFailedRedirectTo: ""/login""
},
}
userEntity is explained in the social auth overview.
2. Adding the User Entity
Let's now define the app.auth.userEntity entity:
JavaScript
TypeScript
main.wasp
// ...
// 3. Define the User entity
entity User {=psl
id Int @id @default(autoincrement())
// ...
psl=}
3. Creating a Google OAuth App
To use Google as an authentication method, you'll first need to create a Google project and provide Wasp with your client key and secret. Here's how you do it:
Create a Google Cloud Platform account if you do not already have one: https://cloud.google.com/
Create and configure a new Google project here: https://console.cloud.google.com/home/dashboard
Search for OAuth in the top bar, click on OAuth consent screen.
Select what type of app you want, we will go with External.
Fill out applicable information on Page 1.
On Page 2, Scopes, you should select userinfo.profile. You can optionally search for other things, like email.
Add any test users you want on Page 3.
Next, click Credentials.
Select Create Credentials.
Select OAuth client ID.
Complete the form
Under Authorized redirect URIs, put in: http://localhost:3001/auth/google/callback
Once you know on which URL(s) your API server will be deployed, also add those URL(s).
For example: https://your-server-url.com/auth/google/callback
When you save, you can click the Edit icon and your credentials will be shown.
Copy your Client ID and Client secret as you will need them in the next step.
4. Adding Environment Variables
Add these environment variables to the .env.server file at the root of your project (take their values from the previous step):
.env.server
GOOGLE_CLIENT_ID=your-google-client-id
GOOGLE_CLIENT_SECRET=your-google-client-secret
5. Adding the Necessary Routes and Pages
Let's define the necessary authentication Routes and Pages.
Add the following code to your main.wasp file:
JavaScript
TypeScript
main.wasp
// ...
// 6. Define the routes
route LoginRoute { path: ""/login"", to: LoginPage }
page LoginPage {
component: import { Login } from ""@src/pages/auth.jsx""
}
We'll define the React components for these pages in the src/pages/auth.tsx file below.
6. Create the Client Pages
info
We are using Tailwind CSS to style the pages. Read more about how to add it here.
Let's now create a auth.tsx file in the src/pages. It should have the following code:
JavaScript
TypeScript
src/pages/auth.jsx
import { LoginForm } from 'wasp/client/auth'
export function Login() {
return (
)
}
// A layout component to center the content
export function Layout({ children }) {
return (
)
}
Auth UI
Our pages use an automatically-generated Auth UI component. Read more about Auth UI components here.
Conclusion
Yay, we've successfully set up Google Auth! 🎉
Running wasp db migrate-dev and wasp start should now give you a working app with authentication. To see how to protect specific pages (i.e., hide them from non-authenticated users), read the docs on using auth.
Default Behaviour
Add google: {} to the auth.methods dictionary to use it with default settings:
JavaScript
TypeScript
main.wasp
app myApp {
wasp: {
version: ""^0.13.0""
},
title: ""My App"",
auth: {
userEntity: User,
methods: {
google: {}
},
onAuthFailedRedirectTo: ""/login""
},
}
When a user signs in for the first time, Wasp creates a new user account and links it to the chosen auth provider account for future logins.
Overrides
By default, Wasp doesn't store any information it receives from the social login provider. It only stores the user's ID specific to the provider.
There are two mechanisms used for overriding the default behavior:
userSignupFields
configFn
Let's explore them in more detail.
Data Received From Google
We are using Google's API and its /userinfo endpoint to fetch the user's data.
The data received from Google is an object which can contain the following fields:
[
""name"",
""given_name"",
""family_name"",
""email"",
""email_verified"",
""aud"",
""exp"",
""iat"",
""iss"",
""locale"",
""picture"",
""sub""
]
The fields you receive depend on the scopes you request. The default scope is set to profile only. If you want to get the user's email, you need to specify the email scope in the configFn function.
For an up to date info about the data received from Google, please refer to the Google API documentation.
Using the Data Received From Google
When a user logs in using a social login provider, the backend receives some data about the user. Wasp lets you access this data inside the userSignupFields getters.
For example, the User entity can include a displayName field which you can set based on the details received from the provider.
Wasp also lets you customize the configuration of the providers' settings using the configFn function.
Let's use this example to show both fields in action:
JavaScript
TypeScript
main.wasp
app myApp {
wasp: {
version: ""^0.13.0""
},
title: ""My App"",
auth: {
userEntity: User,
methods: {
google: {
configFn: import { getConfig } from ""@src/auth/google.js"",
userSignupFields: import { userSignupFields } from ""@src/auth/google.js""
}
},
onAuthFailedRedirectTo: ""/login""
},
}
entity User {=psl
id Int @id @default(autoincrement())
username String @unique
displayName String
psl=}
// ...
src/auth/google.js
export const userSignupFields = {
username: () => ""hardcoded-username"",
displayName: (data) => data.profile.name,
}
export function getConfig() {
return {
scopes: ['profile', 'email'],
}
}
Using Auth
To read more about how to set up the logout button and get access to the logged-in user in both client and server code, read the docs on using auth.
API Reference
Provider-specific behavior comes down to implementing two functions.
configFn
userSignupFields
The reference shows how to define both.
For behavior common to all providers, check the general API Reference.
JavaScript
TypeScript
main.wasp
app myApp {
wasp: {
version: ""^0.13.0""
},
title: ""My App"",
auth: {
userEntity: User,
methods: {
google: {
configFn: import { getConfig } from ""@src/auth/google.js"",
userSignupFields: import { userSignupFields } from ""@src/auth/google.js""
}
},
onAuthFailedRedirectTo: ""/login""
},
}
The google dict has the following properties:
configFn: ExtImport
This function must return an object with the scopes for the OAuth provider.
JavaScript
TypeScript
src/auth/google.js
export function getConfig() {
return {
scopes: ['profile', 'email'],
}
}
userSignupFields: ExtImport
userSignupFields defines all the extra fields that need to be set on the User during the sign-up process. For example, if you have address and phone fields on your User entity, you can set them by defining the userSignupFields like this:
JavaScript
TypeScript
src/auth.js
import { defineUserSignupFields } from 'wasp/server/auth'
export const userSignupFields = defineUserSignupFields({
address: (data) => {
if (!data.address) {
throw new Error('Address is required')
}
return data.address
}
phone: (data) => data.phone,
})
Read more about the userSignupFields function here.","https://wasp-lang.dev/docs/auth/social-auth/google"
"1","200","2024-04-23T15:14:09.907Z","https://wasp-lang.dev/docs/auth/social-auth/github","https://wasp-lang.dev/docs","browser","## GitHub
Wasp supports Github Authentication out of the box. GitHub is a great external auth choice when you're building apps for developers, as most of them already have a GitHub account.
Letting your users log in using their GitHub accounts turns the signup process into a breeze.
Let's walk through enabling Github Authentication, explain some of the default settings, and show how to override them.
## Setting up Github Auth[](#setting-up-github-auth ""Direct link to Setting up Github Auth"")
Enabling GitHub Authentication comes down to a series of steps:
1. Enabling GitHub authentication in the Wasp file.
2. Adding the `User` entity.
3. Creating a GitHub OAuth app.
4. Adding the necessary Routes and Pages
5. Using Auth UI components in our Pages.
Here's a skeleton of how our `main.wasp` should look like after we're done:
main.wasp
```
// Configuring the social authenticationapp myApp { auth: { ... }}// Defining entitiesentity User { ... }// Defining routes and pagesroute LoginRoute { ... }page LoginPage { ... }
```
### 1\. Adding Github Auth to Your Wasp File[](#1-adding-github-auth-to-your-wasp-file ""Direct link to 1. Adding Github Auth to Your Wasp File"")
Let's start by properly configuring the Auth object:
* JavaScript
* TypeScript
main.wasp
```
app myApp { wasp: { version: ""^0.13.0"" }, title: ""My App"", auth: { // 1. Specify the User entity (we'll define it next) userEntity: User, methods: { // 2. Enable Github Auth gitHub: {} }, onAuthFailedRedirectTo: ""/login"" },}
```
### 2\. Add the User Entity[](#2-add-the-user-entity ""Direct link to 2. Add the User Entity"")
Let's now define the `app.auth.userEntity` entity:
* JavaScript
* TypeScript
main.wasp
```
// ...// 3. Define the User entityentity User {=psl id Int @id @default(autoincrement()) // ...psl=}
```
### 3\. Creating a GitHub OAuth App[](#3-creating-a-github-oauth-app ""Direct link to 3. Creating a GitHub OAuth App"")
To use GitHub as an authentication method, you'll first need to create a GitHub OAuth App and provide Wasp with your client key and secret. Here's how you do it:
1. Log into your GitHub account and navigate to: [https://github.com/settings/developers](https://github.com/settings/developers).
2. Select **New OAuth App**.
3. Supply required information.
* For **Authorization callback URL**:
* For development, put: `http://localhost:3001/auth/github/callback`.
* Once you know on which URL your API server will be deployed, you can create a new app with that URL instead e.g. `https://your-server-url.com/auth/github/callback`.
4. Hit **Register application**.
5. Hit **Generate a new client secret** on the next page.
6. Copy your Client ID and Client secret as you'll need them in the next step.
### 4\. Adding Environment Variables[](#4-adding-environment-variables ""Direct link to 4. Adding Environment Variables"")
Add these environment variables to the `.env.server` file at the root of your project (take their values from the previous step):
.env.server
```
GITHUB_CLIENT_ID=your-github-client-idGITHUB_CLIENT_SECRET=your-github-client-secret
```
### 5\. Adding the Necessary Routes and Pages[](#5-adding-the-necessary-routes-and-pages ""Direct link to 5. Adding the Necessary Routes and Pages"")
Let's define the necessary authentication Routes and Pages.
Add the following code to your `main.wasp` file:
* JavaScript
* TypeScript
main.wasp
```
// ...// 6. Define the routesroute LoginRoute { path: ""/login"", to: LoginPage }page LoginPage { component: import { Login } from ""@src/pages/auth.jsx""}
```
We'll define the React components for these pages in the `src/pages/auth.tsx` file below.
### 6\. Creating the Client Pages[](#6-creating-the-client-pages ""Direct link to 6. Creating the Client Pages"")
info
We are using [Tailwind CSS](https://tailwindcss.com/) to style the pages. Read more about how to add it [here](https://wasp-lang.dev/docs/project/css-frameworks).
Let's create a `auth.tsx` file in the `src/pages` folder and add the following to it:
* JavaScript
* TypeScript
src/pages/auth.jsx
```
import { LoginForm } from 'wasp/client/auth'export function Login() { return ( )}// A layout component to center the contentexport function Layout({ children }) { return ( )}
```
We imported the generated Auth UI components and used them in our pages. Read more about the Auth UI components [here](https://wasp-lang.dev/docs/auth/ui).
### Conclusion[](#conclusion ""Direct link to Conclusion"")
Yay, we've successfully set up Github Auth! 🎉

Running `wasp db migrate-dev` and `wasp start` should now give you a working app with authentication. To see how to protect specific pages (i.e., hide them from non-authenticated users), read the docs on [using auth](https://wasp-lang.dev/docs/auth/overview).
## Default Behaviour[](#default-behaviour ""Direct link to Default Behaviour"")
Add `gitHub: {}` to the `auth.methods` dictionary to use it with default settings.
* JavaScript
* TypeScript
main.wasp
```
app myApp { wasp: { version: ""^0.13.0"" }, title: ""My App"", auth: { userEntity: User, methods: { gitHub: {} }, onAuthFailedRedirectTo: ""/login"" },}
```
When a user **signs in for the first time**, Wasp creates a new user account and links it to the chosen auth provider account for future logins.
## Overrides[](#overrides ""Direct link to Overrides"")
By default, Wasp doesn't store any information it receives from the social login provider. It only stores the user's ID specific to the provider.
There are two mechanisms used for overriding the default behavior:
* `userSignupFields`
* `configFn`
Let's explore them in more detail.
### Data Received From GitHub[](#data-received-from-github ""Direct link to Data Received From GitHub"")
We are using GitHub's API and its `/user` and `/user/emails` endpoints to get the user data.
We combine the data from the two endpoints
You'll find the emails in the `emails` property in the object that you receive in `userSignupFields`.
This is because we combine the data from the `/user` and `/user/emails` endpoints **if the `user` or `user:email` scope is requested.**
The data we receive from GitHub on the `/user` endpoint looks something this:
```
{ ""login"": ""octocat"", ""id"": 1, ""name"": ""monalisa octocat"", ""avatar_url"": ""https://github.com/images/error/octocat_happy.gif"", ""gravatar_id"": """", // ...}
```
And the data from the `/user/emails` endpoint looks something like this:
```
[ { ""email"": ""octocat@github.com"", ""verified"": true, ""primary"": true, ""visibility"": ""public"" }]
```
The fields you receive will depend on the scopes you requested. By default we don't specify any scopes. If you want to get the emails, you need to specify the `user` or `user:email` scope in the `configFn` function.
For an up to date info about the data received from GitHub, please refer to the [GitHub API documentation](https://docs.github.com/en/rest/users/users?apiVersion=2022-11-28#get-the-authenticated-user).
### Using the Data Received From GitHub[](#using-the-data-received-from-github ""Direct link to Using the Data Received From GitHub"")
When a user logs in using a social login provider, the backend receives some data about the user. Wasp lets you access this data inside the `userSignupFields` getters.
For example, the User entity can include a `displayName` field which you can set based on the details received from the provider.
Wasp also lets you customize the configuration of the providers' settings using the `configFn` function.
Let's use this example to show both fields in action:
* JavaScript
* TypeScript
main.wasp
```
app myApp { wasp: { version: ""^0.13.0"" }, title: ""My App"", auth: { userEntity: User, methods: { gitHub: { configFn: import { getConfig } from ""@src/auth/github.js"", userSignupFields: import { userSignupFields } from ""@src/auth/github.js"" } }, onAuthFailedRedirectTo: ""/login"" },}entity User {=psl id Int @id @default(autoincrement()) username String @unique displayName Stringpsl=}// ...
```
src/auth/github.js
```
export const userSignupFields = { username: () => ""hardcoded-username"", displayName: (data) => data.profile.name,};export function getConfig() { return { scopes: ['user'], };}
```
## Using Auth[](#using-auth ""Direct link to Using Auth"")
To read more about how to set up the logout button and get access to the logged-in user in both client and server code, read the docs on [using auth](https://wasp-lang.dev/docs/auth/overview).
## API Reference[](#api-reference ""Direct link to API Reference"")
Provider-specific behavior comes down to implementing two functions.
* `configFn`
* `userSignupFields`
The reference shows how to define both.
For behavior common to all providers, check the general [API Reference](https://wasp-lang.dev/docs/auth/overview#api-reference).
* JavaScript
* TypeScript
main.wasp
```
app myApp { wasp: { version: ""^0.13.0"" }, title: ""My App"", auth: { userEntity: User, methods: { gitHub: { configFn: import { getConfig } from ""@src/auth/github.js"", userSignupFields: import { userSignupFields } from ""@src/auth/github.js"" } }, onAuthFailedRedirectTo: ""/login"" },}
```
The `gitHub` dict has the following properties:
* #### `configFn: ExtImport`[](#configfn-extimport ""Direct link to configfn-extimport"")
This function should return an object with the scopes for the OAuth provider.
* JavaScript
* TypeScript
src/auth/github.js
```
export function getConfig() { return { scopes: [], }}
```
* #### `userSignupFields: ExtImport`[](#usersignupfields-extimport ""Direct link to usersignupfields-extimport"")
`userSignupFields` defines all the extra fields that need to be set on the `User` during the sign-up process. For example, if you have `address` and `phone` fields on your `User` entity, you can set them by defining the `userSignupFields` like this:
* JavaScript
* TypeScript
src/auth.js
```
import { defineUserSignupFields } from 'wasp/server/auth'export const userSignupFields = defineUserSignupFields({ address: (data) => { if (!data.address) { throw new Error('Address is required') } return data.address } phone: (data) => data.phone,})
```
Read more about the `userSignupFields` function [here](https://wasp-lang.dev/docs/auth/overview#1-defining-extra-fields).",,"https://wasp-lang.dev/docs/auth/social-auth/github","Wasp supports Github Authentication out of the box.","*","0","h3="":443""; ma=86400","max-age=600","DYNAMIC","878ecd2acc354bcc-BUF",,"br","text/html; charset=utf-8","Tue, 23 Apr 2024 15:14:07 GMT","Tue, 23 Apr 2024 15:24:07 GMT","Thu, 18 Apr 2024 15:50:26 GMT","{""success_fraction"":0, ""report_to"":""cf-nel"", ""max_age"":604800}","{""endpoints"":[{""url"":""https:\/\/a.nel.cloudflare.com\/report\/v4?s=ySefw1Ll4oOAiPtV%2F70WtDTSmZqQw3zFeGPF%2Bl5bZsDF4avaTP3QRPCDlFDEA3QByDVR9dSWzepjT6hICflMpUUXhmOQ%2Fw%2BOmjcYj1vwv2hw5Kdo3mu8%2B6kgOrmlsE4R""}], ""group"":""cf-nel"", ""max_age"":604800}","cloudflare",,"Accept-Encoding","1.1 varnish","MISS","0","9593c6e72232cd2457529c5a06d562d384a1b0b8","h2","CAF8:83772:3990B8A:44AD815:6627D03E","HIT","MISS","cache-nyc-kteb1890087-NYC","S1713885247.182391, VS0, VE18",,,"en","https://wasp-lang.dev/img/wasp_twitter_cover.png","og:image","https://wasp-lang.dev/docs/auth/social-auth/github","og:url","GitHub | Wasp","og:title","Wasp supports Github Authentication out of the box.","og:description","GitHub | Wasp",,"GitHub
Wasp supports Github Authentication out of the box. GitHub is a great external auth choice when you're building apps for developers, as most of them already have a GitHub account.
Letting your users log in using their GitHub accounts turns the signup process into a breeze.
Let's walk through enabling Github Authentication, explain some of the default settings, and show how to override them.
Setting up Github Auth
Enabling GitHub Authentication comes down to a series of steps:
Enabling GitHub authentication in the Wasp file.
Adding the User entity.
Creating a GitHub OAuth app.
Adding the necessary Routes and Pages
Using Auth UI components in our Pages.
Here's a skeleton of how our main.wasp should look like after we're done:
main.wasp
// Configuring the social authentication
app myApp {
auth: { ... }
}
// Defining entities
entity User { ... }
// Defining routes and pages
route LoginRoute { ... }
page LoginPage { ... }
1. Adding Github Auth to Your Wasp File
Let's start by properly configuring the Auth object:
JavaScript
TypeScript
main.wasp
app myApp {
wasp: {
version: ""^0.13.0""
},
title: ""My App"",
auth: {
// 1. Specify the User entity (we'll define it next)
userEntity: User,
methods: {
// 2. Enable Github Auth
gitHub: {}
},
onAuthFailedRedirectTo: ""/login""
},
}
2. Add the User Entity
Let's now define the app.auth.userEntity entity:
JavaScript
TypeScript
main.wasp
// ...
// 3. Define the User entity
entity User {=psl
id Int @id @default(autoincrement())
// ...
psl=}
3. Creating a GitHub OAuth App
To use GitHub as an authentication method, you'll first need to create a GitHub OAuth App and provide Wasp with your client key and secret. Here's how you do it:
Log into your GitHub account and navigate to: https://github.com/settings/developers.
Select New OAuth App.
Supply required information.
For Authorization callback URL:
For development, put: http://localhost:3001/auth/github/callback.
Once you know on which URL your API server will be deployed, you can create a new app with that URL instead e.g. https://your-server-url.com/auth/github/callback.
Hit Register application.
Hit Generate a new client secret on the next page.
Copy your Client ID and Client secret as you'll need them in the next step.
4. Adding Environment Variables
Add these environment variables to the .env.server file at the root of your project (take their values from the previous step):
.env.server
GITHUB_CLIENT_ID=your-github-client-id
GITHUB_CLIENT_SECRET=your-github-client-secret
5. Adding the Necessary Routes and Pages
Let's define the necessary authentication Routes and Pages.
Add the following code to your main.wasp file:
JavaScript
TypeScript
main.wasp
// ...
// 6. Define the routes
route LoginRoute { path: ""/login"", to: LoginPage }
page LoginPage {
component: import { Login } from ""@src/pages/auth.jsx""
}
We'll define the React components for these pages in the src/pages/auth.tsx file below.
6. Creating the Client Pages
info
We are using Tailwind CSS to style the pages. Read more about how to add it here.
Let's create a auth.tsx file in the src/pages folder and add the following to it:
JavaScript
TypeScript
src/pages/auth.jsx
import { LoginForm } from 'wasp/client/auth'
export function Login() {
return (
)
}
// A layout component to center the content
export function Layout({ children }) {
return (
)
}
We imported the generated Auth UI components and used them in our pages. Read more about the Auth UI components here.
Conclusion
Yay, we've successfully set up Github Auth! 🎉
Running wasp db migrate-dev and wasp start should now give you a working app with authentication. To see how to protect specific pages (i.e., hide them from non-authenticated users), read the docs on using auth.
Default Behaviour
Add gitHub: {} to the auth.methods dictionary to use it with default settings.
JavaScript
TypeScript
main.wasp
app myApp {
wasp: {
version: ""^0.13.0""
},
title: ""My App"",
auth: {
userEntity: User,
methods: {
gitHub: {}
},
onAuthFailedRedirectTo: ""/login""
},
}
When a user signs in for the first time, Wasp creates a new user account and links it to the chosen auth provider account for future logins.
Overrides
By default, Wasp doesn't store any information it receives from the social login provider. It only stores the user's ID specific to the provider.
There are two mechanisms used for overriding the default behavior:
userSignupFields
configFn
Let's explore them in more detail.
Data Received From GitHub
We are using GitHub's API and its /user and /user/emails endpoints to get the user data.
We combine the data from the two endpoints
You'll find the emails in the emails property in the object that you receive in userSignupFields.
This is because we combine the data from the /user and /user/emails endpoints if the user or user:email scope is requested.
The data we receive from GitHub on the /user endpoint looks something this:
{
""login"": ""octocat"",
""id"": 1,
""name"": ""monalisa octocat"",
""avatar_url"": ""https://github.com/images/error/octocat_happy.gif"",
""gravatar_id"": """",
// ...
}
And the data from the /user/emails endpoint looks something like this:
[
{
""email"": ""octocat@github.com"",
""verified"": true,
""primary"": true,
""visibility"": ""public""
}
]
The fields you receive will depend on the scopes you requested. By default we don't specify any scopes. If you want to get the emails, you need to specify the user or user:email scope in the configFn function.
For an up to date info about the data received from GitHub, please refer to the GitHub API documentation.
Using the Data Received From GitHub
When a user logs in using a social login provider, the backend receives some data about the user. Wasp lets you access this data inside the userSignupFields getters.
For example, the User entity can include a displayName field which you can set based on the details received from the provider.
Wasp also lets you customize the configuration of the providers' settings using the configFn function.
Let's use this example to show both fields in action:
JavaScript
TypeScript
main.wasp
app myApp {
wasp: {
version: ""^0.13.0""
},
title: ""My App"",
auth: {
userEntity: User,
methods: {
gitHub: {
configFn: import { getConfig } from ""@src/auth/github.js"",
userSignupFields: import { userSignupFields } from ""@src/auth/github.js""
}
},
onAuthFailedRedirectTo: ""/login""
},
}
entity User {=psl
id Int @id @default(autoincrement())
username String @unique
displayName String
psl=}
// ...
src/auth/github.js
export const userSignupFields = {
username: () => ""hardcoded-username"",
displayName: (data) => data.profile.name,
};
export function getConfig() {
return {
scopes: ['user'],
};
}
Using Auth
To read more about how to set up the logout button and get access to the logged-in user in both client and server code, read the docs on using auth.
API Reference
Provider-specific behavior comes down to implementing two functions.
configFn
userSignupFields
The reference shows how to define both.
For behavior common to all providers, check the general API Reference.
JavaScript
TypeScript
main.wasp
app myApp {
wasp: {
version: ""^0.13.0""
},
title: ""My App"",
auth: {
userEntity: User,
methods: {
gitHub: {
configFn: import { getConfig } from ""@src/auth/github.js"",
userSignupFields: import { userSignupFields } from ""@src/auth/github.js""
}
},
onAuthFailedRedirectTo: ""/login""
},
}
The gitHub dict has the following properties:
configFn: ExtImport
This function should return an object with the scopes for the OAuth provider.
JavaScript
TypeScript
src/auth/github.js
export function getConfig() {
return {
scopes: [],
}
}
userSignupFields: ExtImport
userSignupFields defines all the extra fields that need to be set on the User during the sign-up process. For example, if you have address and phone fields on your User entity, you can set them by defining the userSignupFields like this:
JavaScript
TypeScript
src/auth.js
import { defineUserSignupFields } from 'wasp/server/auth'
export const userSignupFields = defineUserSignupFields({
address: (data) => {
if (!data.address) {
throw new Error('Address is required')
}
return data.address
}
phone: (data) => data.phone,
})
Read more about the userSignupFields function here.","https://wasp-lang.dev/docs/auth/social-auth/github"
"1",,"2024-04-23T15:14:18.123Z","https://wasp-lang.dev/docs/auth/social-auth/keycloak","https://wasp-lang.dev/docs","http","## Keycloak
Wasp supports Keycloak Authentication out of the box.
[Keycloak](https://www.keycloak.org/) is an open-source identity and access management solution for modern applications and services. Keycloak provides both SAML and OpenID protocol solutions. It also has a very flexible and powerful administration UI.
Let's walk through enabling Keycloak authentication, explain some of the default settings, and show how to override them.
## Setting up Keycloak Auth[](#setting-up-keycloak-auth ""Direct link to Setting up Keycloak Auth"")
Enabling Keycloak Authentication comes down to a series of steps:
1. Enabling Keycloak authentication in the Wasp file.
2. Adding the `User` entity.
3. Creating a Keycloak client.
4. Adding the necessary Routes and Pages
5. Using Auth UI components in our Pages.
Here's a skeleton of how our `main.wasp` should look like after we're done:
main.wasp
```
// Configuring the social authenticationapp myApp { auth: { ... }}// Defining entitiesentity User { ... }// Defining routes and pagesroute LoginRoute { ... }page LoginPage { ... }
```
### 1\. Adding Keycloak Auth to Your Wasp File[](#1-adding-keycloak-auth-to-your-wasp-file ""Direct link to 1. Adding Keycloak Auth to Your Wasp File"")
Let's start by properly configuring the Auth object:
* JavaScript
* TypeScript
main.wasp
```
app myApp { wasp: { version: ""^0.13.0"" }, title: ""My App"", auth: { // 1. Specify the User entity (we'll define it next) userEntity: User, methods: { // 2. Enable Keycloak Auth keycloak: {} }, onAuthFailedRedirectTo: ""/login"" },}
```
The `userEntity` is explained in [the social auth overview](https://wasp-lang.dev/docs/auth/social-auth/overview#social-login-entity).
### 2\. Adding the User Entity[](#2-adding-the-user-entity ""Direct link to 2. Adding the User Entity"")
Let's now define the `app.auth.userEntity` entity:
* JavaScript
* TypeScript
main.wasp
```
// ...// 3. Define the User entityentity User {=psl id Int @id @default(autoincrement()) // ...psl=}
```
### 3\. Creating a Keycloak Client[](#3-creating-a-keycloak-client ""Direct link to 3. Creating a Keycloak Client"")
1. Log into your Keycloak admin console.
2. Under **Clients**, click on **Create Client**.
3. Fill in the **Client ID** and choose a name for the client.
4. In the next step, enable **Client Authentication**.
5. Under **Valid Redirect URIs**, add `http://localhost:3001/auth/keycloak/callback` for local development.
* Once you know on which URL(s) your API server will be deployed, also add those URL(s).
* For example: `https://my-server-url.com/auth/keycloak/callback`.
6. Click **Save**.
7. In the **Credentials** tab, copy the **Client Secret** value, which we'll use in the next step.
### 4\. Adding Environment Variables[](#4-adding-environment-variables ""Direct link to 4. Adding Environment Variables"")
Add these environment variables to the `.env.server` file at the root of your project (take their values from the previous step):
.env.server
```
KEYCLOAK_CLIENT_ID=your-keycloak-client-idKEYCLOAK_CLIENT_SECRET=your-keycloak-client-secretKEYCLOAK_REALM_URL=https://your-keycloak-url.com/realms/master
```
We assumed in the `KEYCLOAK_REALM_URL` env variable that you are using the `master` realm. If you are using a different realm, replace `master` with your realm name.
### 5\. Adding the Necessary Routes and Pages[](#5-adding-the-necessary-routes-and-pages ""Direct link to 5. Adding the Necessary Routes and Pages"")
Let's define the necessary authentication Routes and Pages.
Add the following code to your `main.wasp` file:
* JavaScript
* TypeScript
main.wasp
```
// ...// 6. Define the routesroute LoginRoute { path: ""/login"", to: LoginPage }page LoginPage { component: import { Login } from ""@src/pages/auth.jsx""}
```
We'll define the React components for these pages in the `src/pages/auth.tsx` file below.
### 6\. Create the Client Pages[](#6-create-the-client-pages ""Direct link to 6. Create the Client Pages"")
info
We are using [Tailwind CSS](https://tailwindcss.com/) to style the pages. Read more about how to add it [here](https://wasp-lang.dev/docs/project/css-frameworks).
Let's now create an `auth.tsx` file in the `src/pages`. It should have the following code:
* JavaScript
* TypeScript
src/pages/auth.jsx
```
import { LoginForm } from 'wasp/client/auth'export function Login() { return ( )}// A layout component to center the contentexport function Layout({ children }) { return ( )}
```
Auth UI
Our pages use an automatically generated Auth UI component. Read more about Auth UI components [here](https://wasp-lang.dev/docs/auth/ui).
### Conclusion[](#conclusion ""Direct link to Conclusion"")
Yay, we've successfully set up Keycloak Auth!
Running `wasp db migrate-dev` and `wasp start` should now give you a working app with authentication. To see how to protect specific pages (i.e., hide them from non-authenticated users), read the docs on [using auth](https://wasp-lang.dev/docs/auth/overview).
## Default Behaviour[](#default-behaviour ""Direct link to Default Behaviour"")
Add `keycloak: {}` to the `auth.methods` dictionary to use it with default settings:
* JavaScript
* TypeScript
main.wasp
```
app myApp { wasp: { version: ""^0.13.0"" }, title: ""My App"", auth: { userEntity: User, methods: { keycloak: {} }, onAuthFailedRedirectTo: ""/login"" },}
```
When a user **signs in for the first time**, Wasp creates a new user account and links it to the chosen auth provider account for future logins.
## Overrides[](#overrides ""Direct link to Overrides"")
By default, Wasp doesn't store any information it receives from the social login provider. It only stores the user's ID specific to the provider.
There are two mechanisms used for overriding the default behavior:
* `userSignupFields`
* `configFn`
Let's explore them in more detail.
### Data Received From Keycloak[](#data-received-from-keycloak ""Direct link to Data Received From Keycloak"")
We are using Keycloak's API and its `/userinfo` endpoint to fetch the user's data.
Keycloak user data
```
{ sub: '5adba8fc-3ea6-445a-a379-13f0bb0b6969', email_verified: true, name: 'Test User', preferred_username: 'test', given_name: 'Test', family_name: 'User', email: '[email protected]'}
```
The fields you receive will depend on the scopes you requested. The default scope is set to `profile` only. If you want to get the user's email, you need to specify the `email` scope in the `configFn` function.
For up-to-date info about the data received from Keycloak, please refer to the [Keycloak API documentation](https://www.keycloak.org/docs-api/23.0.7/javadocs/org/keycloak/representations/UserInfo.html).
### Using the Data Received From Keycloak[](#using-the-data-received-from-keycloak ""Direct link to Using the Data Received From Keycloak"")
When a user logs in using a social login provider, the backend receives some data about the user. Wasp lets you access this data inside the `userSignupFields` getters.
For example, the User entity can include a `displayName` field which you can set based on the details received from the provider.
Wasp also lets you customize the configuration of the providers' settings using the `configFn` function.
Let's use this example to show both fields in action:
* JavaScript
* TypeScript
main.wasp
```
app myApp { wasp: { version: ""^0.13.0"" }, title: ""My App"", auth: { userEntity: User, methods: { keycloak: { configFn: import { getConfig } from ""@src/auth/keycloak.js"", userSignupFields: import { userSignupFields } from ""@src/auth/keycloak.js"" } }, onAuthFailedRedirectTo: ""/login"" },}entity User {=psl id Int @id @default(autoincrement()) username String @unique displayName Stringpsl=}// ...
```
src/auth/keycloak.js
```
export const userSignupFields = { username: () => ""hardcoded-username"", displayName: (data) => data.profile.name,}export function getConfig() { return { scopes: ['profile', 'email'], }}
```
## Using Auth[](#using-auth ""Direct link to Using Auth"")
To read more about how to set up the logout button and get access to the logged-in user in both client and server code, read the docs on [using auth](https://wasp-lang.dev/docs/auth/overview).
## API Reference[](#api-reference ""Direct link to API Reference"")
Provider-specific behavior comes down to implementing two functions.
* `configFn`
* `userSignupFields`
The reference shows how to define both.
For behavior common to all providers, check the general [API Reference](https://wasp-lang.dev/docs/auth/overview#api-reference).
* JavaScript
* TypeScript
main.wasp
```
app myApp { wasp: { version: ""^0.13.0"" }, title: ""My App"", auth: { userEntity: User, methods: { keycloak: { configFn: import { getConfig } from ""@src/auth/keycloak.js"", userSignupFields: import { userSignupFields } from ""@src/auth/keycloak.js"" } }, onAuthFailedRedirectTo: ""/login"" },}
```
The `keycloak` dict has the following properties:
* #### `configFn: ExtImport`[](#configfn-extimport ""Direct link to configfn-extimport"")
This function must return an object with the scopes for the OAuth provider.
* JavaScript
* TypeScript
src/auth/keycloak.js
```
export function getConfig() { return { scopes: ['profile', 'email'], }}
```
* #### `userSignupFields: ExtImport`[](#usersignupfields-extimport ""Direct link to usersignupfields-extimport"")
`userSignupFields` defines all the extra fields that need to be set on the `User` during the sign-up process. For example, if you have `address` and `phone` fields on your `User` entity, you can set them by defining the `userSignupFields` like this:
* JavaScript
* TypeScript
src/auth.js
```
import { defineUserSignupFields } from 'wasp/server/auth'export const userSignupFields = defineUserSignupFields({ address: (data) => { if (!data.address) { throw new Error('Address is required') } return data.address } phone: (data) => data.phone,})
```
Read more about the `userSignupFields` function [here](https://wasp-lang.dev/docs/auth/overview#1-defining-extra-fields).",,"https://wasp-lang.dev/docs/auth/social-auth/keycloak","Wasp supports Keycloak Authentication out of the box.","*","0","h3="":443""; ma=86400","max-age=600","DYNAMIC","878ecd6ecbb756d4-IAD","close","br","text/html; charset=utf-8","Tue, 23 Apr 2024 15:14:18 GMT","Tue, 23 Apr 2024 15:17:26 GMT","Thu, 18 Apr 2024 15:50:27 GMT","{""success_fraction"":0,""report_to"":""cf-nel"",""max_age"":604800}","{""endpoints"":[{""url"":""https:\/\/a.nel.cloudflare.com\/report\/v4?s=NjLilRkViXBMCbKr5KH%2Ba5BuJvmbt5iVR0jPNm6AcSJNAfprPoqED3ukMJRaw%2FtnWBZzheBo%2FqyBXerzJd2Qtaq8nlZrQBolVYGdUP7HyFZqHhzqVSIbcmxxqJz7DlbT""}],""group"":""cf-nel"",""max_age"":604800}","cloudflare","chunked","Accept-Encoding","1.1 varnish","HIT","0","de5c85e90a6151a3e20d0496c079b3c2ed53f494",,"3D8E:16EE:844396:9E9DE6:6627CEAC",,"MISS","cache-iad-kiad7000173-IAD","S1713885258.064817,VS0,VE6",,,"en","https://wasp-lang.dev/img/wasp_twitter_cover.png","og:image","https://wasp-lang.dev/docs/auth/social-auth/keycloak","og:url","Keycloak | Wasp","og:title","Wasp supports Keycloak Authentication out of the box.","og:description","Keycloak | Wasp",,"Keycloak
Wasp supports Keycloak Authentication out of the box.
Keycloak is an open-source identity and access management solution for modern applications and services. Keycloak provides both SAML and OpenID protocol solutions. It also has a very flexible and powerful administration UI.
Let's walk through enabling Keycloak authentication, explain some of the default settings, and show how to override them.
Setting up Keycloak Auth
Enabling Keycloak Authentication comes down to a series of steps:
Enabling Keycloak authentication in the Wasp file.
Adding the User entity.
Creating a Keycloak client.
Adding the necessary Routes and Pages
Using Auth UI components in our Pages.
Here's a skeleton of how our main.wasp should look like after we're done:
main.wasp
// Configuring the social authentication
app myApp {
auth: { ... }
}
// Defining entities
entity User { ... }
// Defining routes and pages
route LoginRoute { ... }
page LoginPage { ... }
1. Adding Keycloak Auth to Your Wasp File
Let's start by properly configuring the Auth object:
JavaScript
TypeScript
main.wasp
app myApp {
wasp: {
version: ""^0.13.0""
},
title: ""My App"",
auth: {
// 1. Specify the User entity (we'll define it next)
userEntity: User,
methods: {
// 2. Enable Keycloak Auth
keycloak: {}
},
onAuthFailedRedirectTo: ""/login""
},
}
The userEntity is explained in the social auth overview.
2. Adding the User Entity
Let's now define the app.auth.userEntity entity:
JavaScript
TypeScript
main.wasp
// ...
// 3. Define the User entity
entity User {=psl
id Int @id @default(autoincrement())
// ...
psl=}
3. Creating a Keycloak Client
Log into your Keycloak admin console.
Under Clients, click on Create Client.
Fill in the Client ID and choose a name for the client.
In the next step, enable Client Authentication.
Under Valid Redirect URIs, add http://localhost:3001/auth/keycloak/callback for local development.
Once you know on which URL(s) your API server will be deployed, also add those URL(s).
For example: https://my-server-url.com/auth/keycloak/callback.
Click Save.
In the Credentials tab, copy the Client Secret value, which we'll use in the next step.
4. Adding Environment Variables
Add these environment variables to the .env.server file at the root of your project (take their values from the previous step):
.env.server
KEYCLOAK_CLIENT_ID=your-keycloak-client-id
KEYCLOAK_CLIENT_SECRET=your-keycloak-client-secret
KEYCLOAK_REALM_URL=https://your-keycloak-url.com/realms/master
We assumed in the KEYCLOAK_REALM_URL env variable that you are using the master realm. If you are using a different realm, replace master with your realm name.
5. Adding the Necessary Routes and Pages
Let's define the necessary authentication Routes and Pages.
Add the following code to your main.wasp file:
JavaScript
TypeScript
main.wasp
// ...
// 6. Define the routes
route LoginRoute { path: ""/login"", to: LoginPage }
page LoginPage {
component: import { Login } from ""@src/pages/auth.jsx""
}
We'll define the React components for these pages in the src/pages/auth.tsx file below.
6. Create the Client Pages
info
We are using Tailwind CSS to style the pages. Read more about how to add it here.
Let's now create an auth.tsx file in the src/pages. It should have the following code:
JavaScript
TypeScript
src/pages/auth.jsx
import { LoginForm } from 'wasp/client/auth'
export function Login() {
return (
)
}
// A layout component to center the content
export function Layout({ children }) {
return (
)
}
Auth UI
Our pages use an automatically generated Auth UI component. Read more about Auth UI components here.
Conclusion
Yay, we've successfully set up Keycloak Auth!
Running wasp db migrate-dev and wasp start should now give you a working app with authentication. To see how to protect specific pages (i.e., hide them from non-authenticated users), read the docs on using auth.
Default Behaviour
Add keycloak: {} to the auth.methods dictionary to use it with default settings:
JavaScript
TypeScript
main.wasp
app myApp {
wasp: {
version: ""^0.13.0""
},
title: ""My App"",
auth: {
userEntity: User,
methods: {
keycloak: {}
},
onAuthFailedRedirectTo: ""/login""
},
}
When a user signs in for the first time, Wasp creates a new user account and links it to the chosen auth provider account for future logins.
Overrides
By default, Wasp doesn't store any information it receives from the social login provider. It only stores the user's ID specific to the provider.
There are two mechanisms used for overriding the default behavior:
userSignupFields
configFn
Let's explore them in more detail.
Data Received From Keycloak
We are using Keycloak's API and its /userinfo endpoint to fetch the user's data.
Keycloak user data
{
sub: '5adba8fc-3ea6-445a-a379-13f0bb0b6969',
email_verified: true,
name: 'Test User',
preferred_username: 'test',
given_name: 'Test',
family_name: 'User',
email: '[email protected]'
}
The fields you receive will depend on the scopes you requested. The default scope is set to profile only. If you want to get the user's email, you need to specify the email scope in the configFn function.
For up-to-date info about the data received from Keycloak, please refer to the Keycloak API documentation.
Using the Data Received From Keycloak
When a user logs in using a social login provider, the backend receives some data about the user. Wasp lets you access this data inside the userSignupFields getters.
For example, the User entity can include a displayName field which you can set based on the details received from the provider.
Wasp also lets you customize the configuration of the providers' settings using the configFn function.
Let's use this example to show both fields in action:
JavaScript
TypeScript
main.wasp
app myApp {
wasp: {
version: ""^0.13.0""
},
title: ""My App"",
auth: {
userEntity: User,
methods: {
keycloak: {
configFn: import { getConfig } from ""@src/auth/keycloak.js"",
userSignupFields: import { userSignupFields } from ""@src/auth/keycloak.js""
}
},
onAuthFailedRedirectTo: ""/login""
},
}
entity User {=psl
id Int @id @default(autoincrement())
username String @unique
displayName String
psl=}
// ...
src/auth/keycloak.js
export const userSignupFields = {
username: () => ""hardcoded-username"",
displayName: (data) => data.profile.name,
}
export function getConfig() {
return {
scopes: ['profile', 'email'],
}
}
Using Auth
To read more about how to set up the logout button and get access to the logged-in user in both client and server code, read the docs on using auth.
API Reference
Provider-specific behavior comes down to implementing two functions.
configFn
userSignupFields
The reference shows how to define both.
For behavior common to all providers, check the general API Reference.
JavaScript
TypeScript
main.wasp
app myApp {
wasp: {
version: ""^0.13.0""
},
title: ""My App"",
auth: {
userEntity: User,
methods: {
keycloak: {
configFn: import { getConfig } from ""@src/auth/keycloak.js"",
userSignupFields: import { userSignupFields } from ""@src/auth/keycloak.js""
}
},
onAuthFailedRedirectTo: ""/login""
},
}
The keycloak dict has the following properties:
configFn: ExtImport
This function must return an object with the scopes for the OAuth provider.
JavaScript
TypeScript
src/auth/keycloak.js
export function getConfig() {
return {
scopes: ['profile', 'email'],
}
}
userSignupFields: ExtImport
userSignupFields defines all the extra fields that need to be set on the User during the sign-up process. For example, if you have address and phone fields on your User entity, you can set them by defining the userSignupFields like this:
JavaScript
TypeScript
src/auth.js
import { defineUserSignupFields } from 'wasp/server/auth'
export const userSignupFields = defineUserSignupFields({
address: (data) => {
if (!data.address) {
throw new Error('Address is required')
}
return data.address
}
phone: (data) => data.phone,
})
Read more about the userSignupFields function here.","https://wasp-lang.dev/docs/auth/social-auth/keycloak"
"1",,"2024-04-23T15:14:20.532Z","https://wasp-lang.dev/docs/auth/entities","https://wasp-lang.dev/docs","http","## Auth Entities
Wasp supports multiple different authentication methods and for each method, we need to store different information about the user. For example, if you are using the [Username & password](https://wasp-lang.dev/docs/auth/username-and-pass) authentication method, we need to store the user's username and password. On the other hand, if you are using the [Email](https://wasp-lang.dev/docs/auth/email) authentication method, you will need to store the user's email, password and for example, their email verification status.
## Entities Explained[](#entities-explained ""Direct link to Entities Explained"")
To store user information, Wasp creates a few entities behind the scenes. In this section, we will explain what entities are created and how they are connected.
### User Entity[](#user-entity ""Direct link to User Entity"")
When you want to add authentication to your app, you need to specify the user entity e.g. `User` in your Wasp file. This entity is a ""business logic user"" which represents a user of your app.
You can use this entity to store any information about the user that you want to store. For example, you might want to store the user's name or address. You can also use the user entity to define the relations between users and other entities in your app. For example, you might want to define a relation between a user and the tasks that they have created.
```
entity User {=psl id Int @id @default(autoincrement()) // Any other fields you want to store about the userpsl=}
```
You **own** the user entity and you can modify it as you wish. You can add new fields to it, remove fields from it, or change the type of the fields. You can also add new relations to it or remove existing relations from it.
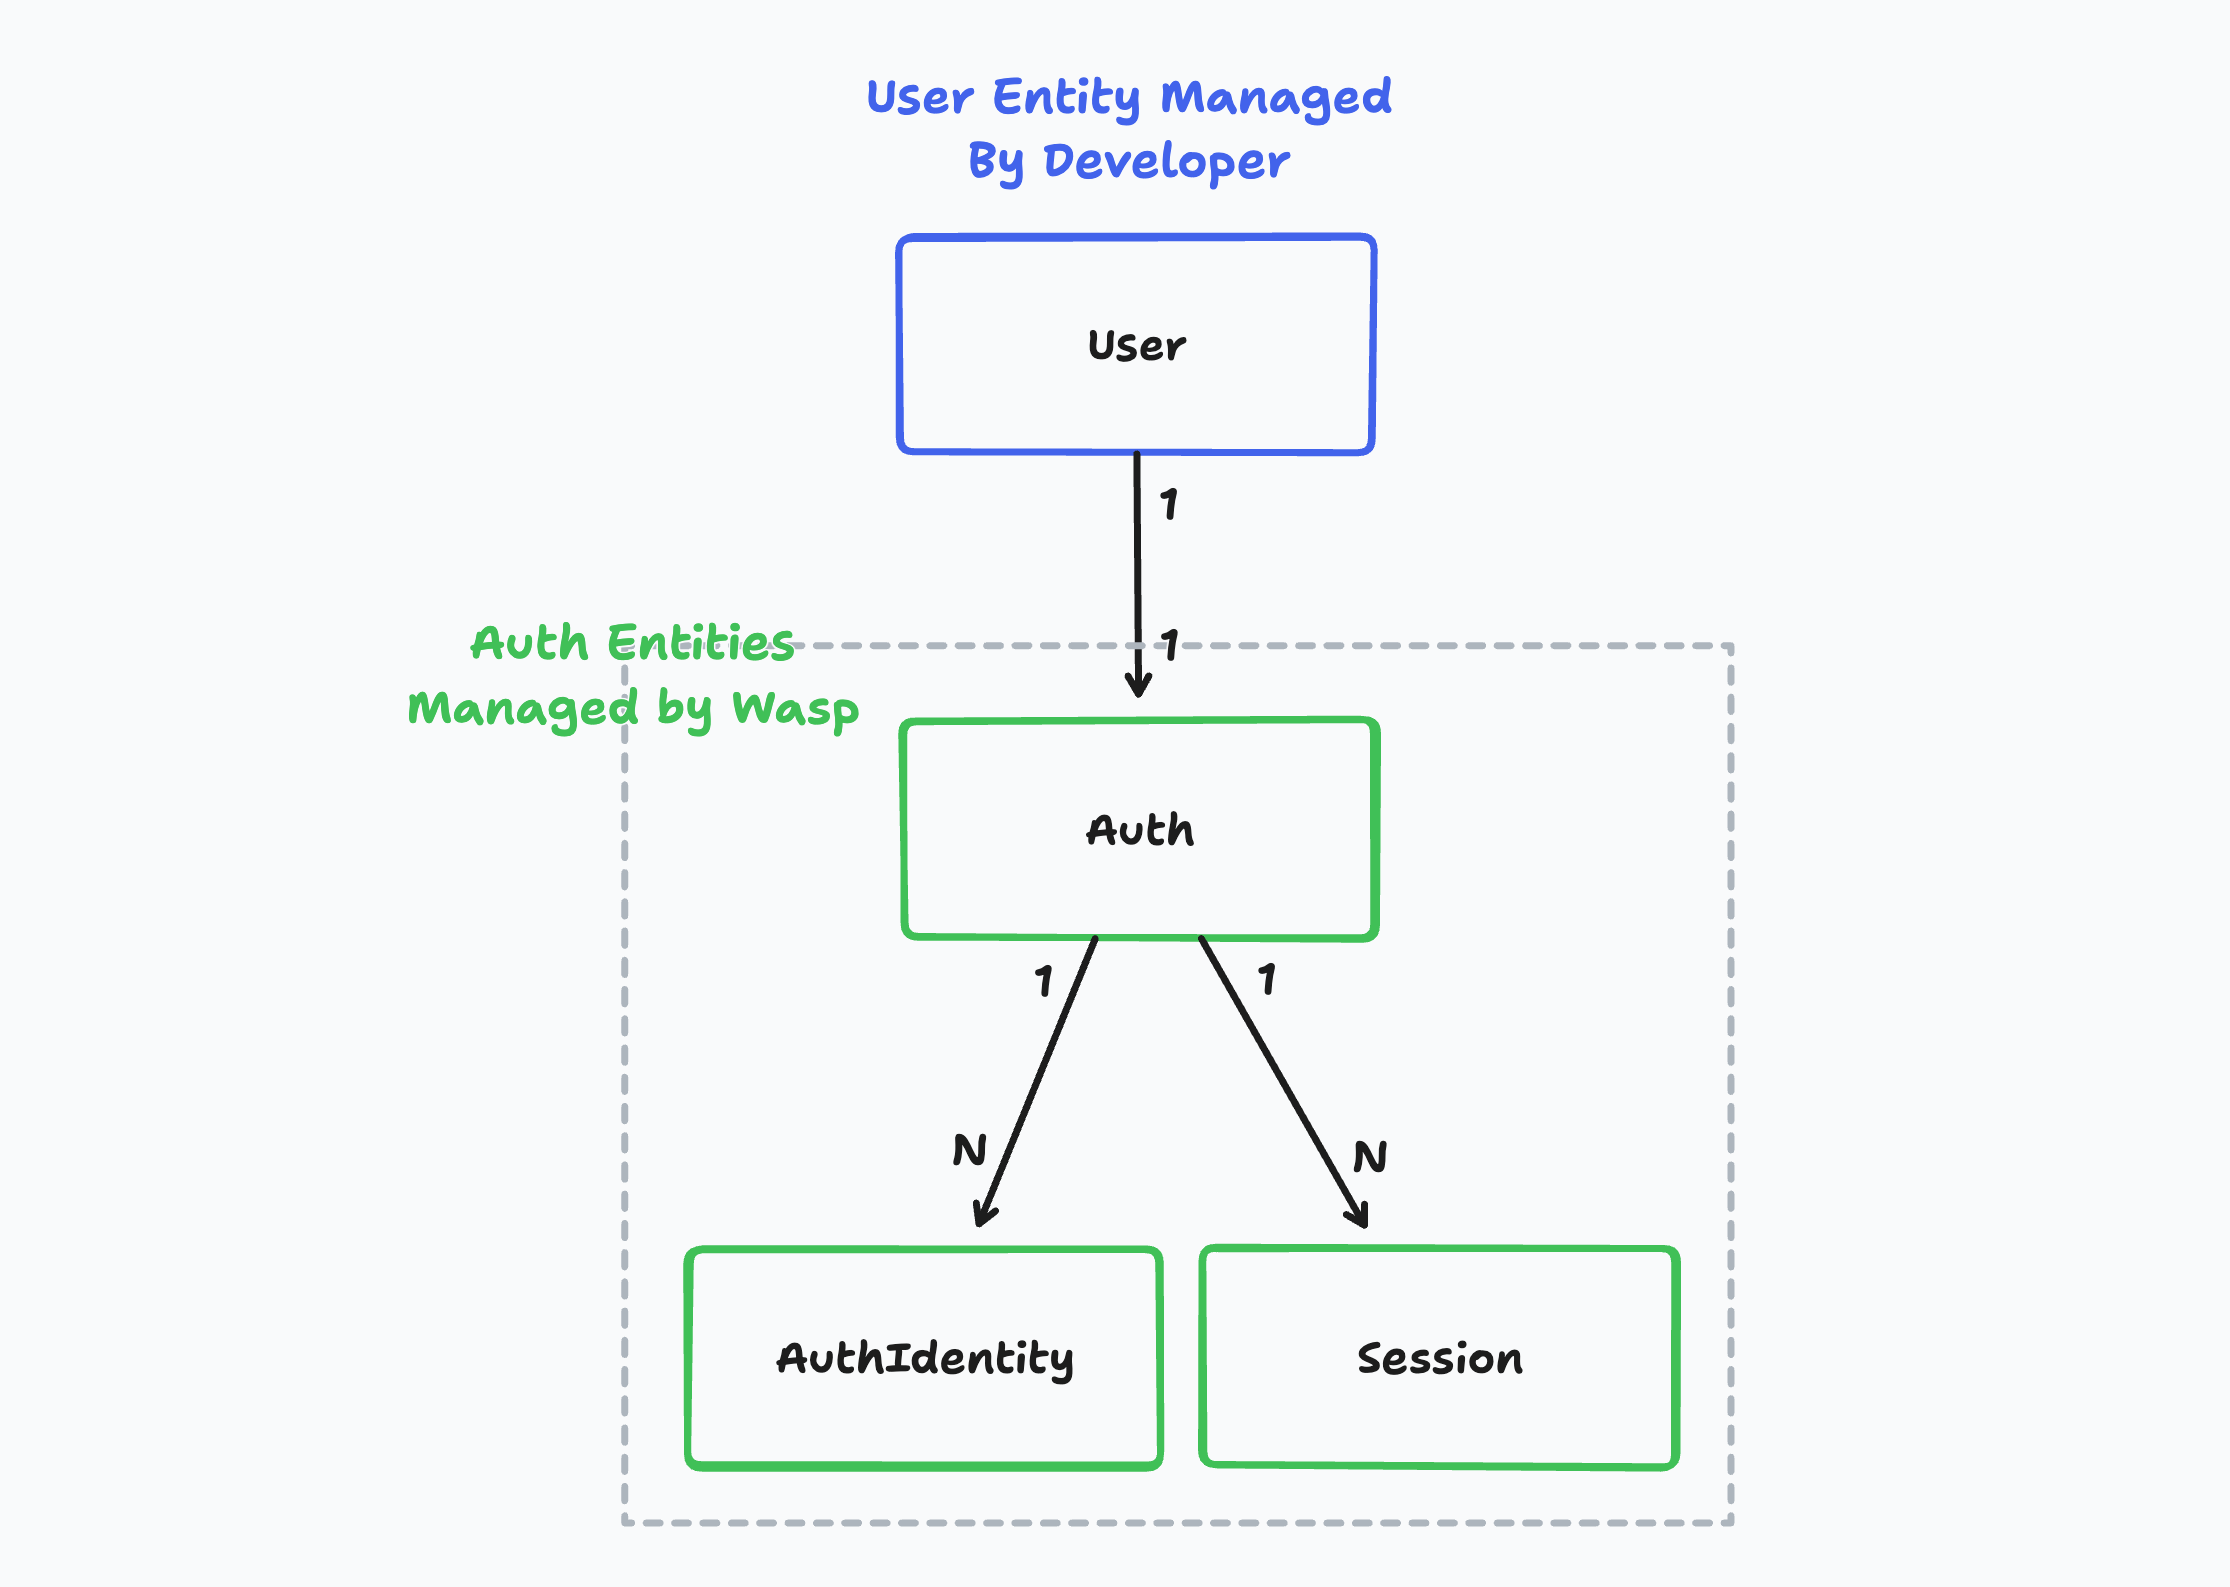
Auth Entities in a Wasp App
On the other hand, the `Auth`, `AuthIdentity` and `Session` entities are created behind the scenes and are used to store the user's login credentials. You as the developer don't need to care about this entity most of the time. Wasp **owns** these entities.
In the case you want to create a custom signup action, you will need to use the `Auth` and `AuthIdentity` entities directly.
### Example App Model[](#example-app-model ""Direct link to Example App Model"")
Let's imagine we created a simple tasks management app:
* The app has email and Google-based auth.
* Users can create tasks and see the tasks that they have created.
Let's look at how would that look in the database:
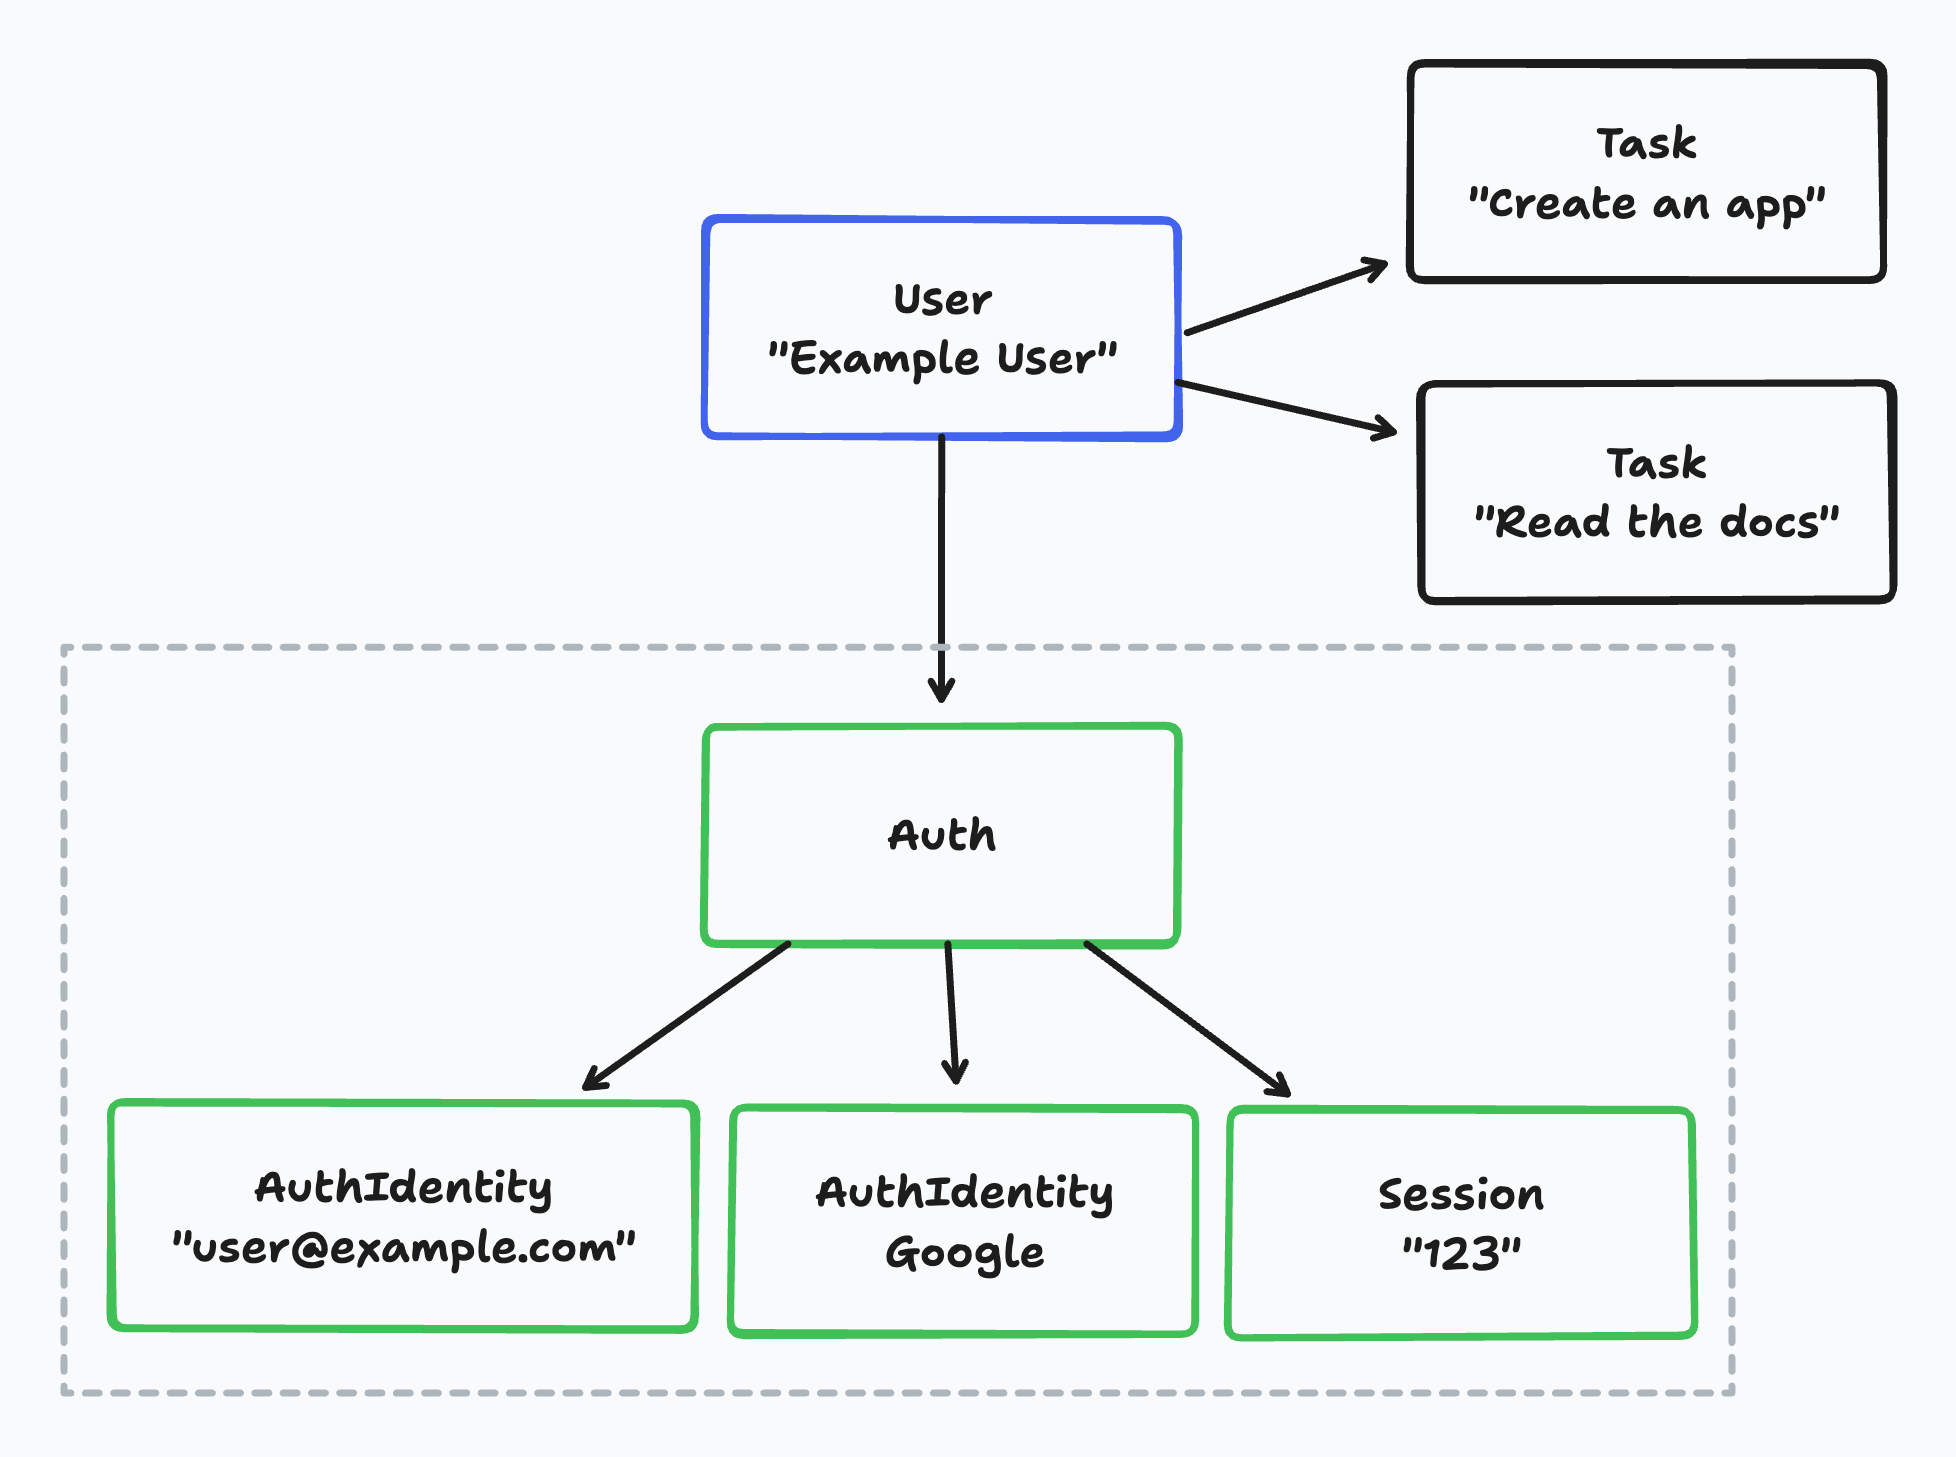
Example of Auth Entities
If we take a look at an example user in the database, we can see:
* The business logic user, `User` is connected to multiple `Task` entities.
* In this example, ""Example User"" has two tasks.
* The `User` is connected to exactly one `Auth` entity.
* Each `Auth` entity can have multiple `AuthIdentity` entities.
* In this example, the `Auth` entity has two `AuthIdentity` entities: one for the email-based auth and one for the Google-based auth.
* Each `Auth` entity can have multiple `Session` entities.
* In this example, the `Auth` entity has one `Session` entity.
Using multiple auth identities for a single user
Wasp currently doesn't support multiple auth identities for a single user. This means, for example, that a user can't have both an email-based auth identity and a Google-based auth identity. This is something we will add in the future with the introduction of the [account merging feature](https://github.com/wasp-lang/wasp/issues/954).
Account merging means that multiple auth identities can be merged into a single user account. For example, a user's email and Google identity can be merged into a single user account. Then the user can log in with either their email or Google account and they will be logged into the same account.
### `Auth` Entity internal[](#auth-entity- ""Direct link to auth-entity-"")
Wasp's internal `Auth` entity is used to connect the business logic user, `User` with the user's login credentials.
```
entity Auth {=psl id String @id @default(uuid()) userId Int? @unique // Wasp injects this relation on the User entity as well user User? @relation(fields: [userId], references: [id], onDelete: Cascade) identities AuthIdentity[] sessions Session[]psl=}
```
The `Auth` fields:
* `id` is a unique identifier of the `Auth` entity.
* `userId` is a foreign key to the `User` entity.
* It is used to connect the `Auth` entity with the business logic user.
* `user` is a relation to the `User` entity.
* This relation is injected on the `User` entity as well.
* `identities` is a relation to the `AuthIdentity` entity.
* `sessions` is a relation to the `Session` entity.
### `AuthIdentity` Entity internal[](#authidentity-entity- ""Direct link to authidentity-entity-"")
The `AuthIdentity` entity is used to store the user's login credentials for various authentication methods.
```
entity AuthIdentity {=psl providerName String providerUserId String providerData String @default(""{}"") authId String auth Auth @relation(fields: [authId], references: [id], onDelete: Cascade) @@id([providerName, providerUserId]) psl=}
```
The `AuthIdentity` fields:
* `providerName` is the name of the authentication provider.
* For example, `email` or `google`.
* `providerUserId` is the user's ID in the authentication provider.
* For example, the user's email or Google ID.
* `providerData` is a JSON string that contains additional data about the user from the authentication provider.
* For example, for password based auth, this field contains the user's hashed password.
* This field is a `String` and not a `Json` type because [Prisma doesn't support the `Json` type for SQLite](https://github.com/prisma/prisma/issues/3786).
* `authId` is a foreign key to the `Auth` entity.
* It is used to connect the `AuthIdentity` entity with the `Auth` entity.
* `auth` is a relation to the `Auth` entity.
### `Session` Entity internal[](#session-entity- ""Direct link to session-entity-"")
The `Session` entity is used to store the user's session information. It is used to keep the user logged in between page refreshes.
```
entity Session {=psl id String @id @unique expiresAt DateTime userId String auth Auth @relation(references: [id], fields: [userId], onDelete: Cascade) @@index([userId])psl=}
```
The `Session` fields:
* `id` is a unique identifier of the `Session` entity.
* `expiresAt` is the date when the session expires.
* `userId` is a foreign key to the `Auth` entity.
* It is used to connect the `Session` entity with the `Auth` entity.
* `auth` is a relation to the `Auth` entity.
## Accessing the Auth Fields[](#accessing-the-auth-fields ""Direct link to Accessing the Auth Fields"")
If you are looking to access the user's email or username in your code, you can do that by accessing the info about the user that is stored in the `AuthIdentity` entity.
Everywhere where Wasp gives you the `user` object, it also includes the `auth` relation with the `identities` relation. This means that you can access the auth identity info by using the `user.auth.identities` array.
To make things a bit easier for you, Wasp offers a few helper functions that you can use to access the auth identity info.
### `getEmail`[](#getemail ""Direct link to getemail"")
The `getEmail` helper returns the user's email or `null` if the user doesn't have an email auth identity.
* JavaScript
* TypeScript
src/MainPage.jsx
```
import { getEmail } from 'wasp/auth'const MainPage = ({ user }) => { const email = getEmail(user) // ...}
```
src/tasks.js
```
import { getEmail } from 'wasp/auth'export const createTask = async (args, context) => { const email = getEmail(context.user) // ...}
```
### `getUsername`[](#getusername ""Direct link to getusername"")
The `getUsername` helper returns the user's username or `null` if the user doesn't have a username auth identity.
* JavaScript
* TypeScript
src/MainPage.jsx
```
import { getUsername } from 'wasp/auth'const MainPage = ({ user }) => { const username = getUsername(user) // ...}
```
src/tasks.js
```
import { getUsername } from 'wasp/auth'export const createTask = async (args, context) => { const username = getUsername(context.user) // ...}
```
### `getFirstProviderUserId`[](#getfirstprovideruserid ""Direct link to getfirstprovideruserid"")
The `getFirstProviderUserId` helper returns the first user ID (e.g. `username` or `email`) that it finds for the user or `null` if it doesn't find any.
[As mentioned before](#authidentity-entity-), the `providerUserId` field is how providers identify our users. For example, the user's `username` in the case of the username auth or the user's `email` in the case of the email auth. This can be useful if you support multiple authentication methods and you need _any_ ID that identifies the user in your app.
* JavaScript
* TypeScript
src/MainPage.jsx
```
import { getFirstProviderUserId } from 'wasp/auth'const MainPage = ({ user }) => { const userId = getFirstProviderUserId(user) // ...}
```
src/tasks.js
```
import { getFirstProviderUserId } from 'wasp/auth'export const createTask = async (args, context) => { const userId = getFirstProviderUserId(context.user) // ...}
```
### `findUserIdentity`[](#finduseridentity ""Direct link to finduseridentity"")
You can find a specific auth identity by using the `findUserIdentity` helper function. This function takes a `user` and a `providerName` and returns the first `providerName` identity that it finds or `null` if it doesn't find any.
Possible provider names are:
* `email`
* `username`
* `google`
* `github`
This can be useful if you want to check if the user has a specific auth identity. For example, you might want to check if the user has an email auth identity or Google auth identity.
* JavaScript
* TypeScript
src/MainPage.jsx
```
import { findUserIdentity } from 'wasp/auth'const MainPage = ({ user }) => { const emailIdentity = findUserIdentity(user, 'email') const googleIdentity = findUserIdentity(user, 'google') if (emailIdentity) { // ... } else if (googleIdentity) { // ... } // ...}
```
src/tasks.js
```
import { findUserIdentity } from 'wasp/client/auth'export const createTask = async (args, context) => { const emailIdentity = findUserIdentity(context.user, 'email') const googleIdentity = findUserIdentity(context.user, 'google') if (emailIdentity) { // ... } else if (googleIdentity) { // ... } // ...}
```
## Custom Signup Action[](#custom-signup-action ""Direct link to Custom Signup Action"")
Let's take a look at how you can use the `Auth` and `AuthIdentity` entities to create custom login and signup actions. For example, you might want to create a custom signup action that creates a user in your app and also creates a user in a third-party service.
Custom Signup Examples
In the [Email](https://wasp-lang.dev/docs/auth/email#creating-a-custom-sign-up-action) section of the docs we give you an example for custom email signup and in the [Username & password](https://wasp-lang.dev/docs/auth/username-and-pass#2-creating-your-custom-sign-up-action) section of the docs we give you an example for custom username & password signup.
Below is a simplified version of a custom signup action which you probably wouldn't use in your app but it shows you how you can use the `Auth` and `AuthIdentity` entities to create a custom signup action.
* JavaScript
* TypeScript
main.wasp
```
// ...action customSignup { fn: import { signup } from ""@src/auth/signup.js"", entities: [User]}
```
src/auth/signup.js
```
import { createProviderId, sanitizeAndSerializeProviderData, createUser,} from 'wasp/server/auth'export const signup = async (args, { entities: { User } }) => { try { // Provider ID is a combination of the provider name and the provider user ID // And it is used to uniquely identify the user in your app const providerId = createProviderId('username', args.username) // sanitizeAndSerializeProviderData hashes the password and returns a JSON string const providerData = await sanitizeAndSerializeProviderData({ hashedPassword: args.password, }) await createUser( providerId, providerData, // Any additional data you want to store on the User entity {}, ) // This is equivalent to: // await User.create({ // data: { // auth: { // create: { // identities: { // create: { // providerName: 'username', // providerUserId: args.username // providerData, // }, // }, // } // }, // } // }) } catch (e) { return { success: false, message: e.message, } } // Your custom code after sign-up. // ... return { success: true, message: 'User created successfully', }}
```
You can use whichever method suits your needs better: either the `createUser` function or Prisma's `User.create` method. The `createUser` function is a bit more convenient to use because it hides some of the complexity. On the other hand, the `User.create` method gives you more control over the data that is stored in the `Auth` and `AuthIdentity` entities.",,"https://wasp-lang.dev/docs/auth/entities","Wasp supports multiple different authentication methods and for each method, we need to store different information about the user. For example, if you are using the Username & password authentication method, we need to store the user's username and password. On the other hand, if you are using the Email authentication method, you will need to store the user's email, password and for example, their email verification status.","*","0","h3="":443""; ma=86400","max-age=600","DYNAMIC","878ecd7ddd762894-IAD","close","br","text/html; charset=utf-8","Tue, 23 Apr 2024 15:14:20 GMT","Tue, 23 Apr 2024 15:24:20 GMT","Thu, 18 Apr 2024 15:50:27 GMT","{""success_fraction"":0,""report_to"":""cf-nel"",""max_age"":604800}","{""endpoints"":[{""url"":""https:\/\/a.nel.cloudflare.com\/report\/v4?s=miT4RYmyTX1U1MquAQilbbLnwxwBFv0UoeckEGt21dqmIltV%2BfzKLUxxCuSTWNOeJqrbISc8DJkIXro95%2B3mjnRvOqm%2BlQfsmSTopy9CA4XJhWAFItUNr7DC0aFbRfWv""}],""group"":""cf-nel"",""max_age"":604800}","cloudflare","chunked","Accept-Encoding","1.1 varnish","MISS","0","30af3cc56b3da83604a20bc733315ce645010807",,"FBC6:53E77:3A82A4C:459F388:6627D04C","HIT","MISS","cache-iad-kiad7000074-IAD","S1713885260.481882,VS0,VE14",,,"en","https://wasp-lang.dev/img/wasp_twitter_cover.png","og:image","https://wasp-lang.dev/docs/auth/entities","og:url","Auth Entities | Wasp","og:title","Wasp supports multiple different authentication methods and for each method, we need to store different information about the user. For example, if you are using the Username & password authentication method, we need to store the user's username and password. On the other hand, if you are using the Email authentication method, you will need to store the user's email, password and for example, their email verification status.","og:description","Auth Entities | Wasp",,"Auth Entities
Wasp supports multiple different authentication methods and for each method, we need to store different information about the user. For example, if you are using the Username & password authentication method, we need to store the user's username and password. On the other hand, if you are using the Email authentication method, you will need to store the user's email, password and for example, their email verification status.
Entities Explained
To store user information, Wasp creates a few entities behind the scenes. In this section, we will explain what entities are created and how they are connected.
User Entity
When you want to add authentication to your app, you need to specify the user entity e.g. User in your Wasp file. This entity is a ""business logic user"" which represents a user of your app.
You can use this entity to store any information about the user that you want to store. For example, you might want to store the user's name or address. You can also use the user entity to define the relations between users and other entities in your app. For example, you might want to define a relation between a user and the tasks that they have created.
entity User {=psl
id Int @id @default(autoincrement())
// Any other fields you want to store about the user
psl=}
You own the user entity and you can modify it as you wish. You can add new fields to it, remove fields from it, or change the type of the fields. You can also add new relations to it or remove existing relations from it.
Auth Entities in a Wasp App
On the other hand, the Auth, AuthIdentity and Session entities are created behind the scenes and are used to store the user's login credentials. You as the developer don't need to care about this entity most of the time. Wasp owns these entities.
In the case you want to create a custom signup action, you will need to use the Auth and AuthIdentity entities directly.
Example App Model
Let's imagine we created a simple tasks management app:
The app has email and Google-based auth.
Users can create tasks and see the tasks that they have created.
Let's look at how would that look in the database:
Example of Auth Entities
If we take a look at an example user in the database, we can see:
The business logic user, User is connected to multiple Task entities.
In this example, ""Example User"" has two tasks.
The User is connected to exactly one Auth entity.
Each Auth entity can have multiple AuthIdentity entities.
In this example, the Auth entity has two AuthIdentity entities: one for the email-based auth and one for the Google-based auth.
Each Auth entity can have multiple Session entities.
In this example, the Auth entity has one Session entity.
Using multiple auth identities for a single user
Wasp currently doesn't support multiple auth identities for a single user. This means, for example, that a user can't have both an email-based auth identity and a Google-based auth identity. This is something we will add in the future with the introduction of the account merging feature.
Account merging means that multiple auth identities can be merged into a single user account. For example, a user's email and Google identity can be merged into a single user account. Then the user can log in with either their email or Google account and they will be logged into the same account.
Auth Entity internal
Wasp's internal Auth entity is used to connect the business logic user, User with the user's login credentials.
entity Auth {=psl
id String @id @default(uuid())
userId Int? @unique
// Wasp injects this relation on the User entity as well
user User? @relation(fields: [userId], references: [id], onDelete: Cascade)
identities AuthIdentity[]
sessions Session[]
psl=}
The Auth fields:
id is a unique identifier of the Auth entity.
userId is a foreign key to the User entity.
It is used to connect the Auth entity with the business logic user.
user is a relation to the User entity.
This relation is injected on the User entity as well.
identities is a relation to the AuthIdentity entity.
sessions is a relation to the Session entity.
AuthIdentity Entity internal
The AuthIdentity entity is used to store the user's login credentials for various authentication methods.
entity AuthIdentity {=psl
providerName String
providerUserId String
providerData String @default(""{}"")
authId String
auth Auth @relation(fields: [authId], references: [id], onDelete: Cascade)
@@id([providerName, providerUserId])
psl=}
The AuthIdentity fields:
providerName is the name of the authentication provider.
For example, email or google.
providerUserId is the user's ID in the authentication provider.
For example, the user's email or Google ID.
providerData is a JSON string that contains additional data about the user from the authentication provider.
For example, for password based auth, this field contains the user's hashed password.
This field is a String and not a Json type because Prisma doesn't support the Json type for SQLite.
authId is a foreign key to the Auth entity.
It is used to connect the AuthIdentity entity with the Auth entity.
auth is a relation to the Auth entity.
Session Entity internal
The Session entity is used to store the user's session information. It is used to keep the user logged in between page refreshes.
entity Session {=psl
id String @id @unique
expiresAt DateTime
userId String
auth Auth @relation(references: [id], fields: [userId], onDelete: Cascade)
@@index([userId])
psl=}
The Session fields:
id is a unique identifier of the Session entity.
expiresAt is the date when the session expires.
userId is a foreign key to the Auth entity.
It is used to connect the Session entity with the Auth entity.
auth is a relation to the Auth entity.
Accessing the Auth Fields
If you are looking to access the user's email or username in your code, you can do that by accessing the info about the user that is stored in the AuthIdentity entity.
Everywhere where Wasp gives you the user object, it also includes the auth relation with the identities relation. This means that you can access the auth identity info by using the user.auth.identities array.
To make things a bit easier for you, Wasp offers a few helper functions that you can use to access the auth identity info.
getEmail
The getEmail helper returns the user's email or null if the user doesn't have an email auth identity.
JavaScript
TypeScript
src/MainPage.jsx
import { getEmail } from 'wasp/auth'
const MainPage = ({ user }) => {
const email = getEmail(user)
// ...
}
src/tasks.js
import { getEmail } from 'wasp/auth'
export const createTask = async (args, context) => {
const email = getEmail(context.user)
// ...
}
getUsername
The getUsername helper returns the user's username or null if the user doesn't have a username auth identity.
JavaScript
TypeScript
src/MainPage.jsx
import { getUsername } from 'wasp/auth'
const MainPage = ({ user }) => {
const username = getUsername(user)
// ...
}
src/tasks.js
import { getUsername } from 'wasp/auth'
export const createTask = async (args, context) => {
const username = getUsername(context.user)
// ...
}
getFirstProviderUserId
The getFirstProviderUserId helper returns the first user ID (e.g. username or email) that it finds for the user or null if it doesn't find any.
As mentioned before, the providerUserId field is how providers identify our users. For example, the user's username in the case of the username auth or the user's email in the case of the email auth. This can be useful if you support multiple authentication methods and you need any ID that identifies the user in your app.
JavaScript
TypeScript
src/MainPage.jsx
import { getFirstProviderUserId } from 'wasp/auth'
const MainPage = ({ user }) => {
const userId = getFirstProviderUserId(user)
// ...
}
src/tasks.js
import { getFirstProviderUserId } from 'wasp/auth'
export const createTask = async (args, context) => {
const userId = getFirstProviderUserId(context.user)
// ...
}
findUserIdentity
You can find a specific auth identity by using the findUserIdentity helper function. This function takes a user and a providerName and returns the first providerName identity that it finds or null if it doesn't find any.
Possible provider names are:
email
username
google
github
This can be useful if you want to check if the user has a specific auth identity. For example, you might want to check if the user has an email auth identity or Google auth identity.
JavaScript
TypeScript
src/MainPage.jsx
import { findUserIdentity } from 'wasp/auth'
const MainPage = ({ user }) => {
const emailIdentity = findUserIdentity(user, 'email')
const googleIdentity = findUserIdentity(user, 'google')
if (emailIdentity) {
// ...
} else if (googleIdentity) {
// ...
}
// ...
}
src/tasks.js
import { findUserIdentity } from 'wasp/client/auth'
export const createTask = async (args, context) => {
const emailIdentity = findUserIdentity(context.user, 'email')
const googleIdentity = findUserIdentity(context.user, 'google')
if (emailIdentity) {
// ...
} else if (googleIdentity) {
// ...
}
// ...
}
Custom Signup Action
Let's take a look at how you can use the Auth and AuthIdentity entities to create custom login and signup actions. For example, you might want to create a custom signup action that creates a user in your app and also creates a user in a third-party service.
Custom Signup Examples
In the Email section of the docs we give you an example for custom email signup and in the Username & password section of the docs we give you an example for custom username & password signup.
Below is a simplified version of a custom signup action which you probably wouldn't use in your app but it shows you how you can use the Auth and AuthIdentity entities to create a custom signup action.
JavaScript
TypeScript
main.wasp
// ...
action customSignup {
fn: import { signup } from ""@src/auth/signup.js"",
entities: [User]
}
src/auth/signup.js
import {
createProviderId,
sanitizeAndSerializeProviderData,
createUser,
} from 'wasp/server/auth'
export const signup = async (args, { entities: { User } }) => {
try {
// Provider ID is a combination of the provider name and the provider user ID
// And it is used to uniquely identify the user in your app
const providerId = createProviderId('username', args.username)
// sanitizeAndSerializeProviderData hashes the password and returns a JSON string
const providerData = await sanitizeAndSerializeProviderData({
hashedPassword: args.password,
})
await createUser(
providerId,
providerData,
// Any additional data you want to store on the User entity
{},
)
// This is equivalent to:
// await User.create({
// data: {
// auth: {
// create: {
// identities: {
// create: {
// providerName: 'username',
// providerUserId: args.username
// providerData,
// },
// },
// }
// },
// }
// })
} catch (e) {
return {
success: false,
message: e.message,
}
}
// Your custom code after sign-up.
// ...
return {
success: true,
message: 'User created successfully',
}
}
You can use whichever method suits your needs better: either the createUser function or Prisma's User.create method. The createUser function is a bit more convenient to use because it hides some of the complexity. On the other hand, the User.create method gives you more control over the data that is stored in the Auth and AuthIdentity entities.","https://wasp-lang.dev/docs/auth/entities"
"1",,"2024-04-23T15:14:23.059Z","https://wasp-lang.dev/docs/project/starter-templates","https://wasp-lang.dev/docs","http","## Starter Templates
We created a few starter templates to help you get started with Wasp. Check out the list [below](#available-templates).
## Using a Template[](#using-a-template ""Direct link to Using a Template"")
Run `wasp new` to run the interactive mode for creating a new Wasp project.
It will ask you for the project name, and then for the template to use:
```
$ wasp newEnter the project name (e.g. my-project) ▸ MyFirstProjectChoose a starter template[1] basic (default) Simple starter template with a single page.[2] todo-ts Simple but well-rounded Wasp app implemented with Typescript & full-stack type safety.[3] saas Everything a SaaS needs! Comes with Auth, ChatGPT API, Tailwind, Stripe payments and more. Check out https://opensaas.sh/ for more details.[4] embeddings Comes with code for generating vector embeddings and performing vector similarity search.[5] ai-generated 🤖 Describe an app in a couple of sentences and have Wasp AI generate initial code for you. (experimental) ▸ 1🐝 --- Creating your project from the ""basic"" template... -------------------------Created new Wasp app in ./MyFirstProject directory!To run your new app, do: cd MyFirstProject wasp db start
```
## Available Templates[](#available-templates ""Direct link to Available Templates"")
When you have a good idea for a new product, you don't want to waste your time on setting up common things like authentication, database, etc. That's why we created a few starter templates to help you get started with Wasp.
### OpenSaaS.sh template[](#opensaassh-template ""Direct link to OpenSaaS.sh template"")
Everything a SaaS needs! Comes with Auth, ChatGPT API, Tailwind, Stripe payments and more. Check out [https://opensaas.sh/](https://opensaas.sh/) for more details.
**Features:** Stripe Payments, OpenAI GPT API, Google Auth, SendGrid, Tailwind, & Cron Jobs
Use this template:
```
wasp new -t saas
```
### Vector Similarity Search Template[](#vector-similarity-search-template ""Direct link to Vector Similarity Search Template"")
A template for generating embeddings and performing vector similarity search on your text data!
**Features:** Embeddings & vector similarity search, OpenAI Embeddings API, Vector DB (Pinecone), Tailwind, Full-stack Type Safety
Use this template:
```
wasp new -t embeddings
```
### Todo App w/ Typescript[](#todo-app-w-typescript ""Direct link to Todo App w/ Typescript"")
A simple Todo App with Typescript and Full-stack Type Safety.
**Features:** Auth (username/password), Full-stack Type Safety
Use this template:
```
wasp new -t todo-ts
```
### AI Generated Starter 🤖[](#ai-generated-starter- ""Direct link to AI Generated Starter 🤖"")
Using the same tech as used on [https://usemage.ai/](https://usemage.ai/), Wasp generates your custom starter template based on your project description. It will automatically generate your data model, auth, queries, actions and React pages.
_You will need to provide your own OpenAI API key to be able to use this template._
**Features:** Generated using OpenAI's GPT models, Auth (username/password), Queries, Actions, Pages, Full-stack Type Safety",,"https://wasp-lang.dev/docs/project/starter-templates","We created a few starter templates to help you get started with Wasp. Check out the list below.","*","0","h3="":443""; ma=86400","max-age=600","DYNAMIC","878ecd8d99ba5ae6-IAD","close","br","text/html; charset=utf-8","Tue, 23 Apr 2024 15:14:23 GMT","Tue, 23 Apr 2024 15:24:23 GMT","Thu, 18 Apr 2024 15:50:26 GMT","{""success_fraction"":0,""report_to"":""cf-nel"",""max_age"":604800}","{""endpoints"":[{""url"":""https:\/\/a.nel.cloudflare.com\/report\/v4?s=g4gebaou890RFqqo%2BZ%2BYOeRcbVnG2CC5GFZVmqCqGV28VF5WhGgdMeQvM7jc4ZrqYCcsResok3PAKmRN8NEPPR51rvkbmbblMKo%2BKmwLjSzDfCC53%2BmeAk36RDu1IAyr""}],""group"":""cf-nel"",""max_age"":604800}","cloudflare","chunked","Accept-Encoding","1.1 varnish","MISS","0","5d03c0305ace367a735ddb1434270307d89185e4",,"96DE:35D1BB:3B37AB0:4654856:6627D04E","HIT","MISS","cache-iad-kiad7000061-IAD","S1713885263.023469,VS0,VE20",,,"en","https://wasp-lang.dev/img/wasp_twitter_cover.png","og:image","https://wasp-lang.dev/docs/project/starter-templates","og:url","Starter Templates | Wasp","og:title","We created a few starter templates to help you get started with Wasp. Check out the list below.","og:description","Starter Templates | Wasp",,"Starter Templates
We created a few starter templates to help you get started with Wasp. Check out the list below.
Using a Template
Run wasp new to run the interactive mode for creating a new Wasp project.
It will ask you for the project name, and then for the template to use:
$ wasp new
Enter the project name (e.g. my-project) ▸ MyFirstProject
Choose a starter template
[1] basic (default)
Simple starter template with a single page.
[2] todo-ts
Simple but well-rounded Wasp app implemented with Typescript & full-stack type safety.
[3] saas
Everything a SaaS needs! Comes with Auth, ChatGPT API, Tailwind, Stripe payments and more. Check out https://opensaas.sh/ for more details.
[4] embeddings
Comes with code for generating vector embeddings and performing vector similarity search.
[5] ai-generated
🤖 Describe an app in a couple of sentences and have Wasp AI generate initial code for you. (experimental)
▸ 1
🐝 --- Creating your project from the ""basic"" template... -------------------------
Created new Wasp app in ./MyFirstProject directory!
To run your new app, do:
cd MyFirstProject
wasp db start
Available Templates
When you have a good idea for a new product, you don't want to waste your time on setting up common things like authentication, database, etc. That's why we created a few starter templates to help you get started with Wasp.
OpenSaaS.sh template
Everything a SaaS needs! Comes with Auth, ChatGPT API, Tailwind, Stripe payments and more. Check out https://opensaas.sh/ for more details.
Features: Stripe Payments, OpenAI GPT API, Google Auth, SendGrid, Tailwind, & Cron Jobs
Use this template:
wasp new -t saas
Vector Similarity Search Template
A template for generating embeddings and performing vector similarity search on your text data!
Features: Embeddings & vector similarity search, OpenAI Embeddings API, Vector DB (Pinecone), Tailwind, Full-stack Type Safety
Use this template:
wasp new -t embeddings
Todo App w/ Typescript
A simple Todo App with Typescript and Full-stack Type Safety.
Features: Auth (username/password), Full-stack Type Safety
Use this template:
wasp new -t todo-ts
AI Generated Starter 🤖
Using the same tech as used on https://usemage.ai/, Wasp generates your custom starter template based on your project description. It will automatically generate your data model, auth, queries, actions and React pages.
You will need to provide your own OpenAI API key to be able to use this template.
Features: Generated using OpenAI's GPT models, Auth (username/password), Queries, Actions, Pages, Full-stack Type Safety","https://wasp-lang.dev/docs/project/starter-templates"
"1",,"2024-04-23T15:14:24.799Z","https://wasp-lang.dev/docs/project/customizing-app","https://wasp-lang.dev/docs","http","Version: 0.13.0
## Customizing the App
Each Wasp project can have only one `app` type declaration. It is used to configure your app and its components.
```
app todoApp { wasp: { version: ""^0.13.0"" }, title: ""ToDo App"", head: [ """" ]}
```
We'll go through some common customizations you might want to do to your app. For more details on each of the fields, check out the [API Reference](#api-reference).
### Changing the App Title[](#changing-the-app-title ""Direct link to Changing the App Title"")
You may want to change the title of your app, which appears in the browser tab, next to the favicon. You can change it by changing the `title` field of your `app` declaration:
```
app myApp { wasp: { version: ""^0.13.0"" }, title: ""BookFace""}
```
### Adding Additional Lines to the Head[](#adding-additional-lines-to-the-head ""Direct link to Adding Additional Lines to the Head"")
If you are looking to add additional style sheets or scripts to your app, you can do so by adding them to the `head` field of your `app` declaration.
An example of adding extra style sheets and scripts:
```
app myApp { wasp: { version: ""^0.13.0"" }, title: ""My App"", head: [ // optional """", """", """" ]}
```
## API Reference[](#api-reference ""Direct link to API Reference"")
```
app todoApp { wasp: { version: ""^0.13.0"" }, title: ""ToDo App"", head: [ """" ], auth: { // ... }, client: { // ... }, server: { // ... }, db: { // ... }, emailSender: { // ... }, webSocket: { // ... }}
```
The `app` declaration has the following fields:
* `wasp: dict` required Wasp compiler configuration. It is a dictionary with a single field:
* `version: string` required
The version specifies which versions of Wasp are compatible with the app. It should contain a valid [SemVer range](https://github.com/npm/node-semver#ranges)
info
For now, the version field only supports caret ranges (i.e., `^x.y.z`). Support for the full specification will come in a future version of Wasp
* `title: string` required
Title of your app. It will appear in the browser tab, next to the favicon.
* `head: [string]`
List of additional lines (e.g. `` or `"",
""""
]
}
API Reference
app todoApp {
wasp: {
version: ""^0.13.0""
},
title: ""ToDo App"",
head: [
""""
],
auth: {
// ...
},
client: {
// ...
},
server: {
// ...
},
db: {
// ...
},
emailSender: {
// ...
},
webSocket: {
// ...
}
}
The app declaration has the following fields:
wasp: dict required Wasp compiler configuration. It is a dictionary with a single field:
version: string required
The version specifies which versions of Wasp are compatible with the app. It should contain a valid SemVer range
info
For now, the version field only supports caret ranges (i.e., ^x.y.z). Support for the full specification will come in a future version of Wasp
title: string required
Title of your app. It will appear in the browser tab, next to the favicon.
head: [string]
List of additional lines (e.g. or "", """" ]}
```
## API Reference[](#api-reference ""Direct link to API Reference"")
```
app todoApp { wasp: { version: ""^0.12.0"" }, title: ""ToDo App"", head: [ """" ], auth: { // ... }, client: { // ... }, server: { // ... }, db: { // ... }, emailSender: { // ... }, webSocket: { // ... }}
```
The `app` declaration has the following fields:
* `wasp: dict` required Wasp compiler configuration. It is a dictionary with a single field:
* `version: string` required
The version specifies which versions of Wasp are compatible with the app. It should contain a valid [SemVer range](https://github.com/npm/node-semver#ranges)
info
For now, the version field only supports caret ranges (i.e., `^x.y.z`). Support for the full specification will come in a future version of Wasp
* `title: string` required
Title of your app. It will appear in the browser tab, next to the favicon.
* `head: [string]`
List of additional lines (e.g. `` or `"",
""""
]
}
API Reference
app todoApp {
wasp: {
version: ""^0.12.0""
},
title: ""ToDo App"",
head: [
""""
],
auth: {
// ...
},
client: {
// ...
},
server: {
// ...
},
db: {
// ...
},
emailSender: {
// ...
},
webSocket: {
// ...
}
}
The app declaration has the following fields:
wasp: dict required Wasp compiler configuration. It is a dictionary with a single field:
version: string required
The version specifies which versions of Wasp are compatible with the app. It should contain a valid SemVer range
info
For now, the version field only supports caret ranges (i.e., ^x.y.z). Support for the full specification will come in a future version of Wasp
title: string required
Title of your app. It will appear in the browser tab, next to the favicon.
head: [string]
List of additional lines (e.g. or "", """" ]}
```
## API Reference[](#api-reference ""Direct link to API Reference"")
```
app todoApp { wasp: { version: ""^0.11.1"" }, title: ""ToDo App"", head: [ """" ], auth: { // ... }, client: { // ... }, server: { // ... }, db: { // ... }, dependencies: [ // ... ], emailSender: { // ... }, webSocket: { // ... }}
```
The `app` declaration has the following fields:
* `wasp: dict` required Wasp compiler configuration. It is a dictionary with a single field:
* `version: string` required
The version specifies which versions of Wasp are compatible with the app. It should contain a valid [SemVer range](https://github.com/npm/node-semver#ranges)
info
For now, the version field only supports caret ranges (i.e., `^x.y.z`). Support for the full specification will come in a future version of Wasp
* `title: string` required
Title of your app. It will appear in the browser tab, next to the favicon.
* `head: [string]`
List of additional lines (e.g. `` or `"",
""""
]
}
API Reference
app todoApp {
wasp: {
version: ""^0.11.1""
},
title: ""ToDo App"",
head: [
""""
],
auth: {
// ...
},
client: {
// ...
},
server: {
// ...
},
db: {
// ...
},
dependencies: [
// ...
],
emailSender: {
// ...
},
webSocket: {
// ...
}
}
The app declaration has the following fields:
wasp: dict required Wasp compiler configuration. It is a dictionary with a single field:
version: string required
The version specifies which versions of Wasp are compatible with the app. It should contain a valid SemVer range
info
For now, the version field only supports caret ranges (i.e., ^x.y.z). Support for the full specification will come in a future version of Wasp
title: string required
Title of your app. It will appear in the browser tab, next to the favicon.
head: [string]
List of additional lines (e.g. or