TraVisionLM-Object-Detection-ft
This model is a fine-tuned version of ucsahin/TraVisionLM-base on the ucsahin/COCO-OD-TR-Single-Objects-v2 dataset. It achieves the following results on the evaluation set:
- Loss: 2.2919
📝𝗘𝗡 You can find the training script at Google Colab
🤖𝗘𝗡 For all the details about the base model, please check out ucsahin/TraVisionLM-base
📝🇹🇷 Eğitimin nasıl yapıldığını gösteren Colab defterine buradan ulaşabilirsiniz: Google Colab
🤖🇹🇷 Base model hakkındaki bütün detaylar için: ucsahin/TraVisionLM-base
Model description
English
This object detection model is a fine-tuned version of ucsahin/TraVisionLM-base using the Trainer class from the Transformers library.
It shows that you can finetune the base model in any downstream task and make the model to acquire the ability to complete the task.
⚠️Note: Object detection is a complex task that demands extensive, high-quality training data. This model has been trained on a dataset of 150K samples and is currently designed to detect a single object per image. As a result, it may sometimes produce inaccurate results. The initial findings indicate that significantly more training data will be necessary to develop a more reliable object detection model. However, the results achieved so far demonstrate a promising foundation.
The examples of the task prompts used are "İşaretle: *object_name*", "Tespit et: *object_name*".
Türkçe
Bu nesne tespiti modeli, Transformers kütüphanesinden Trainer sınıfı kullanılarak ucsahin/TraVisionLM-base modelinin ince ayar yapılmış bir versiyonudur. Bu model, temel modeli herhangi bir alt görevde ince ayar yaparak, modele bu görevi tamamlama yeteneği kazandırabileceğinizi göstermektedir.
⚠️Not: Nesne tespiti, yüksek kaliteli ve büyük miktarda eğitim verisi gerektiren karmaşık bir görevdir. Bu model, 150K veri örneği ile eğitilmiştir ve şu anda bir görüntüde yalnızca tek bir nesneyi tespit edecek şekilde tasarlanmıştır. Bu nedenle, bazen hatalı sonuçlar üretebilir. İlk bulgular, daha güvenilir bir nesne tespiti modeli geliştirmek için çok daha fazla eğitim verisi gerekeceğini göstermektedir. Ancak, şu ana kadar elde edilen sonuçlar umut verici bir başlangıç noktası sunmaktadır.
Kullanılan görev istemi örnekleri şunlardır: "İşaretle: *nesne_adı*", "Tespit et: *nesne_adı*".
You can easily load the model and do inference using the Transformers library:
from transformers import AutoModelForCausalLM, AutoProcessor
import torch
import requests
from PIL import Image

model = AutoModelForCausalLM.from_pretrained('ucsahin/TraVisionLM-Object-Detection-ft', trust_remote_code=True, device_map="cuda")
# you can also load the model in bfloat16 or float16
# model = AutoModelForCausalLM.from_pretrained('ucsahin/TraVisionLM-base', trust_remote_code=True, torch_dtype=torch.bfloat16, device_map="cuda")
processor = AutoProcessor.from_pretrained('ucsahin/TraVisionLM-Object-Detection-ft', trust_remote_code=True)

url = "https://huggingface.co/datasets/huggingface/documentation-images/resolve/main/transformers/tasks/car.jpg"
image = Image.open(requests.get(url, stream=True).raw).convert("RGB")

prompt = "İşaretle: araba"
# prompt = "Tespit et: araba"

inputs = processor(text=prompt, images=image, return_tensors="pt").to("cuda")

outputs = model.generate(**inputs, max_new_tokens=512, do_sample=True, temperature=0.6, top_p=0.9, top_k=50, repetition_penalty=1.2)

output_text = processor.batch_decode(outputs, skip_special_tokens=True)[0]

print("Model response: ", output_text)
"""
Model response:  İşaretle: araba
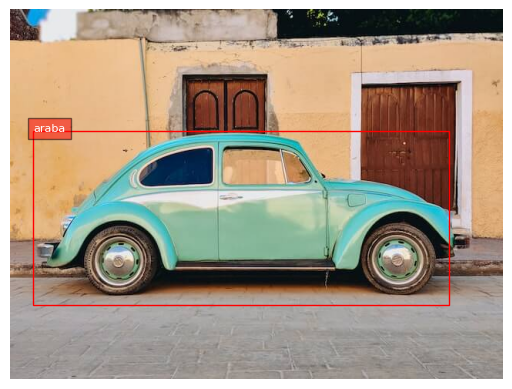
<loc0048><loc0338><loc0912><loc0819> araba;
"""
𝗘𝗡 The model has special tokens for bounding box locations: "<loc0000>, <loc0001>, ..., <loc1024>". The bounding box coordinates are in the form of special <loc[value]> tokens, where value is a number that represents a normalized coordinate. Each detection is represented by four location coordinates in the order x_min(left), y_min(top), x_max(right), y_max(bottom), followed by the label that was detected in that box. To convert values to coordinates, you first need to divide the numbers by 1024, then multiply y by the image height and x by its width. This will give you the coordinates of the bounding boxes, relative to the original image size.
🇹🇷 Model, sınırlayıcı kutu konumları için özel tokenlara sahiptir: "<loc0000>, <loc0001>, ..., <loc1024>". Sınırlayıcı kutu koordinatları, <loc[value]> şeklindeki özel tokenlar ile belirtilir ve bu tokenlardaki value değeri, normalize edilmiş bir koordinatı temsil eden bir sayıdır. Her bir tespit, sırasıyla x_min(sol), y_min(üst), x_max(sağ), y_max(alt) şeklinde dört konum koordinatı ile bu kutuda tespit edilen etiketle temsil edilir. Değerleri koordinatlara dönüştürmek için önce sayıları 1024’e bölmeniz, ardından y’yi görüntü yüksekliğiyle ve x’i genişliğiyle çarpmanız gerekir. Bu, sınırlayıcı kutuların orijinal görüntü boyutuna göre koordinatlarını verir.
For the post-processing of the bounding box and plotting it on the image, you can use the following:
import matplotlib.pyplot as plt
import matplotlib.patches as patches
import re

plt.rcParams['font.family'] = 'DejaVu Sans'

def plot_bbox(image, labels, bboxes):
   # Create a figure and axes
    fig, ax = plt.subplots()

    # Display the image
    ax.imshow(image)

    # Plot each bounding box
    for bbox, label in zip(bboxes, labels):
        # Unpack the bounding box coordinates
        x1, y1, x2, y2 = bbox
        # Create a Rectangle patch
        rect = patches.Rectangle((x1, y1), x2-x1, y2-y1, linewidth=1, edgecolor='r', facecolor='none')
        # Add the rectangle to the Axes
        ax.add_patch(rect)
        # Annotate the label
        plt.text(x1, y1, label, color='white', fontsize=8, bbox=dict(facecolor='red', alpha=0.5))

    # Remove the axis ticks and labels
    ax.axis('off')

    # Show the plot
    plt.show()

def extract_loc_values_and_labels(bbox_str, width, height):
    bbox_label_pairs = re.findall(r'((?:<loc\d+>){4})\s*([\w\s]+)', bbox_str)

    bboxes = []
    labels = []

    for bbox, label in bbox_label_pairs:
        loc_values = re.findall(r'<loc(\d+)>', bbox)
        loc_values = [int(x) for x in loc_values]
        loc_values = [value/1024 for value in loc_values]
        # convert to PASCAL VOC format
        loc_values = [
            int(loc_values[0] * width), int(loc_values[1] * height),
            int(loc_values[2] * width), int(loc_values[3] * height),
        ]
        bboxes.append(loc_values)
        labels.append(label)

    return bboxes, labels
Then,
bboxes, labels = extract_loc_values_and_labels(output_text, image.width, image.height)
print("bboxes: ", bboxes)
print("labels: ", labels)
plot_bbox(image, labels, bboxes)
and the final result will be
Training procedure
Training hyperparameters
The following hyperparameters were used during training:
- learning_rate: 1e-05
- train_batch_size: 4
- eval_batch_size: 4
- seed: 42
- gradient_accumulation_steps: 16
- total_train_batch_size: 64
- optimizer: Adam with betas=(0.9,0.999) and epsilon=1e-08
- lr_scheduler_type: linear
- num_epochs: 3
Training results
| Training Loss | Epoch | Step | Validation Loss |
|---|---|---|---|
| 2.3213 | 0.2406 | 570 | 2.3409 |
| 2.3129 | 0.4813 | 1140 | 2.3436 |
| 2.3128 | 0.7219 | 1710 | 2.3322 |
| 2.3082 | 0.9626 | 2280 | 2.3239 |
| 2.2853 | 1.2032 | 2850 | 2.3228 |
| 2.2826 | 1.4438 | 3420 | 2.3098 |
| 2.2707 | 1.6845 | 3990 | 2.3067 |
| 2.2706 | 1.9251 | 4560 | 2.3042 |
| 2.2465 | 2.1658 | 5130 | 2.3014 |
| 2.2435 | 2.4064 | 5700 | 2.2978 |
| 2.2433 | 2.6470 | 6270 | 2.2953 |
| 2.2344 | 2.8877 | 6840 | 2.2919 |
Framework versions
- Transformers 4.44.0.dev0
- Pytorch 2.3.1+cu121
- Datasets 2.20.0
- Tokenizers 0.19.1
- Downloads last month
- 13
Model tree for ucsahin/TraVisionLM-Object-Detection-ft
Base model
ucsahin/TraVisionLM-base